In this post, I am gonna introduce to you a very interesting project called WebVM. This project is a real “black technology”. It allows user to run a full functional Linux operating system inside your browser. Not only you can run all linux commands, also it can compile programs, execute 32-bit x86 binaries, etc. , no need to set any infrastructure on server, or lab environment, just open the URL to use immediately. You can also deploy services including custom files and libraries according to personal needs.
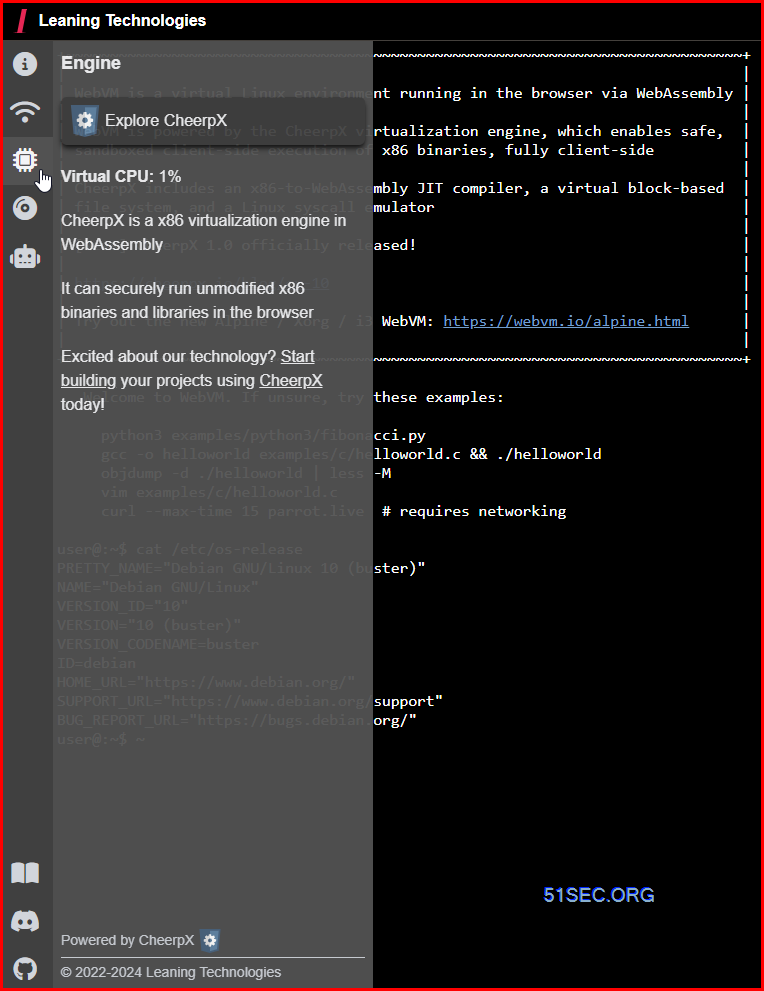
WebVM is a server-less virtual environment running fully client-side in HTML5/WebAssembly. It’s designed to be Linux ABI-compatible. It runs an unmodified Debian distribution including many native development toolchains.
WebVM is powered by the CheerpX virtualization engine, and enables safe, sandboxed client-side execution of x86 binaries on any browser. CheerpX includes an x86-to-WebAssembly JIT compiler, a virtual block-based file system, and a Linux syscall emulator.
")
Use Cases:
- running and learning linux without a cost in a convenient way
- Safe Sandbox to run code
- ssh client
- etc
WebVM and Online Demo
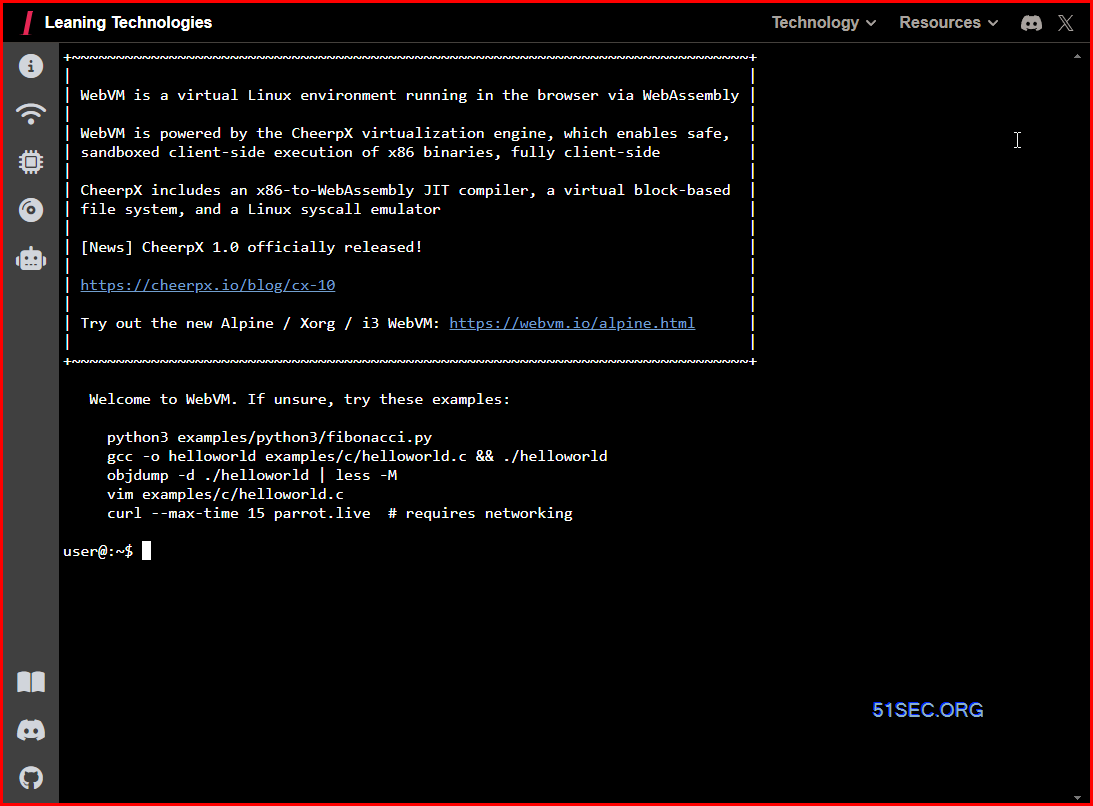
From WebVM’s GitHub page , we can find its Demo link. Click in and you can operate Linux commands directly on the browser.
- https://webvm.io/
- https://webvm.io/alpine.html
WebVM also has some commonly used built-in development tools, such as Python, gcc, etc. We can simply test it by compiling a Hello World C file in it, or use Python to run a Fibonacci sequence to experience the feeling of writing a program in the browser.
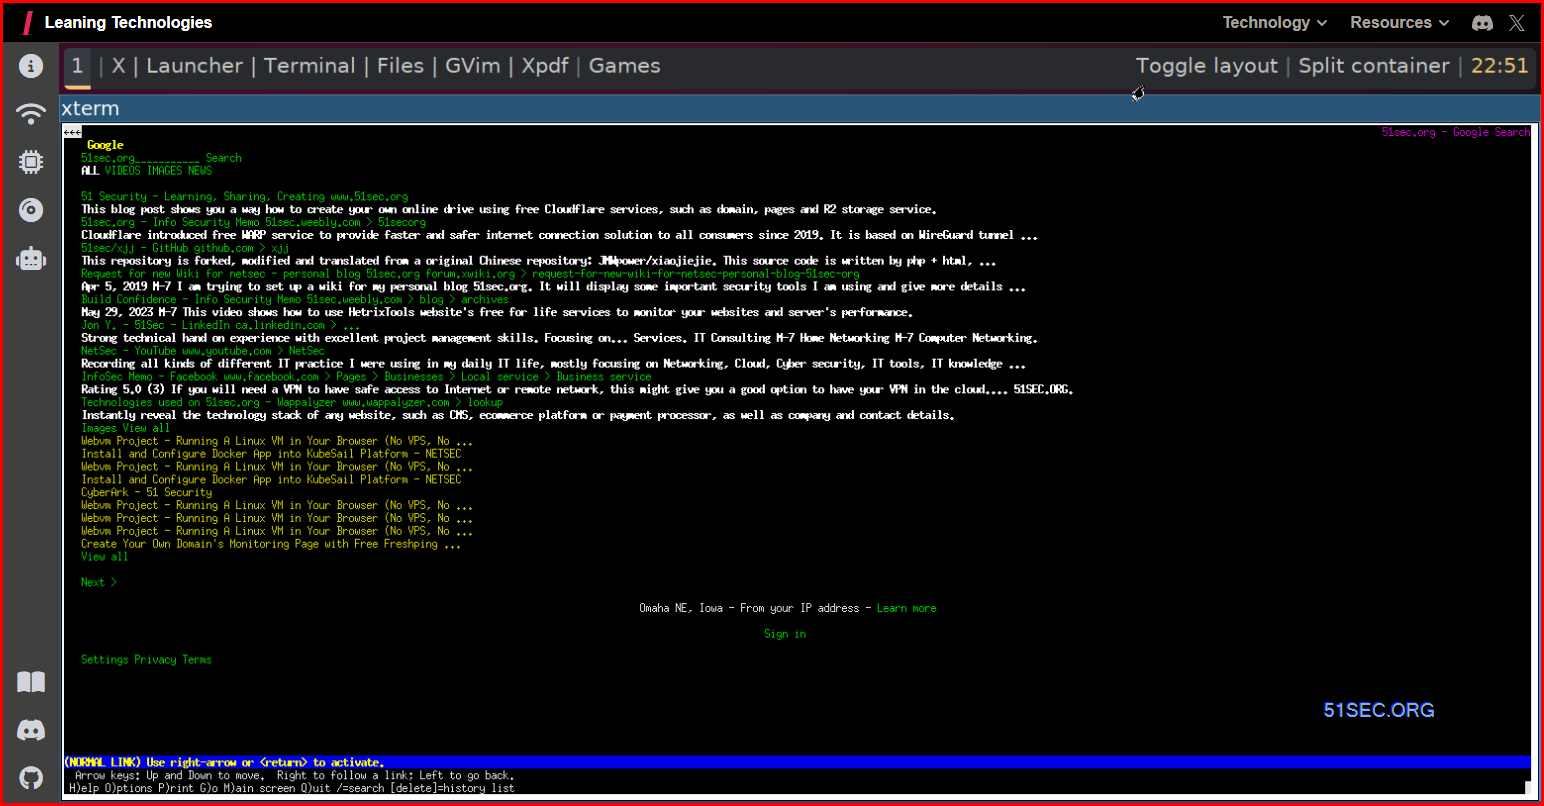
You also can run a demo which has Alpine Linux with desktop to run some GUI applications and games.
- nano / vi
- ls -la
- python3 examples/python3/fibonacci.py
- gcc -o helloworld examples/c/helloworld.c && ./helloworld
- objdump -d ./helloworld | less -M
- vim examples/c/helloworld.c
- curl –max-time 15 parrot.live # requires networking
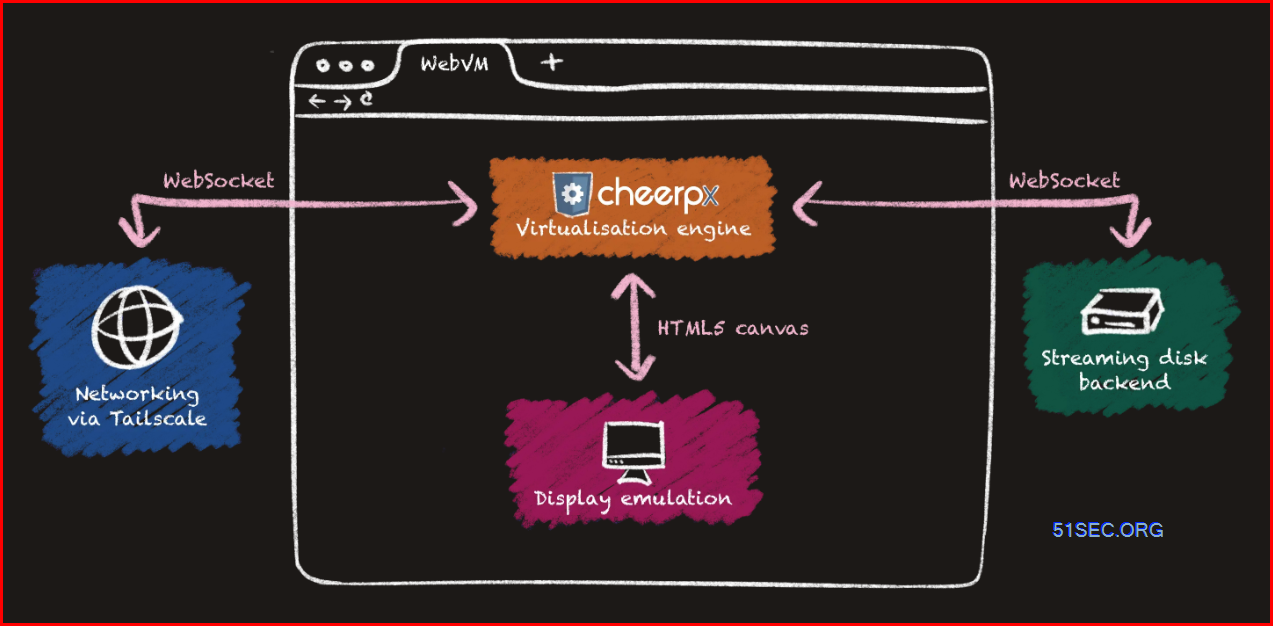
WebVM is composed of four main building blocks: The CheerpX virtualization engine, a virtual storage backend, a networking layer, and the emulated graphical device.
CheerpX is a unique WebAssembly-based virtualization engine for x86 binary code. This engine is based on an efficient Just-In-Time compiler from x86 instructions into WebAssembly, plus an emulation layer for Linux system calls. This combination makes it possible to run unmodified Linux x86 binaries in the browser, and it is robust and scalable enough to run whole Linux distributions.
The second main component of WebVM is its streaming disk backend. One of the key benchmarks of success of WebVM is to be able to boot full, unmodified Linux distributions, without requiring the preloading of the full file system. This implies the ability to support 1GB+ root filesystems and to dynamically load disk blocks with low-latency, a critical concern for the overall performance of the VM.
Finally, the picture is completed by the private networking layer, implemented via Tailscale![]() and Xorg support using the KMS Linux API. More on these in later sections.
and Xorg support using the KMS Linux API. More on these in later sections.
Create Your Own Webvm in Github
- I only updated the deployment files which can make the whole process completed without an error.
1 Fork the repository from https://github.com/leaningtech/webvm
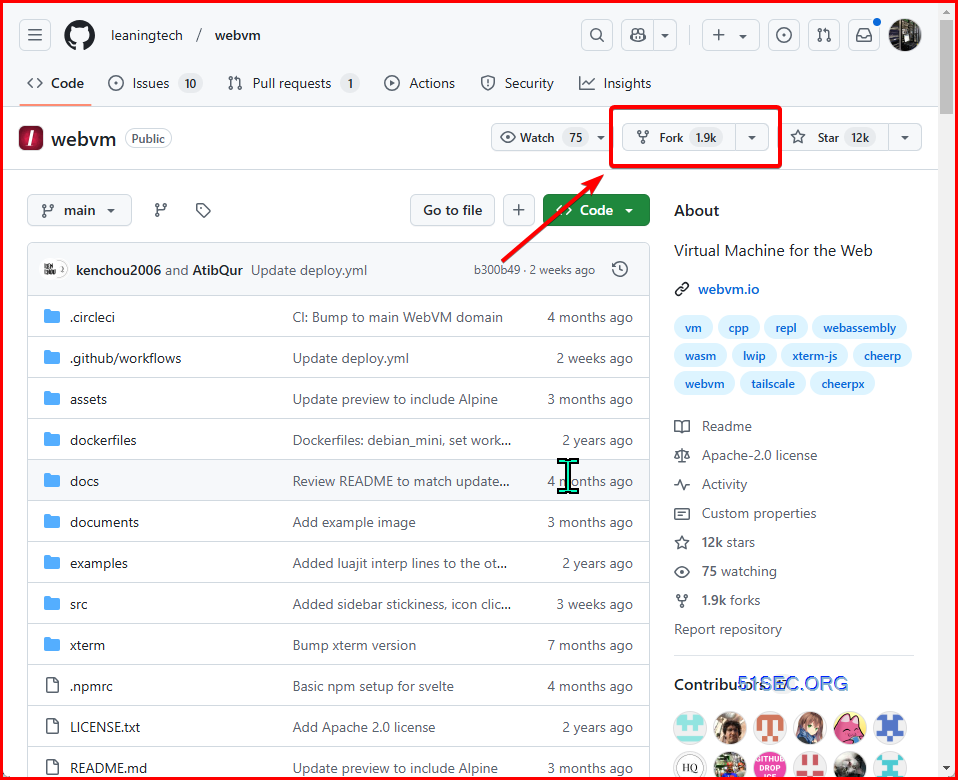
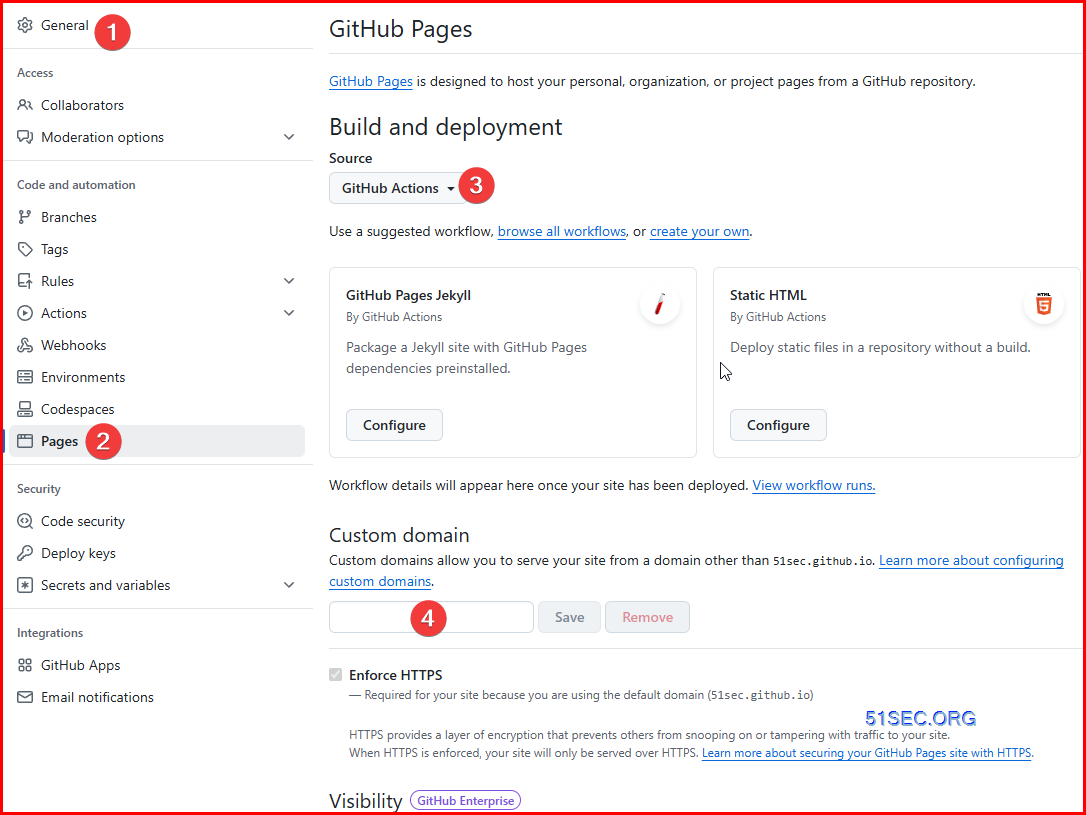
2 Enable Github pages in settings.
- Click on
Settings. - Go to the
Pagessection. - Select
Github Actionsas the source. - If you are using a custom domain, ensure
Enforce HTTPSis enabled.
3 Run the workflow.
- Click on
Actions. - Accept the prompt. This is required only once to enable Actions for your fork.
- Click on the workflow named
Deploy. - Click
Run workflowand then once moreRun workflowin the menu.
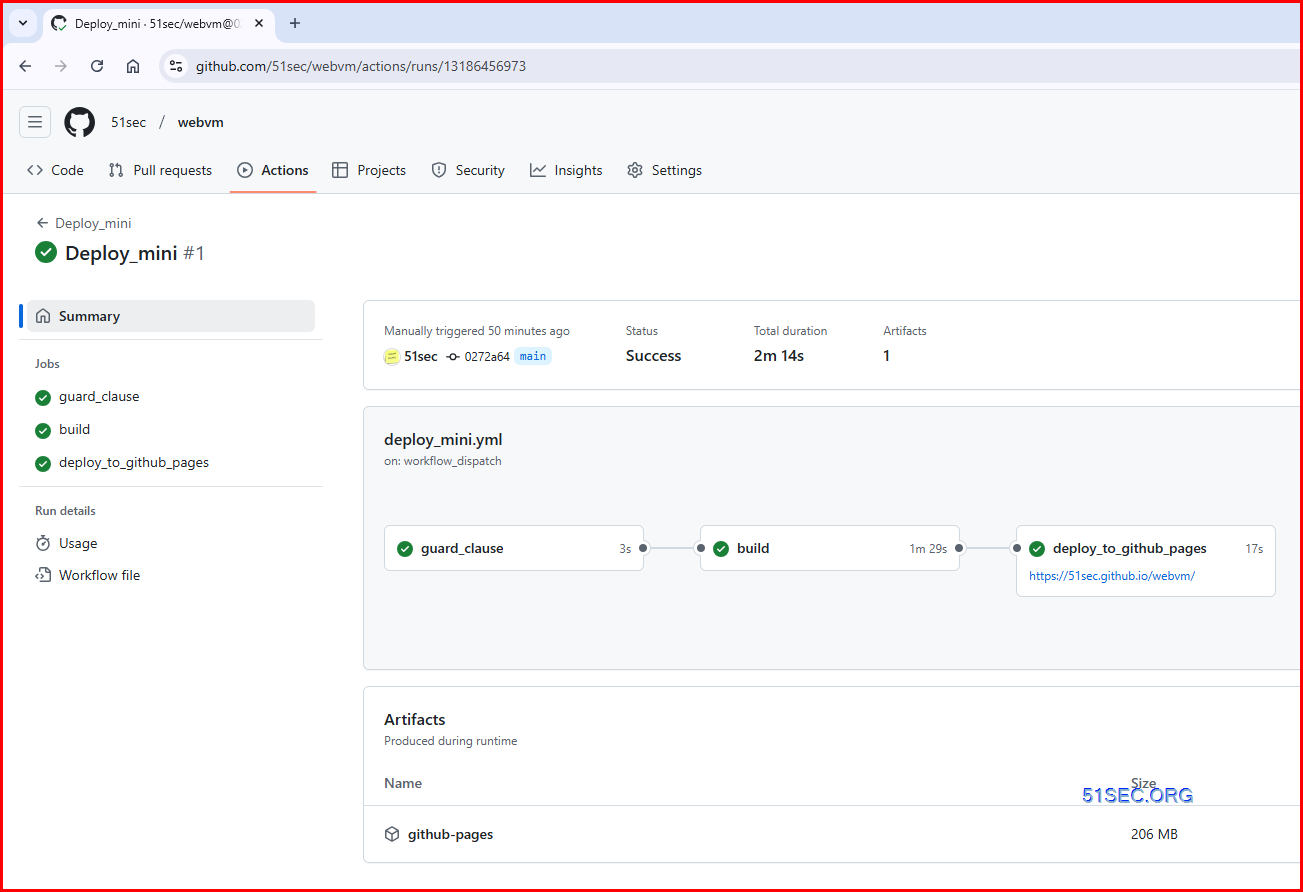
4 After a few seconds a new Deploy workflow will start, click on it to see details.
5 After the workflow completes, which takes a few minutes, it will show the URL below the deploy_to_github_pages job.
Linux Commands:
- $ cat /etc/os-release
- $ lsb_release -a
- $ hostnamectl
Use your own domain for your Github page:
Local Deployment (Your Own Server or VPS)
1 Clone the project
- git clone https://github.com/leaningtech/webvm
- cd webvm
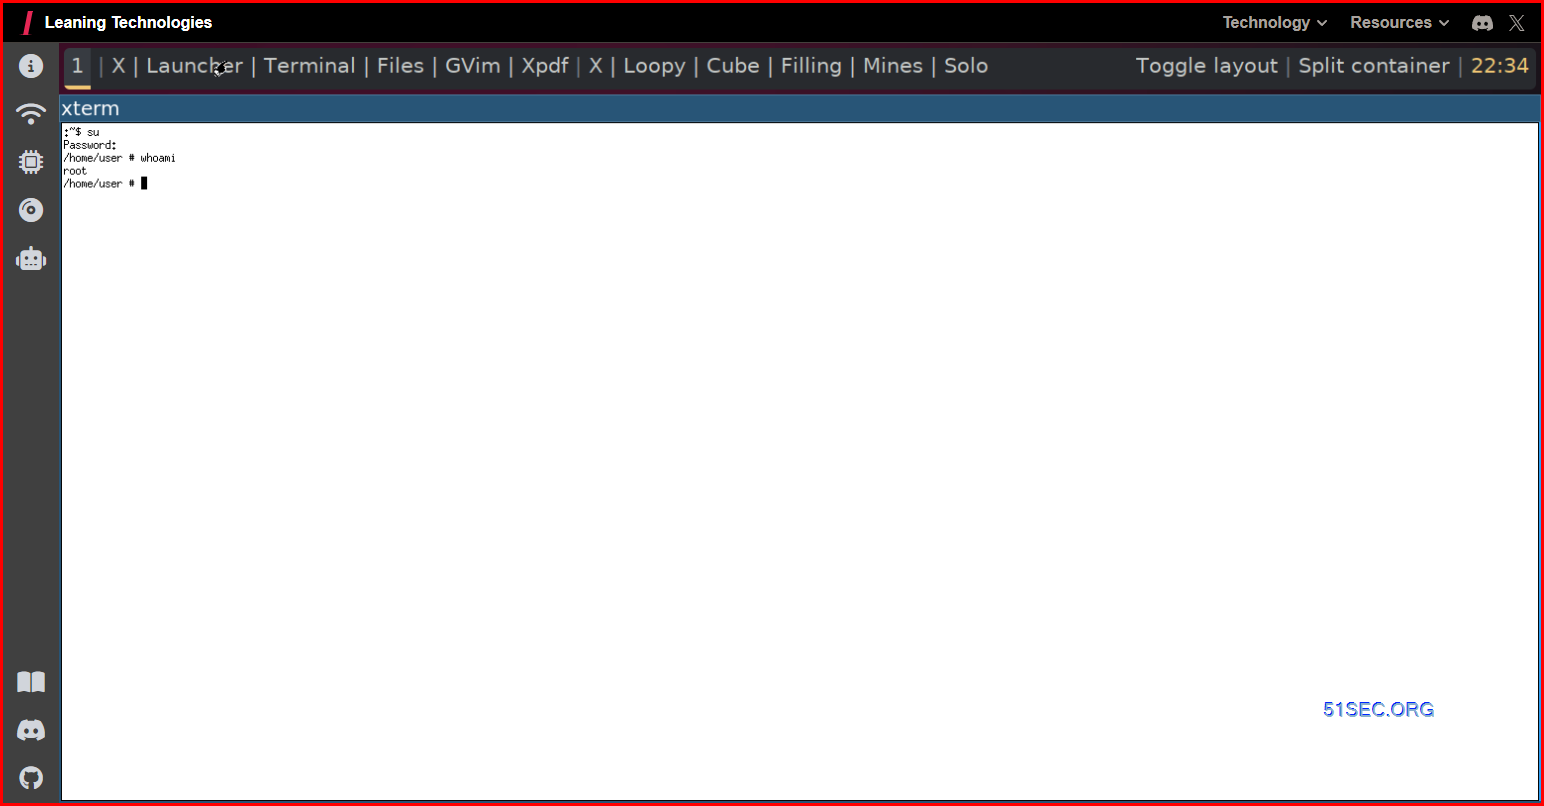
debian_mini Ext2 image from https://github.com/leaningtech/webvm/releases/ (the release from author does not have su password enabled)- wget https://github.com/leaningtech/webvm/releases/download/ext2_image/debian_large_20230522_5044875331.ext2
- this one is from original github repository, su account password was not set.
- https://github.com/JohnnyNetsec/webvm/releases/download/ext2_image/debian_mini_220250206_13186456973.ext2
- su password has been set as password.
config_github_terminal.js
npm, output will be placed in the build directoryapt install npmnpm installnpm run build
build directory just createdapt install nginxnginx -p . -c nginx.conf
nginx -p . -c nginx.conf
apt install screen
screen -S ngcd webvm
nginx -p . -c nginx.conf
ctrl + A + D (detach from the screen, going back to original session)
Other Screen commands
- Install screen (Depends on the Linux Distribution if it came pre installed or not) : yum install screen or apt install screen
- Initiate a Screen : screen or screen -S <screen name> <command to execute>
- Detach from the screen : "CTRL+A,D" not "CTRL+A+D"
- List all the screen currently working : screen -ls
- Reattach to a screen : screen -r <session number> or screen -r <screen name>
- Kill specific screen: screen -X -S <screen name> quit
- Kill all screens : pkill screen
- Reattach to screen : screen -x -r <pid>.<session name>
root@instance-webvm:~# screen -x There are several suitable screens on: 64262.ng (02/02/25 23:59:16) (Detached) 63983.pts-1.instance-webvm (02/02/25 23:46:53) (Detached) 18301.nginx (01/28/25 21:11:25) (Attached) Type "screen [-d] -r [pid.]tty.host" to resume one of them. root@instance-webvm:~# screen -x -r 64262.ng
http://127.0.0.1:8081 and enjoy your local WebVM
user@:~$ su Password: password root@:/home/user#Command list:
- git clone https://github.com/leaningtech/webvm
- cd webvm
- wget https://github.com/JohnnyNetsec/webvm/releases/download/ext2_image/
- nano config_github_terminal.js
- apt install npm
- npm install
- npm run build
- screen -S nginx
- nginx -p . -c nginx.conf
- ctrl+A+D
Enable HTTPS with Custom Domain
+~~~~~~~~~~~~~~~~~~~~~~~~~~~~~~~~~~~~~~~~~~~~~~~~~~~~~~~~~~~~~~~~~~~~~~~~~~~~~+
| |
| WebVM is a virtual Linux environment running in the browser via WebAssembly |
| |
| WebVM is powered by the CheerpX virtualization engine, which enables safe, |
| sandboxed client-side execution of x86 binaries, fully client-side |
| |
| CheerpX includes an x86-to-WebAssembly JIT compiler, a virtual block-based |
| file system, and a Linux syscall emulator |
| |
| [News] CheerpX 1.0 officially released! |
| |
| https://cheerpx.io/blog/cx-10 |
| |
| Try out the new Alpine / Xorg / i3 WebVM: https://webvm.io/alpine.html |
| |
+~~~~~~~~~~~~~~~~~~~~~~~~~~~~~~~~~~~~~~~~~~~~~~~~~~~~~~~~~~~~~~~~~~~~~~~~~~~~~+
Welcome to WebVM. If unsure, try these examples:
python3 examples/python3/fibonacci.py
gcc -o helloworld examples/c/helloworld.c && ./helloworld
objdump -d ./helloworld | less -M
vim examples/c/helloworld.c
curl –max-time 15 parrot.live # requires networking
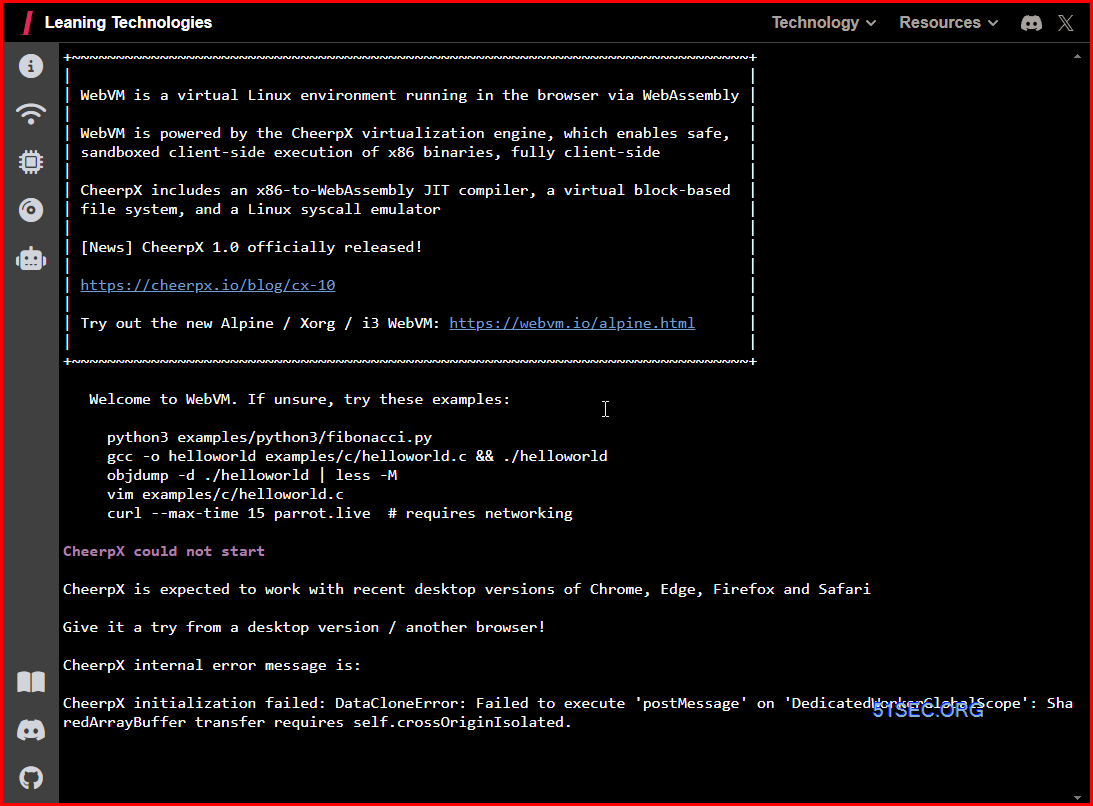
CheerpX could not start
CheerpX is expected to work with recent desktop versions of Chrome, Edge, Firefox and Safari
Give it a try from a desktop version / another browser!
CheerpX internal error message is:
CheerpX initialization failed: DataCloneError: Failed to execute ‘postMessage’ on ‘DedicatedWorkerGlobalScope’: SharedArrayBuffer transfer requires self.crossOriginIsolated.
Based on faq https://cheerpx.io/docs/faq,
If you encounter the following error message:
Uncaught CheerpX initialization failed: DataCloneError: DedicatedWorkerGlobalScope.postMessage: The SharedArrayBuffer object cannot be serialized. The Cross-Origin-Opener-Policy and Cross-Origin-Embedder-Policy HTTP headers can be used to enable this.
This error occurs because CheerpX relies on SharedArrayBuffer![]() , which requires the site to be cross-origin isolated
, which requires the site to be cross-origin isolated![]() . To activate cross-origin isolation, ensure your site is served over HTTPS and include the following headers in your responses:
. To activate cross-origin isolation, ensure your site is served over HTTPS and include the following headers in your responses:
We will enable a custom domain and make it working over https.
Cloudflare add an A record.
NPM add a new proxy host with https enabled.
Now it should be working as shown below.
Enable Networking
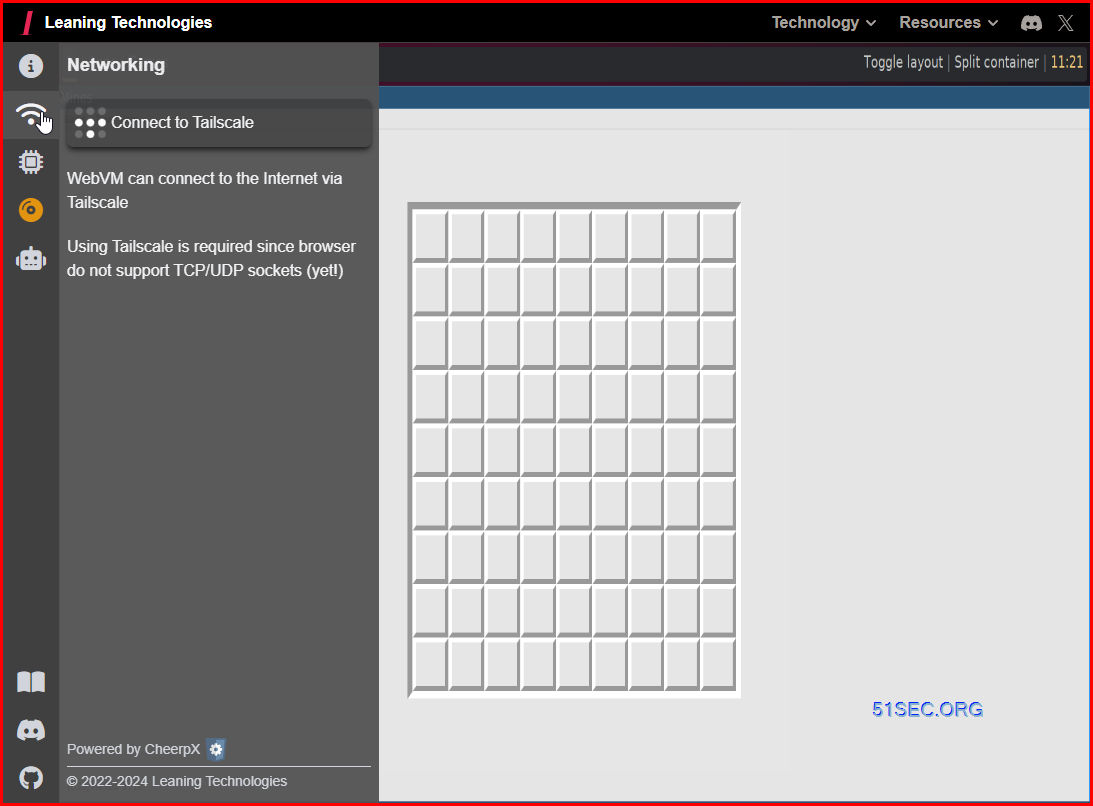
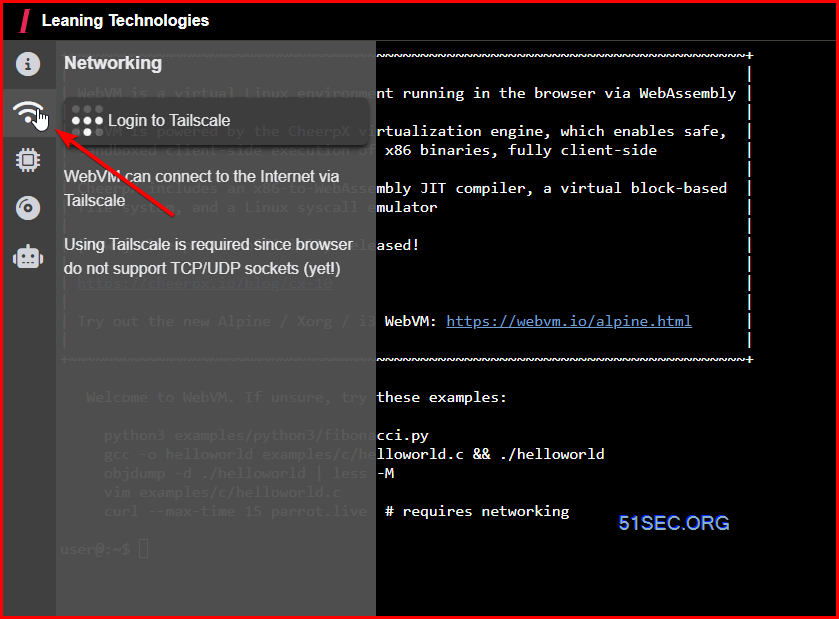
Modern browsers do not provide APIs to directly use TCP or UDP. WebVM provides networking support by integrating with Tailscale, a VPN network that supports WebSockets as a transport layer.
- Open the “Networking” panel from the side-bar
- Click “Connect to Tailscale” from the panel
- Log in to Tailscale (create an account if you don’t have one)
- Click “Connect” when prompted by Tailscale
- If you are unfamiliar with Tailscale or would like additional information see WebVM and Tailscale.
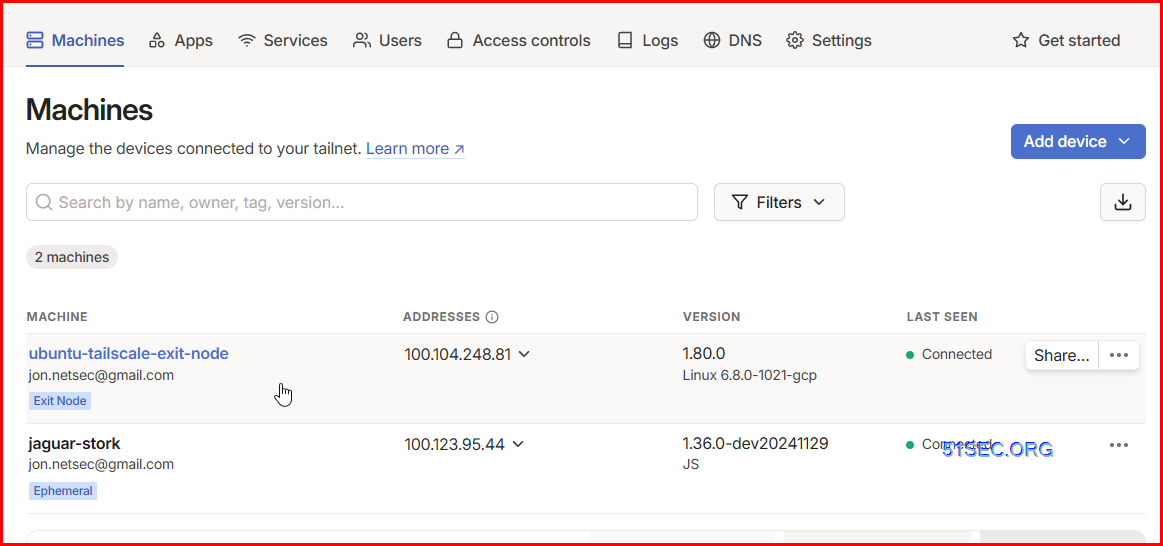
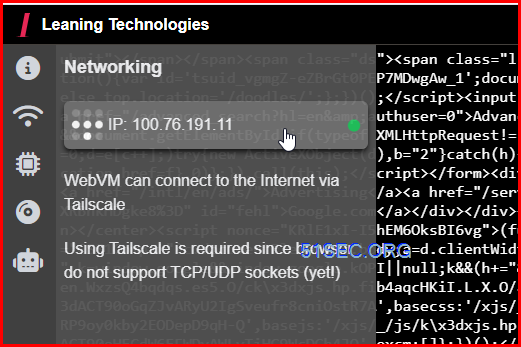
Once connected , you will see an ip address has been assigned to the vm.
- curl www.google.ca
- curl ip.sb
- curl –max-time 15 parrot.live
- ssh <ssh server public ip>
List of free online SFTP servers
| Web | Check | Hostname | Login | Note |
|---|---|---|---|---|
| web | check | test.rebex.net:22 | demo/password | Also supports SSH, FTP/SSL, FTP, IMAP, POP3 and Time protocols. Read-only. |
| web | check | itcsubmit.wustl.edu:22 | – | Only for connection test. No public username/password available. |
| web | n/a | demo.wftpserver.com:2222 | demo/demo | Also supports FTP/SSL and FTP. |
Wing FTP Server Online Demo
We set up an online demo server for you to explore the new features available in Wing FTP Server. You can explore both Web-based Administration and Web-based Client.
Secure Web-based Administration:
- Location: https://demo.wftpserver.com:5466/
- Username: demo-admin
- Password: demo-admin
Secure Web-based Client:
- Location: https://demo.wftpserver.com/
- Username: demo
- Password: demo
Login using your own client with FTP, FTPS, SFTP protocol:
- Location: demo.wftpserver.com
- Username: demo
- Password: demo
- FTP Port: 21
- FTPS Port: 990
- SFTP Port: 2222
Note: all the demo accounts are read-only accounts, so you can not change server settings.
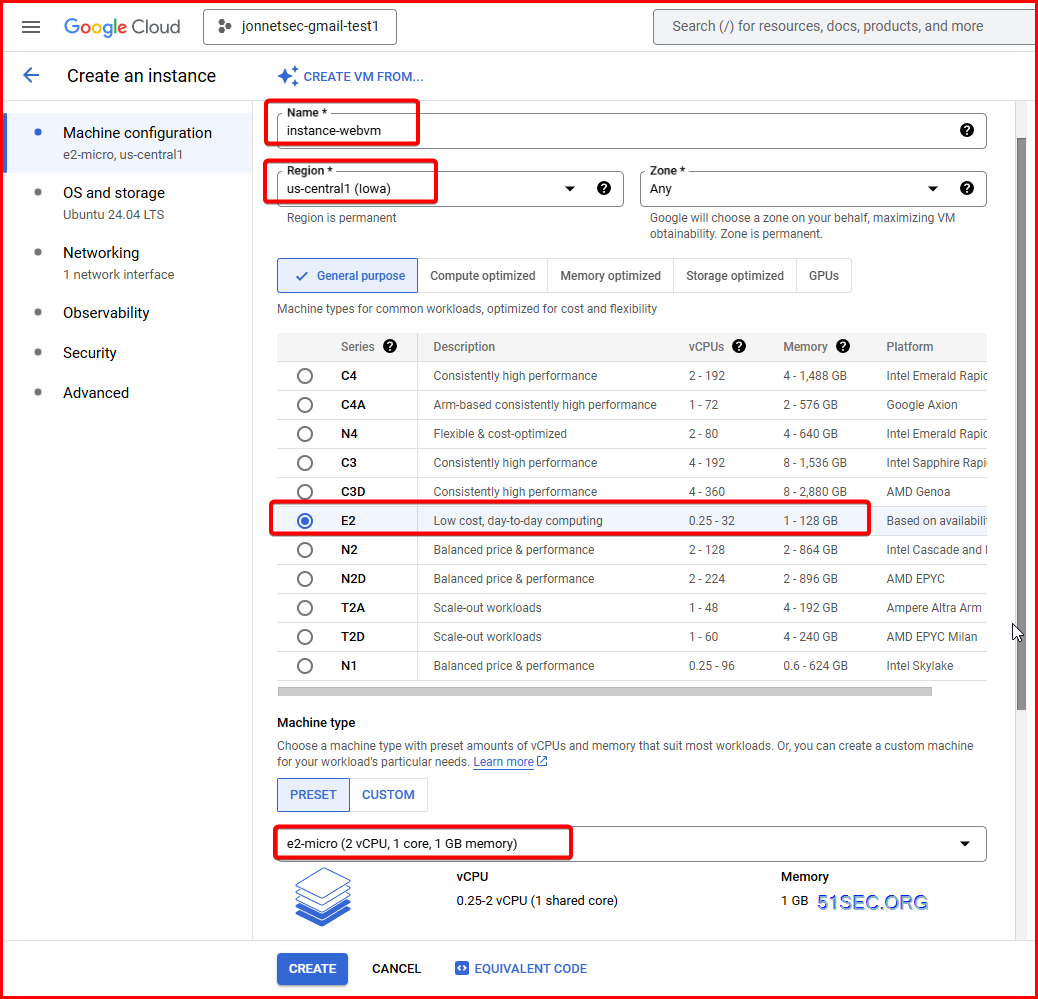
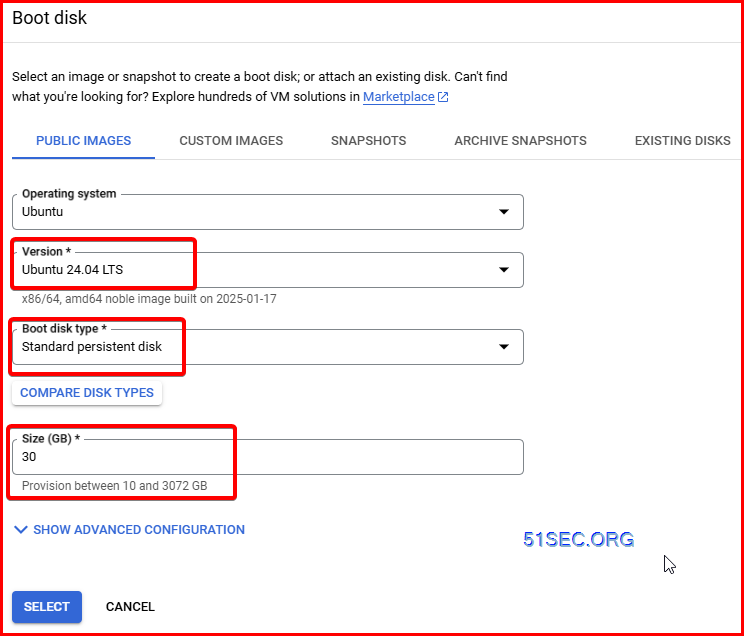
Free GCP Instance
Requirements for Free Tier Compute Engine
- 1 non-preemptible
e2-microVM instance per month in one of the following US regions:- Oregon:
us-west1 - Iowa:
us-central1 - South Carolina:
us-east1
- Oregon:
- 30 GB-months standard persistent disk
- 1 GB of outbound data transfer from North America to all region destinations (excluding China and Australia) per month
Make your own image file
FROM --platform=i386 i386/debian:buster

ARG DEBIAN_FRONTEND=noninteractive

RUN apt-get clean && apt-get update && apt-get -y upgrade

RUN apt-get -y install apt-utils gcc \

	python3 vim unzip ruby nodejs \

	fakeroot dbus base whiptail hexedit \

	patch wamerican ucf manpages \

	file luajit make lua50 dialog curl \

	less cowsay netcat-openbsd

RUN useradd -m user && echo "user:password" | chpasswd

COPY --chown=user:user ./examples /home/user/examples

RUN chmod -R +x  /home/user/examples/lua

# We set WORKDIR, as this gets extracted by Webvm to be used as the cwd. This is optional.

WORKDIR /home/user/

# We set env, as this gets extracted by Webvm. This is optional.

ENV HOME="/home/user" TERM="xterm" USER="user" SHELL="/bin/bash" EDITOR="vim" LANG="en_US.UTF-8" LC_ALL="C"

RUN echo 'root:password' | chpasswd

CMD [ "/bin/bash" ]- git clone https://github.com/leaningtech/webvm
- cd webvm
- mv dockerfiles/debian_mini Dockerfile
- docker build -t mywebvm .
root@instance-webvm:~/webvm# mv dockerfiles/debian_mini Dockerfile
root@instance-webvm:~/webvm# docker build -t mywebvm .
DEPRECATED: The legacy builder is deprecated and will be removed in a future release.
            Install the buildx component to build images with BuildKit:
            https://docs.docker.com/go/buildx/

Sending build context to Docker daemon  3.584kB
Step 1/11 : FROM --platform=i386 i386/debian:buster
buster: Pulling from i386/debian
webvm desktop
https://webvm.io/alpine.html
- https://youtu.be/LHYBu3y_0Rs
Videos
References
- https://the-walking-fish.com/p/webvm/
- https://www.youtube.com/watch?v=JtknHXoXXX0
- https://sredevops.org/en/how-to-run-a-linux-desktop-in-your-browser-webvm-2-0-webassembly-is-the-answer/
- https://www.youtube.com/watch?v=TgJqmfxW1Jo