The following steps is only used for a selected environment to have a simplified deployments which is to target bringing MDE to all devices as fast as we can (in a week for 1k devices including windows, macOS, linux, servers, workstations, etc), also remove existing expired antimalware software, at the same time, has maximum possible security on the end point devices.
The idea deployment will take 2-3 months with all thorough testing, planning and verifying.
Background
Third Party Antivirus / Malicious program already deployed into all Workstations and Servers.
Microsoft Defender for Endpoints (P2) and Defender for Servers (P1) has been selected to replace this third party security software on all workstations (Windows and Mac) and all servers (Windows and Linux)
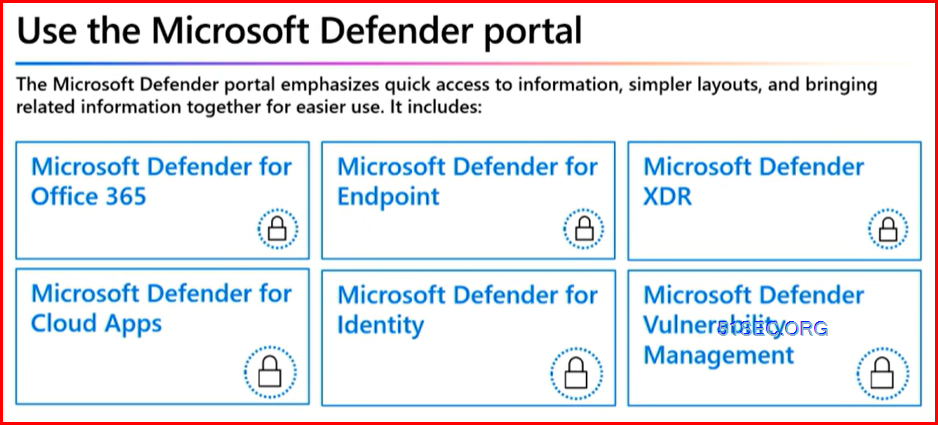
From Microsoft learn, https://learn.microsoft.com/en-us/defender-endpoint/mde-planning-guide, the steps to deploy Defender for Endpoint are:

- Step 1 – Set up Microsoft Defender for Endpoint deployment: This step focuses on getting your environment ready for deployment.
- Step 2 – Assign roles and permissions: Identify and assign roles and permissions to view and manage Defender for Endpoint.
- Step 3 – Identify your architecture and choose your deployment method: Identify your architecture and the deployment method that best suits your organization.
- Step 4 – Onboard devices: Assess and onboard your devices to Defender for Endpoint.
- Step 5 – Configure capabilities: You’re now ready to configure Defender for Endpoint security capabilities to protect your devices.
Process related to MDE
High Level Deployment Steps for Workstation
1 Generating onboarding code
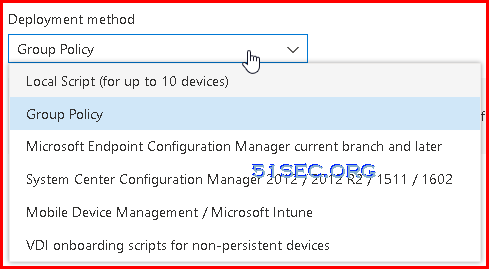
Onboard devices to Microsoft Defender for Endpoint using the onboarding configuration package that matches your preferred deployment method. For other device preparation instructions, read Onboard and set up.Deployment methods:
- Group Policy
You can configure your devices using Group Policy.
For more information on how to configure and monitor Microsoft Defender for Endpoint devices see Configure devices using Group Policy section in the Microsoft Defender for Endpoint guide.
- Local Script (for up to 10 devices)
Local Script (for up to 10 devices)
You can configure a single device by running a script locally.
Note: This script has been optimized for usage with a limited number of devices (1-10). To deploy at scale, please see other deployment options above.
For more information on how to configure and monitor Microsoft Defender for Endpoint devices, see Configure devices using a local script
section in the Microsoft Defender for Endpoint guide. Download onboarding package
2 Deploy onboarding package (script) to all workstations
It can be done phase by phase, starting from pilot machines, then departments by departments, or location by location.
Check MDE portal https://security.microsoft.com/ – Assets – Devices page to get the list of all machines and get the status of machines.
You can use Group Policy or third party deployment tools for your patching and software installation to deploy this script.
3 If there is third party XDR software already installed on workstations, the MDE will run on passive mode.
Get-MpComputerStatus : <br /><br /><span color="var(--black-600)" style="--theme-background-attachment: auto; --theme-background-color: var(--white); --theme-background-position: top left; --theme-background-repeat: repeat; --theme-background-size: auto; --theme-base-primary-color-h: 198; --theme-base-primary-color-l: 51.37254902%; --theme-base-primary-color-s: 60.48387097%; --theme-body-font-color: var(--black-600); --theme-body-font-family: var(--ff-sans); --theme-button-active-background-color: var(--theme-primary-200); --theme-button-color: var(--theme-primary); --theme-button-hover-background-color: var(--theme-primary-100); --theme-button-hover-color: var(--theme-primary-400); --theme-button-outlined-border-color: var(--theme-primary-400); --theme-button-outlined-selected-border-color: var(--theme-primary-500); --theme-button-primary-active-background-color: var(--theme-primary-600); --theme-button-primary-active-color: var(--white); --theme-button-primary-background-color: var(--theme-primary-400); --theme-button-primary-color: var(--white); --theme-button-primary-hover-background-color: var(--theme-primary-500); --theme-button-primary-hover-color: var(--white); --theme-button-primary-selected-background-color: var(--theme-primary-600); --theme-button-primary-selected-color: var(--white); --theme-button-selected-background-color: var(--theme-primary-300); --theme-button-selected-color: var(--theme-primary-600); --theme-content-background-color: var(--white); --theme-content-border-color: hsl(210,8%,90%); --theme-footer-background-border-top: 0; --theme-footer-background-color: transparent; --theme-footer-background-position: top left; --theme-footer-background-repeat: no-repeat; --theme-footer-background-size: auto; --theme-footer-divider-color: hsl(210,8%,90%); --theme-footer-link-color-hover: hsl(210,8%,5%); --theme-footer-link-color: hsl(210,8%,25%); --theme-footer-padding-bottom: 0; --theme-footer-padding-top: 0; --theme-footer-text-color: hsl(210,8%,68%); --theme-footer-title-color: #0082A3; --theme-header-background-border-bottom: 0; --theme-header-background-color: transparent; --theme-header-background-position: center left; --theme-header-background-repeat: repeat; --theme-header-background-size: auto; --theme-header-foreground-color: transparent; --theme-header-foreground-position: bottom right; --theme-header-foreground-repeat: no-repeat; --theme-header-foreground-size: auto; --theme-header-link-color: var(--theme-primary); --theme-header-sponsored-color: hsl(210,8%,25%); --theme-link-color-hover: #61b4d8; --theme-link-color-visited: #50AEC6; --theme-link-color: #38A1CE; --theme-post-body-font-family: var(--ff-sans); --theme-post-owner-background-color: var(--theme-primary-100); --theme-post-owner-new-background-color: var(--theme-primary-200); --theme-post-title-color-hover: rgba(56,161,206,0.8); --theme-post-title-color-visited: #50AEC6; --theme-post-title-color: #38A1CE; --theme-post-title-font-family: var(--ff-sans); --theme-primary-custom-100: hsl(var(--theme-base-primary-color-h), var(--theme-base-primary-color-s), calc(var(--theme-base-primary-color-l) + ((100% - var(--theme-base-primary-color-l)) * .9))); --theme-primary-custom-200: hsl(var(--theme-base-primary-color-h), var(--theme-base-primary-color-s), calc(var(--theme-base-primary-color-l) + ((100% - var(--theme-base-primary-color-l)) * .75))); --theme-primary-custom-300: hsl(var(--theme-base-primary-color-h), var(--theme-base-primary-color-s), calc(var(--theme-base-primary-color-l) + ((100% - var(--theme-base-primary-color-l)) * .5))); --theme-primary-custom-400: hsl(var(--theme-base-primary-color-h), var(--theme-base-primary-color-s), var(--theme-base-primary-color-l)); --theme-primary-custom-500: hsl(var(--theme-base-primary-color-h), var(--theme-base-primary-color-s), calc(var(--theme-base-primary-color-l) + (var(--theme-base-primary-color-l) * -.3))); --theme-primary-custom-600: hsl(var(--theme-base-primary-color-h), var(--theme-base-primary-color-s), calc(var(--theme-base-primary-color-l) + (var(--theme-base-primary-color-l) * -.6))); --theme-primary-custom: var(--theme-primary-custom-400); --theme-topbar-bottom-border: none; border-radius: 0px; border: 0px; box-sizing: inherit; font-family: courier; font-feature-settings: inherit; font-kerning: inherit; font-optical-sizing: inherit; font-size-adjust: inherit; font-size: var(--_pr-code-fs); font-stretch: inherit; font-style: inherit; font-variant: inherit; font-variation-settings: inherit; font-weight: inherit; line-height: inherit; margin: 0px; padding: 0px; vertical-align: baseline; white-space: inherit;"><br /></span><pre style="--theme-background-attachment: auto; --theme-background-color: var(--white); --theme-background-position: top left; --theme-background-repeat: repeat; --theme-background-size: auto; --theme-base-primary-color-h: 198; --theme-base-primary-color-l: 51.37254902%; --theme-base-primary-color-s: 60.48387097%; --theme-body-font-color: var(--black-600); --theme-body-font-family: var(--ff-sans); --theme-button-active-background-color: var(--theme-primary-200); --theme-button-color: var(--theme-primary); --theme-button-hover-background-color: var(--theme-primary-100); --theme-button-hover-color: var(--theme-primary-400); --theme-button-outlined-border-color: var(--theme-primary-400); --theme-button-outlined-selected-border-color: var(--theme-primary-500); --theme-button-primary-active-background-color: var(--theme-primary-600); --theme-button-primary-active-color: var(--white); --theme-button-primary-background-color: var(--theme-primary-400); --theme-button-primary-color: var(--white); --theme-button-primary-hover-background-color: var(--theme-primary-500); --theme-button-primary-hover-color: var(--white); --theme-button-primary-selected-background-color: var(--theme-primary-600); --theme-button-primary-selected-color: var(--white); --theme-button-selected-background-color: var(--theme-primary-300); --theme-button-selected-color: var(--theme-primary-600); --theme-content-background-color: var(--white); --theme-content-border-color: hsl(210,8%,90%); --theme-footer-background-border-top: 0; --theme-footer-background-color: transparent; --theme-footer-background-position: top left; --theme-footer-background-repeat: no-repeat; --theme-footer-background-size: auto; --theme-footer-divider-color: hsl(210,8%,90%); --theme-footer-link-color-hover: hsl(210,8%,5%); --theme-footer-link-color: hsl(210,8%,25%); --theme-footer-padding-bottom: 0; --theme-footer-padding-top: 0; --theme-footer-text-color: hsl(210,8%,68%); --theme-footer-title-color: #0082A3; --theme-header-background-border-bottom: 0; --theme-header-background-color: transparent; --theme-header-background-position: center left; --theme-header-background-repeat: repeat; --theme-header-background-size: auto; --theme-header-foreground-color: transparent; --theme-header-foreground-position: bottom right; --theme-header-foreground-repeat: no-repeat; --theme-header-foreground-size: auto; --theme-header-link-color: var(--theme-primary); --theme-header-sponsored-color: hsl(210,8%,25%); --theme-link-color-hover: #61b4d8; --theme-link-color-visited: #50AEC6; --theme-link-color: #38A1CE; --theme-post-body-font-family: var(--ff-sans); --theme-post-owner-background-color: var(--theme-primary-100); --theme-post-owner-new-background-color: var(--theme-primary-200); --theme-post-title-color-hover: rgba(56,161,206,0.8); --theme-post-title-color-visited: #50AEC6; --theme-post-title-color: #38A1CE; --theme-post-title-font-family: var(--ff-sans); --theme-primary-custom-100: hsl(var(--theme-base-primary-color-h), var(--theme-base-primary-color-s), calc(var(--theme-base-primary-color-l) + ((100% - var(--theme-base-primary-color-l)) * .9))); --theme-primary-custom-200: hsl(var(--theme-base-primary-color-h), var(--theme-base-primary-color-s), calc(var(--theme-base-primary-color-l) + ((100% - var(--theme-base-primary-color-l)) * .75))); --theme-primary-custom-300: hsl(var(--theme-base-primary-color-h), var(--theme-base-primary-color-s), calc(var(--theme-base-primary-color-l) + ((100% - var(--theme-base-primary-color-l)) * .5))); --theme-primary-custom-400: hsl(var(--theme-base-primary-color-h), var(--theme-base-primary-color-s), var(--theme-base-primary-color-l)); --theme-primary-custom-500: hsl(var(--theme-base-primary-color-h), var(--theme-base-primary-color-s), calc(var(--theme-base-primary-color-l) + (var(--theme-base-primary-color-l) * -.3))); --theme-primary-custom-600: hsl(var(--theme-base-primary-color-h), var(--theme-base-primary-color-s), calc(var(--theme-base-primary-color-l) + (var(--theme-base-primary-color-l) * -.6))); --theme-primary-custom: var(--theme-primary-custom-400); --theme-topbar-bottom-border: none; -webkit-tap-highlight-color: transparent; background-color: #282a36; border-bottom: none; border-image: initial; border-left: 5px solid rgb(167, 111, 206); border-radius: 3px; border-right: none; border-top: none; box-sizing: border-box; color: var(--black-600); font-family: var(--ff-mono); font-feature-settings: inherit; font-kerning: inherit; font-optical-sizing: inherit; font-size-adjust: inherit; font-size: var(--_pr-code-fs); font-stretch: inherit; font-style: inherit; font-variant: inherit; font-variation-settings: inherit; font-weight: inherit; line-height: 1.42857; margin: 0px 0px 30px; outline: 0px; overflow-wrap: break-word; overflow: auto; padding: 18px 23px; transition: 0.3s; vertical-align: baseline; white-space: inherit; word-break: break-all;"><span style="outline: 0px; transition: 0.3s;"><span style="color: white; font-family: courier; font-size: 13px; text-wrap-mode: wrap;">PS C:\Users\User> get-mpcomputerstatus
AMEngineVersion : 1.1.25010.7
AMProductVersion : 4.18.24090.11
AMRunningMode : Normal
AMServiceEnabled : True
AMServiceVersion : 4.18.24090.11
AntispywareEnabled : True
AntispywareSignatureAge : 0
AntispywareSignatureLastUpdated : 2/21/2025 11:24:41 AM
AntispywareSignatureVersion : 1.423.36.0
AntivirusEnabled : True
AntivirusSignatureAge : 0
AntivirusSignatureLastUpdated : 2/21/2025 11:24:41 AM
AntivirusSignatureVersion : 1.423.36.0
BehaviorMonitorEnabled : True
ComputerID : C223A6B9-EE37-4983-B88D-09CC8C8BFA9F
ComputerState : 0
DefenderSignaturesOutOfDate : False
DeviceControlDefaultEnforcement :
DeviceControlPoliciesLastUpdated : 3/27/2023 10:12:31 AM
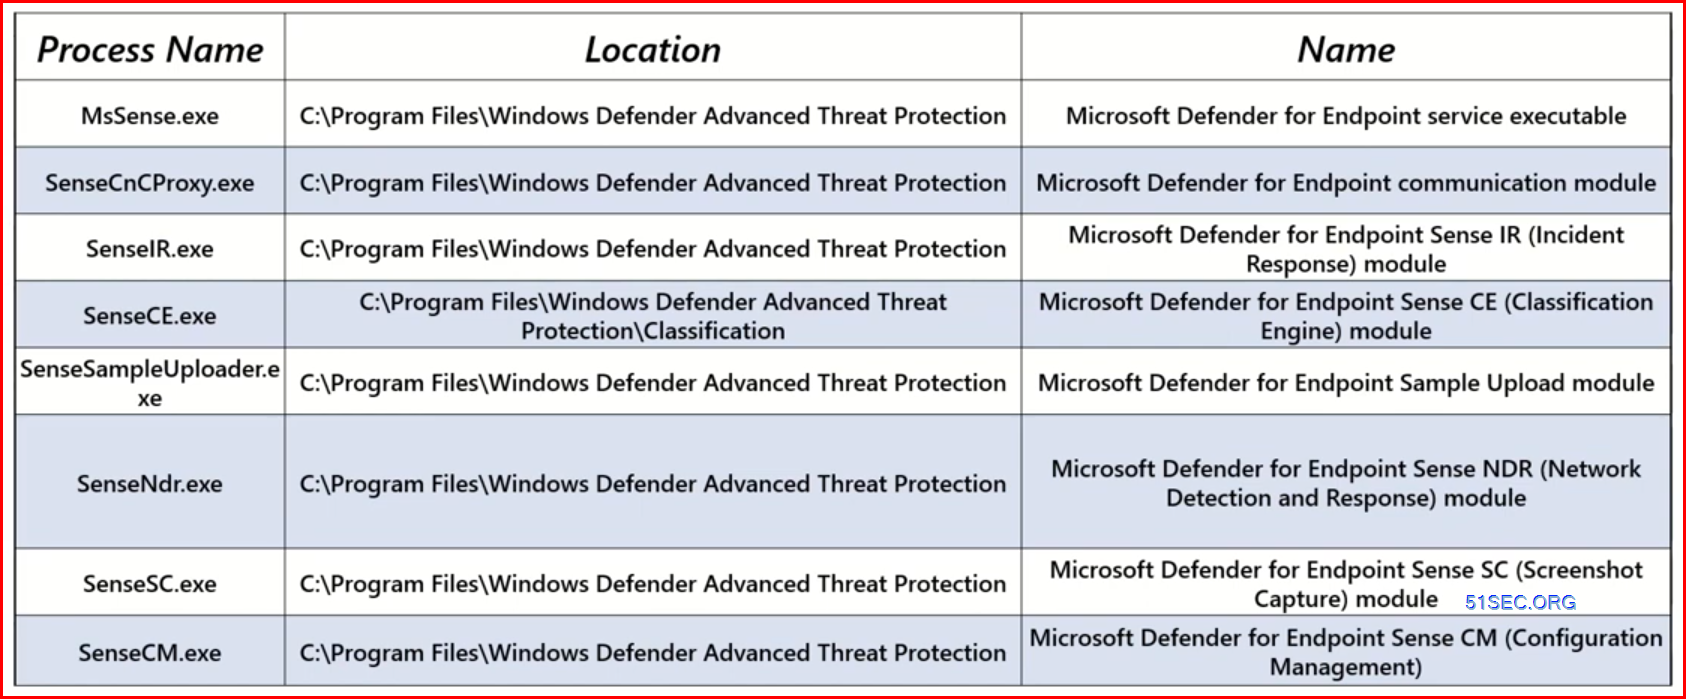
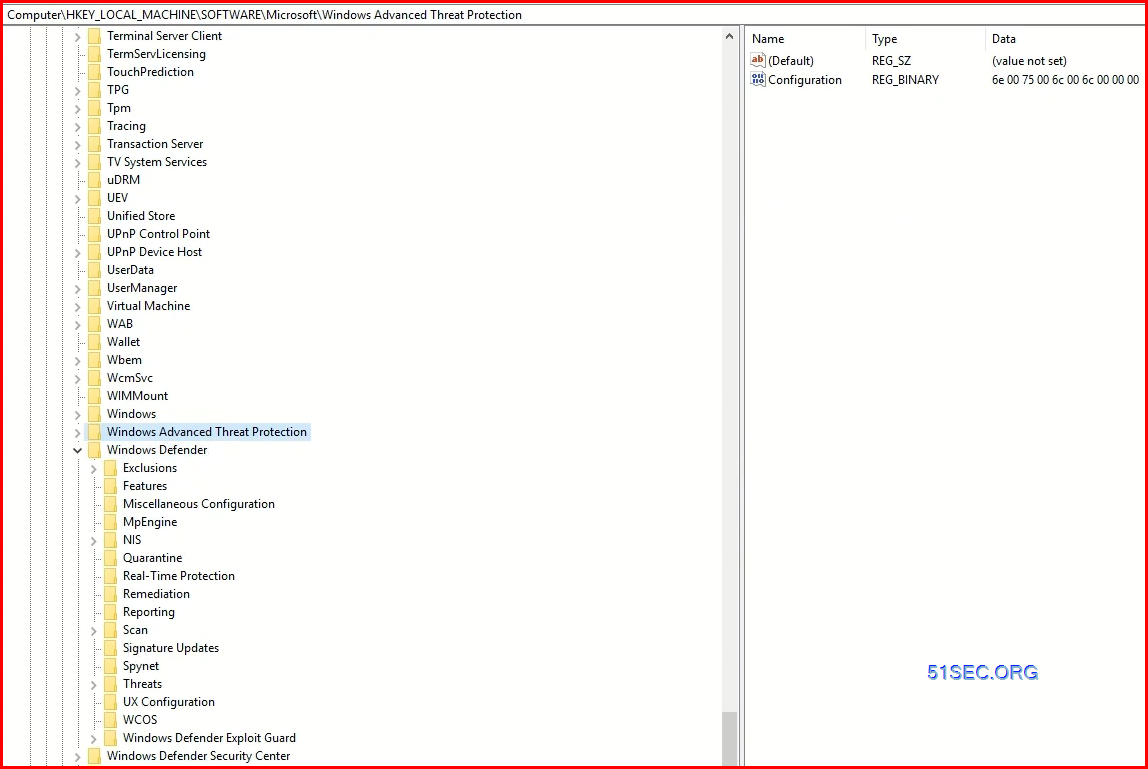
DeviceControlState : Disabled</span></span></pre><p><span style="font-family: Times New Roman;"><span style="white-space: normal;">https://learn.microsoft.com/en-us/powershell/module/defender/get-mpcomputerstatus?view=windowsserver2025-ps</span></span></p><p style="background-color: white; box-sizing: border-box; color: #616161; font-family: "Open Sans"; font-size: 15px; line-height: 1.8; margin: 0px 0px 15px; white-space: normal;"><span style="box-sizing: border-box; font-weight: 700;">Get-MpComputerStatus </span>gets the antimalware status of Defender AV. Use the command for validating the running mode. Check the following items:</p><ul class="wp-block-list" style="background-color: white; box-sizing: border-box; color: #616161; font-family: "Open Sans"; font-size: 15px; margin-bottom: 10px; margin-top: 0px; white-space: normal;"><li style="box-sizing: border-box; padding: 1px 2px;">AMRunningMode: Must be in normal mode for active Defender protection</li><li style="box-sizing: border-box; padding: 1px 2px;">AMProductVersion: Must be one of the latest released versions</li><li style="box-sizing: border-box; padding: 1px 2px;">AMServiceEnabled: Must be True</li><li style="box-sizing: border-box; padding: 1px 2px;">AntiSpywareEnabled: Must be True</li><li style="box-sizing: border-box; padding: 1px 2px;">BehaviorMonitorEnabled: Must be True</li><li style="box-sizing: border-box; padding: 1px 2px;">RealTimeProtectionEnabled: Must be True</li><li style="box-sizing: border-box; padding: 1px 2px;">IoavProtectionEnabled: Must be Tru</li></ul><p><span style="font-family: Times New Roman;"><span style="white-space: normal;"><br /></span></span></p><p><span face="-apple-system, BlinkMacSystemFont, "Segoe UI", Roboto, "Helvetica Neue", Arial, "Apple Color Emoji", "Segoe UI Emoji", "Segoe UI Symbol", sans-serif" style="background-color: white; color: #333d42; font-size: 14px; white-space: normal;">If the client is running MDE it will have processes like sensendr running</span></p><p style="background-color: #fafafa; color: #333d42; font-family: -apple-system, BlinkMacSystemFont, "Segoe UI", Roboto, "Helvetica Neue", Arial, "Apple Color Emoji", "Segoe UI Emoji", "Segoe UI Symbol", sans-serif; font-size: 14px; margin-bottom: 1rem; margin-top: 0px; white-space: normal;">HKEY_LOCAL_MACHINE\SOFTWARE\Microsoft\Windows Advanced Threat Protection\Status</p><p style="background-color: #fafafa; color: #333d42; font-family: -apple-system, BlinkMacSystemFont, "Segoe UI", Roboto, "Helvetica Neue", Arial, "Apple Color Emoji", "Segoe UI Emoji", "Segoe UI Symbol", sans-serif; font-size: 14px; margin-bottom: 1rem; white-space: normal;"></p><p style="background-color: #fafafa; color: #333d42; font-family: -apple-system, BlinkMacSystemFont, "Segoe UI", Roboto, "Helvetica Neue", Arial, "Apple Color Emoji", "Segoe UI Emoji", "Segoe UI Symbol", sans-serif; font-size: 14px; margin-bottom: 0px; white-space: normal;">+ I guess you could check for mssense.exe</p>4 After uninstalled third party XDR software, MDE will become active mode.
High Level Deployment Steps for Servers
1. MDE standard deployment
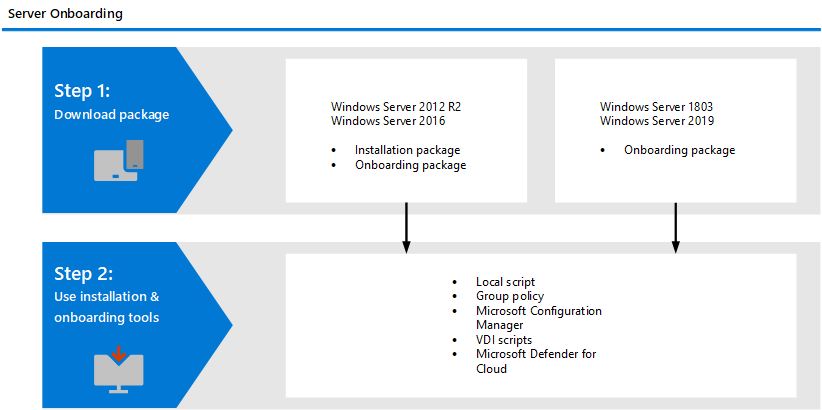
Microsoft article: Onboard Windows servers to the Microsoft Defender for Endpoint service
You need to complete the following general steps to successfully onboard servers.
Applies to:
- Microsoft Defender for Endpoint Server
- Microsoft Defender for Servers
Check the workflow in next section.
2. Connect your non-azure machines to Microsoft Defender for Cloud with Defender for Endpoint
1. Connect AWS / GCP machines
2. Connect on-premises machines
3. Enable Defender for servers (Tenant level or Powershell script for assigned resources)
4. Take advantage of free data ingestion
5. Prepare for OS assessment (Defender for server plan 2)
6. Set up File Integrity monitoring (Defender for server plan 2)
This tenant-level setting allows you to automatically and natively onboard any non-Azure server running Defender for Endpoint to Defender for Cloud, without any extra agent deployments. This onboarding path is ideal for customers with mixed and hybrid server estate who wish to consolidate server protection under Defender for Servers.
Enabling direct onboarding is an opt-in setting at the tenant level. It affects both existing and new servers onboarded to Defender for Endpoint in the same Microsoft Entra tenant. Shortly after you enable this setting, your server devices will show under the designated subscription.
- Go to Defender for Cloud > Environment Settings > Direct onboarding.
- Switch the Direct onboarding toggle to On.
- Select the subscription you would like to use for servers onboarded directly with Defender for Endpoint.
- Select Save.
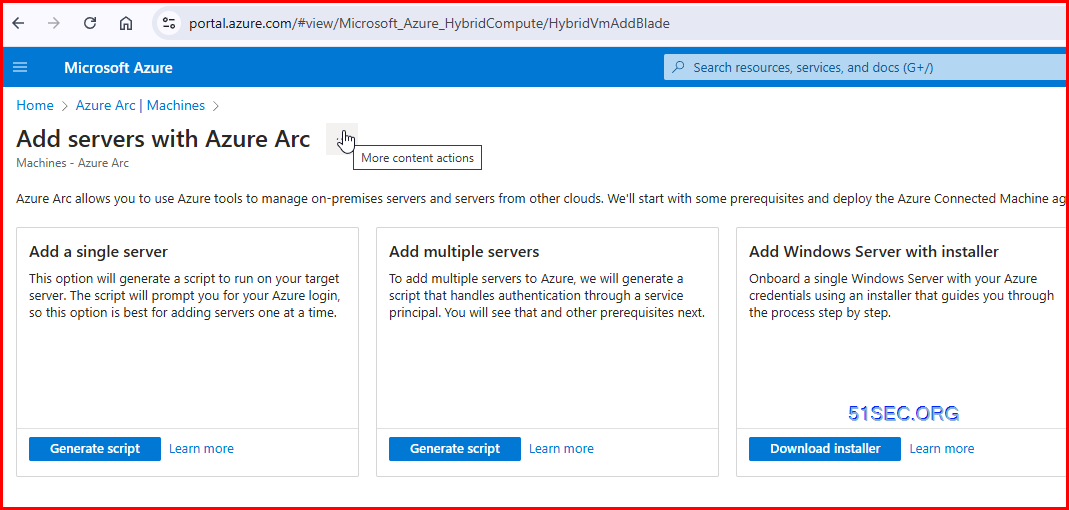
Connect your non-azure machines to Microsoft defender for cloud
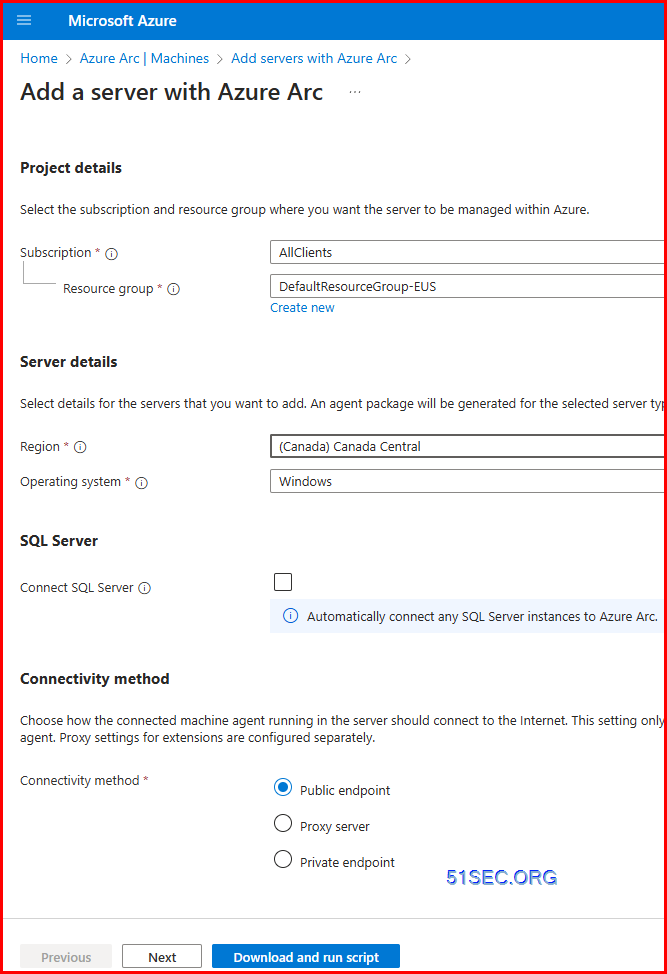
- Connect on-premises machines by using Azure Arc
- Connect on-premises machines by using the Azure portal
- Microsoft Defender for Endpoint integration or agentless scanning
Pre-requirements
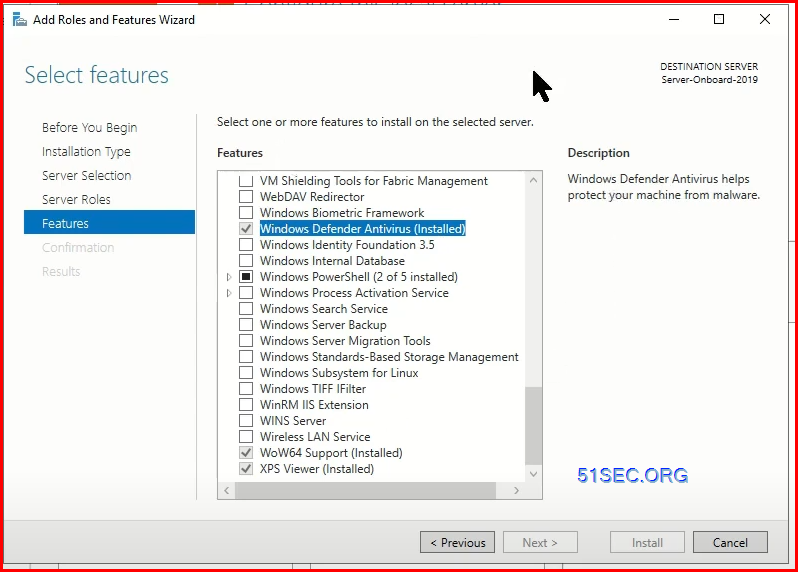
- Servers will not be onboarded if the windows defender AV component is not installed on the machine
- Defender AV is not disabled by GPO
- Make sure your server is having latest security updates
- Required URLs are whitelisted – https://download.microsoft.com/download/6/b/f/6bfff670-47c3-4e45-b01b-64a2610eaefa/mde-urls-commercial.xlsx
To simplify server mgmt, use Azure Update Management Center. watch this playlist: https://www.youtube.com/playlist?list=PLboJ9yx0c_SUn_pQQrKfFUmk5mA0kC9MV
You might also want to configurare Azure Log Analytics and Antomation Account for Azure Arc and Update Management Center:
1 Generate Azure Arc Script
2 Run Special PowerShell Script to Enable MDE
Running Powershell script to enable defender for servers
3 Upload ResourceLevelPricingAtScale.ps1 into your cloud shell
Make sure use proper resource group or tag to enable MDE.
4 Put MDE in passive mode if you are using a third-party anti-malware solution.
You need to apply the following Microsoft Defender Antivirus passive mode setting. Verify that it was configured correctly: Set the following registry entry:
- Path:
HKLM\SOFTWARE\Policies\Microsoft\Windows Advanced Threat Protection - Name:
ForceDefenderPassiveMode - Type:
REG_DWORD - Value:
1

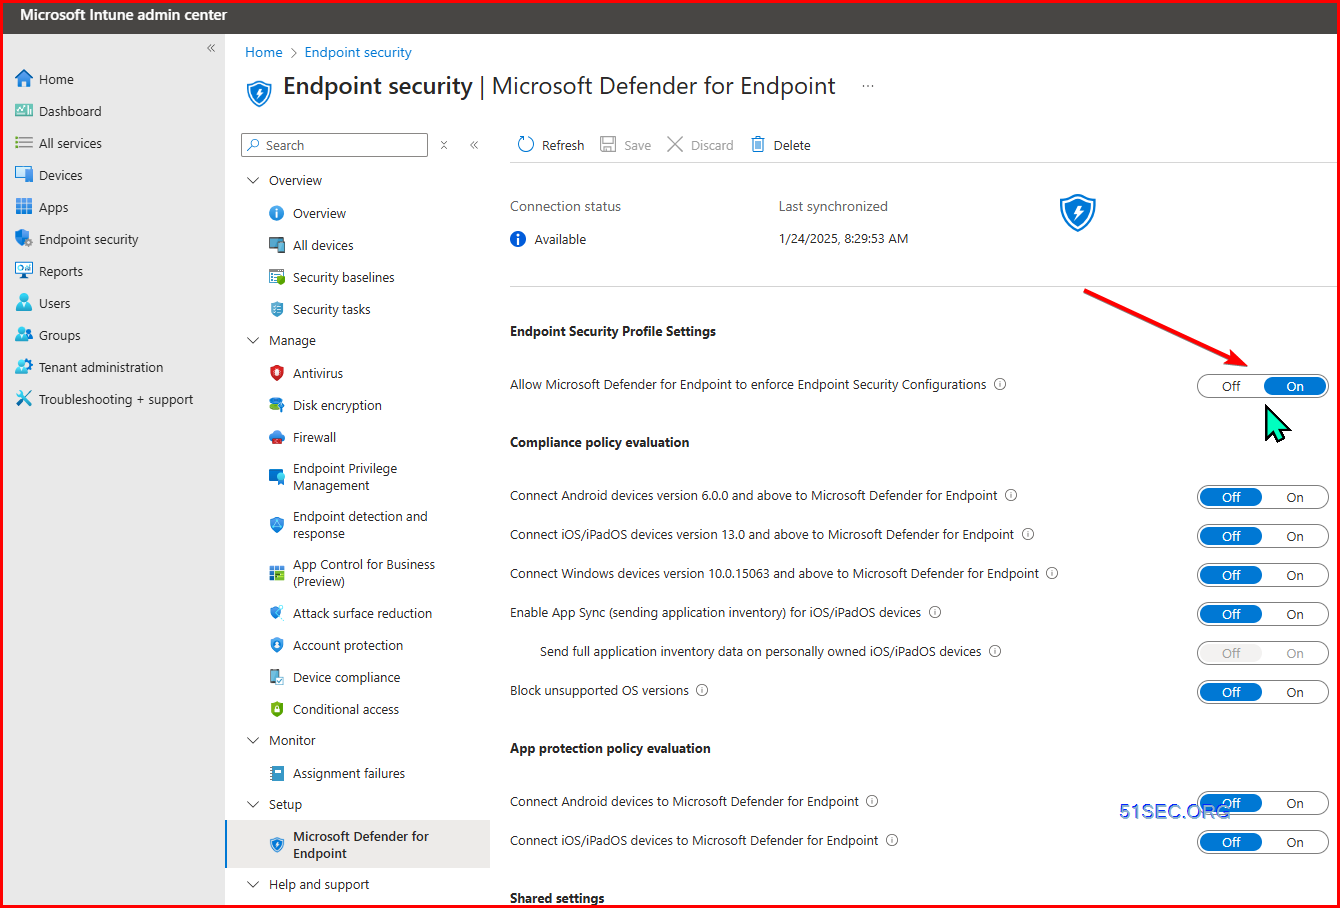
5 Configure Defender Portal connect to Intune
Defender Settings
6 Configure Intune to Connect Windows Devices to Microsoft Defender for Endpoint
Intune – Endpoint Security – Setup – Microsoft Defender for Endpoints
7 Configure Antivirus and Expose Management Policy / Profiles in Intune
Workflow of Onboarding Servers
This workflow is an example using onboarding script. If you are using Arc, it will be different in step 4.
1. Verify AV service installed and running on the machines
- sc query windefend
- sc qc windefend
- hostname
2. Check the registries before onboarding
3. Check the event logs in the sense related folders
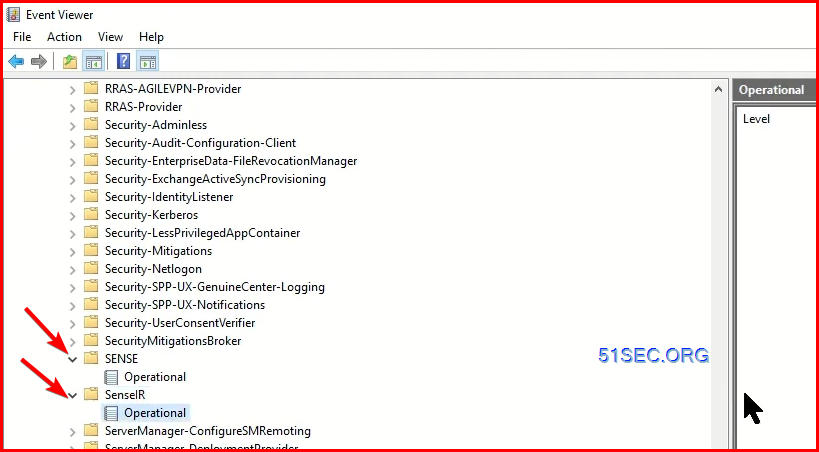
- sc qc sense
- sc query sense
the service is not running and no logs are in sense related folders
4. Run onboarding script
5. verify sense service is running
Offboard Windows Servers
You can offboard Windows Server 2012 R2, Windows Server 2016, Windows Server (SAC), Windows Server 2019, Windows Server 2019 Core edition, Windows Server 2022, and Windows Server 2025 (beginning in February 2025 and rolling out over the next several weeks) using the same method available for Windows 10 client devices.
- Offboard devices using Group Policy
- Offboard devices using Configuration Manager
- Offboard devices using Mobile Device Management tools
- Offboard devices using a local script
After offboarding, you can proceed to uninstall the unified solution package on Windows Server 2016 and Windows Server 2012 R2.
For other Windows server versions, you have two options to offboard Windows servers from the service:
- Uninstall the MMA agent
- Remove the Defender for Endpoint workspace configuration
Offboarding devices is a potential solution. This sounds interesting at first, but it won’t work in our case.
Two different ways exist to offboard devices:
- Locally, by running an offboarding script on a device (supported for macOS, Linux, and Windows (Server)).
- Through the offboarding API (supported for Windows 10 and Windows Server 2019).
It is important to understand that offboarding a device does not remove a device from the inventory. Instead, the device switches to an ‘inactive’ state 7 days after offboarding. This means that offboarding is not an efficient way to manage reimaged/repurposed devices.
The main goal of offboarding is to sever the connection between Microsoft Defender and the device. This is useful in several scenarios, including:
- A device encounters compatibility issues because the scanning process impacts performance and the standard operation of the server or legitimate processes are being blocked
- You are moving away from Microsoft Defender to a different EDR solution.
- The device is no longer in scope.
The last scenario is something I regularly encounter with customers: by accident, the customer onboarded personal devices into Microsoft Defender for Endpoint due to a misconfiguration. By using the offboarding API, I could block the device from sending data to Microsoft 365 Defender by moving it out of scope for the company. So offboarding devices do have a use case, but it is not a solution for managing inactive devices
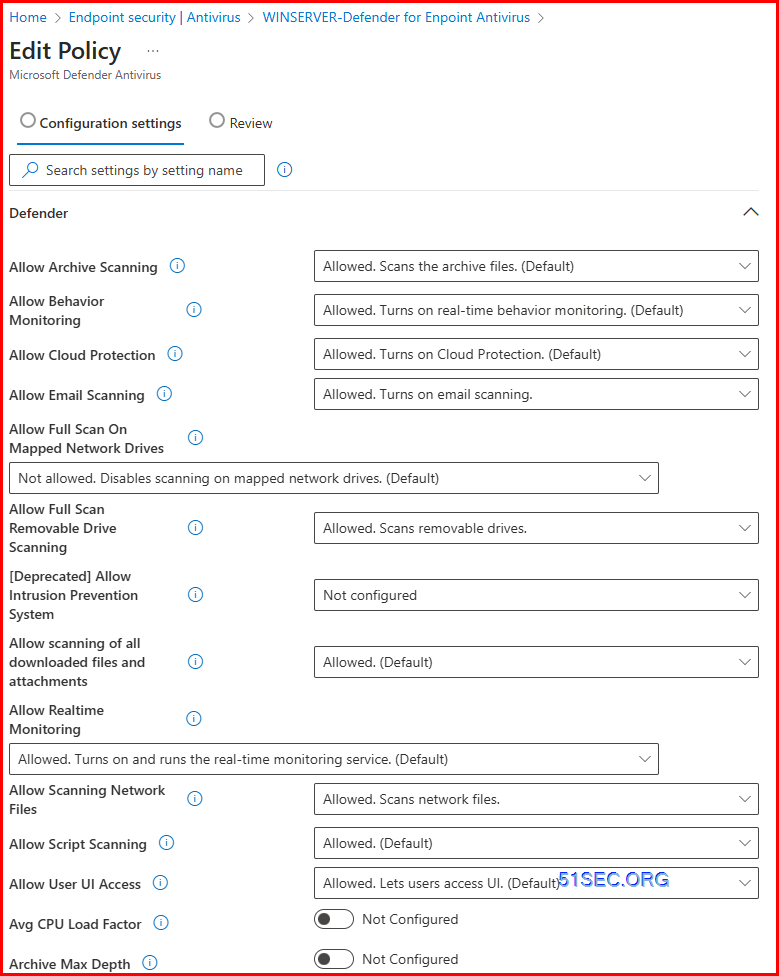
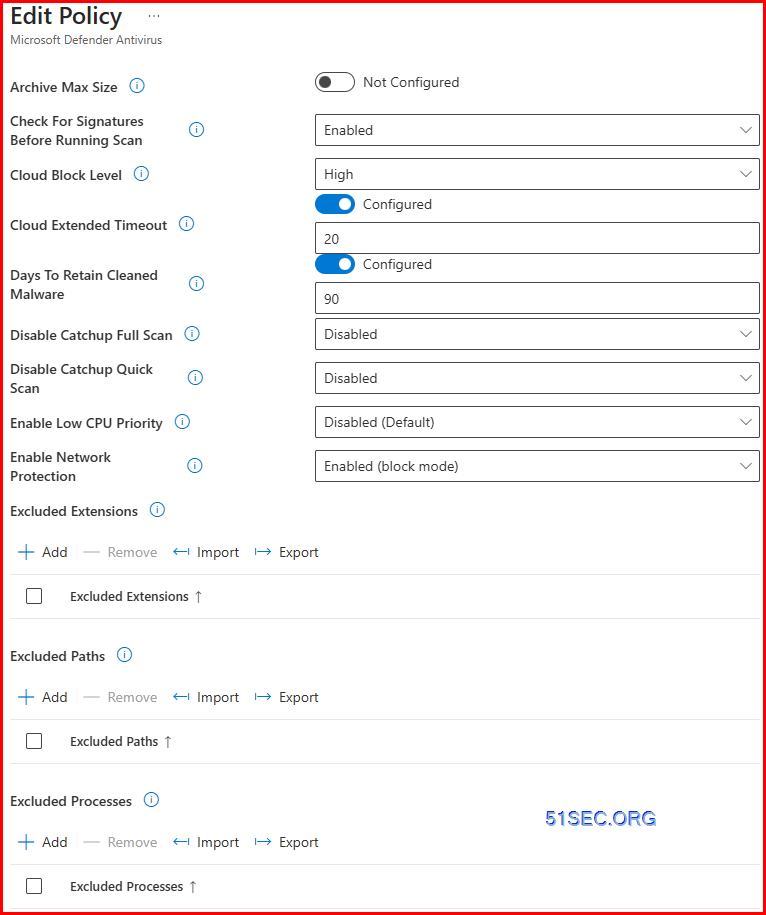
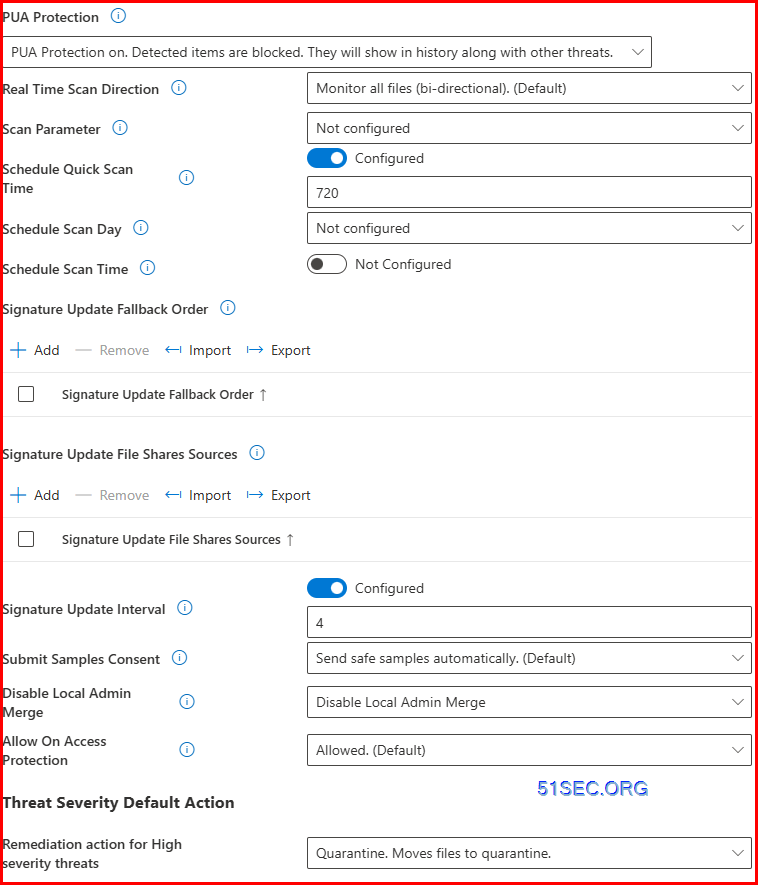
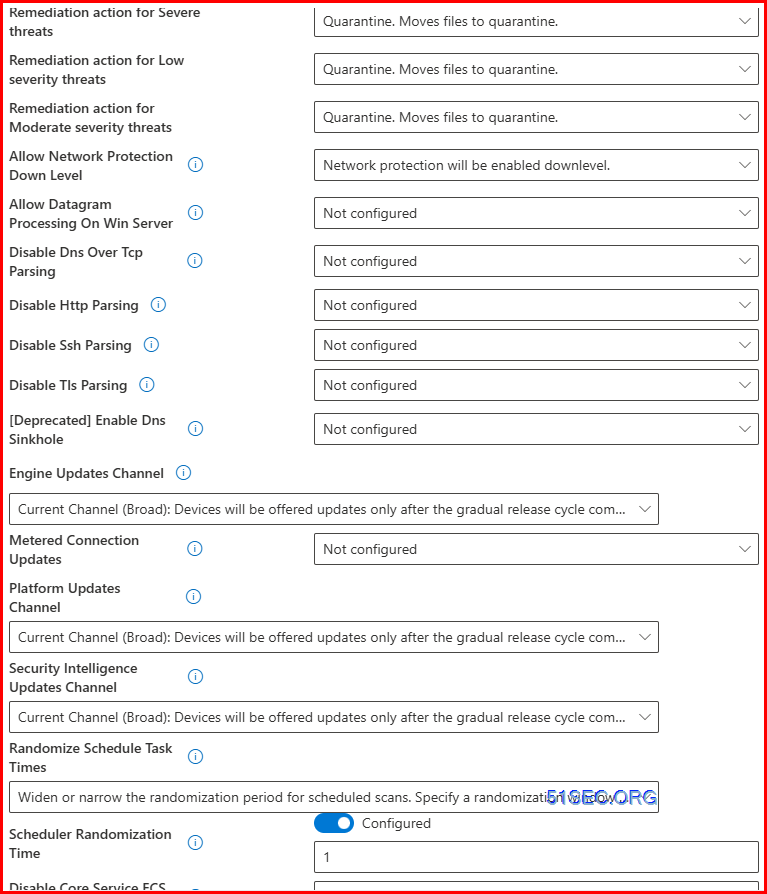
Security Policies for Windows Workstation
Intune – Endpoint Security – Manage – AntiVirus
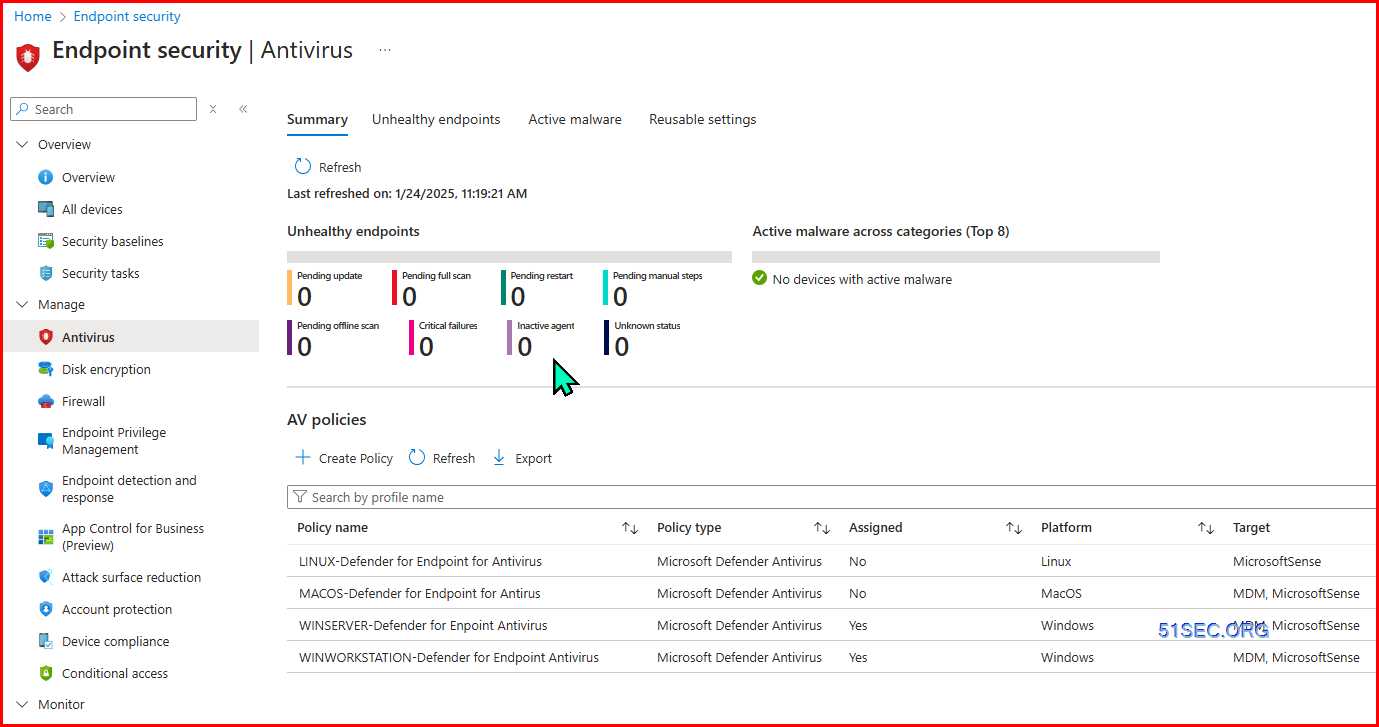
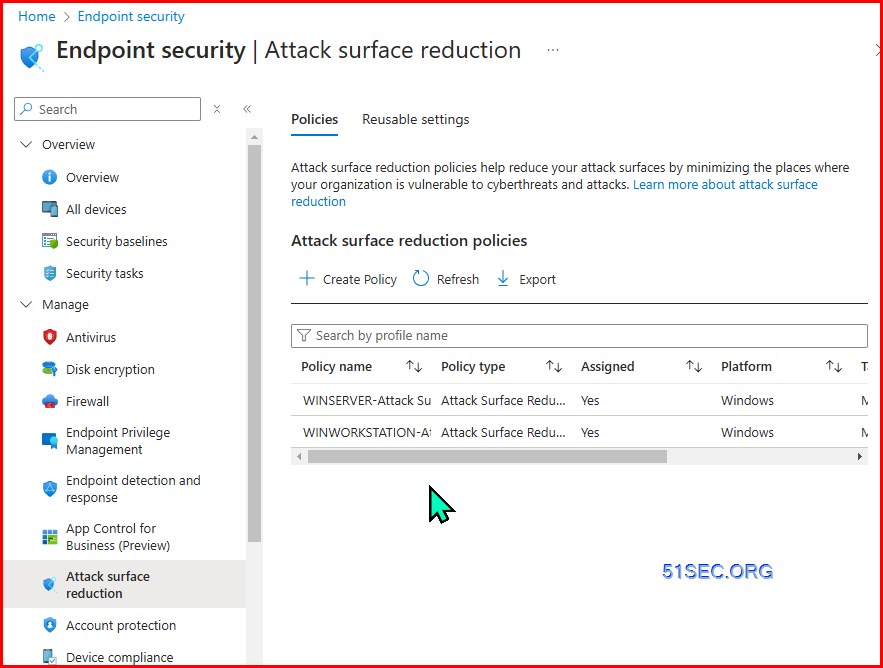
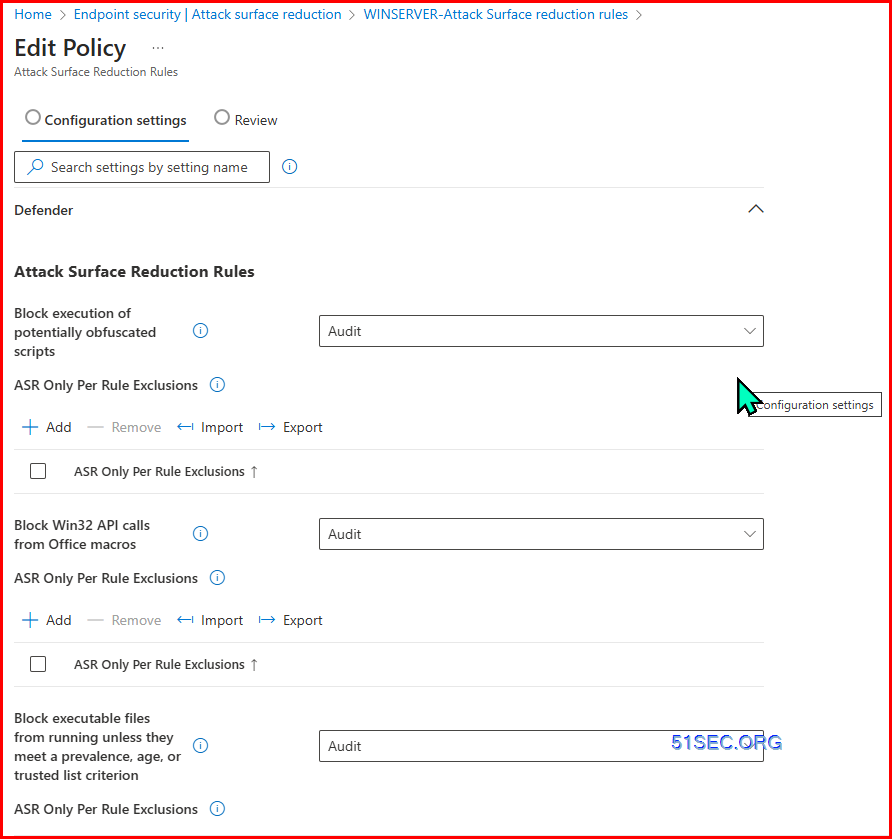
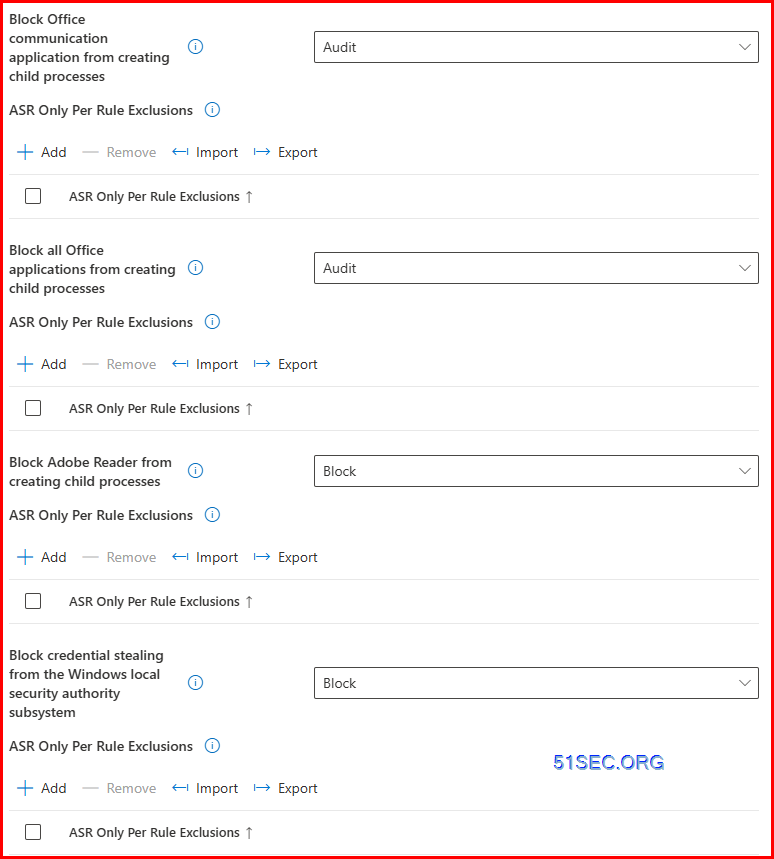
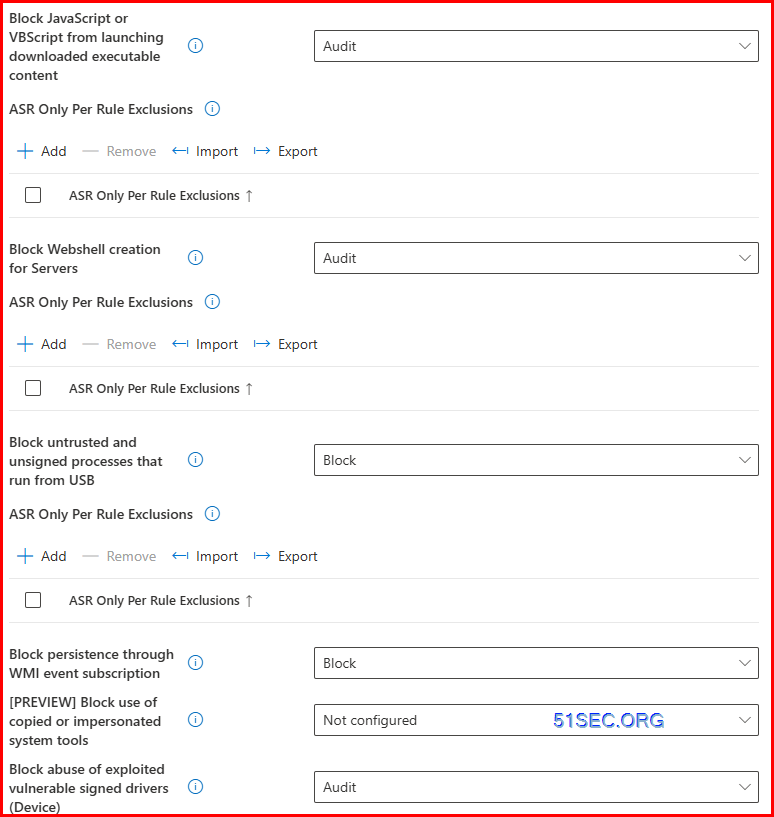
Security Policies for Windows Servers
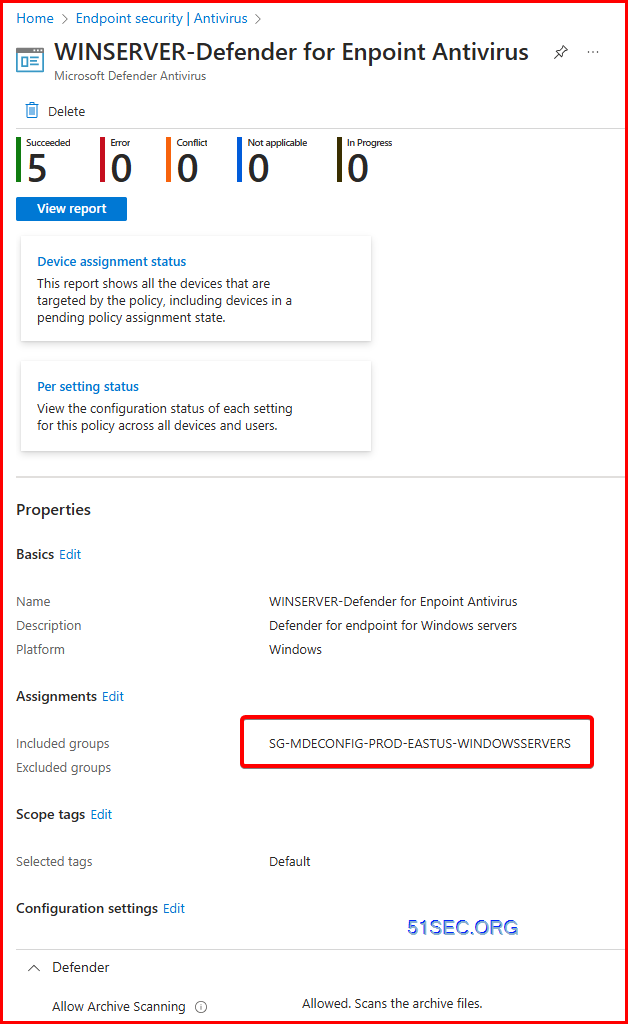
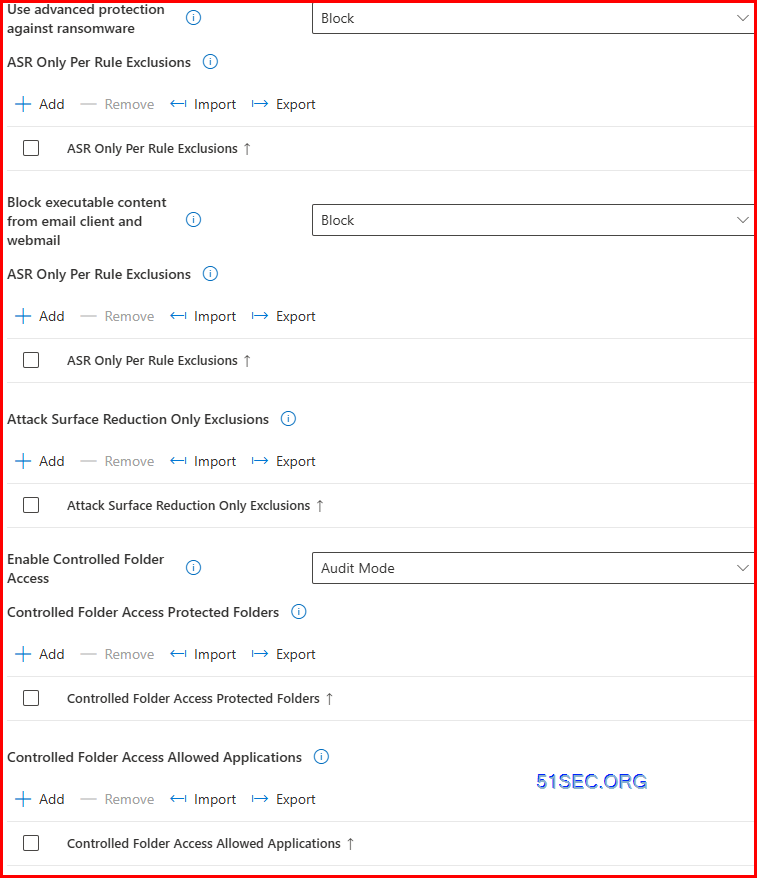
Configuration Setttings:
Intune – Endpoint Security – Manage – Attack surface reduction

Security Policies for Mac
Security Policies for Linux
- Linux servers onboarded through Microsoft Defender for Cloud have their initial configuration set to run Defender Antivirus in passive mode.
Microsoft Defender for Endpoint client analyzer
- The latest stable edition is available for download from following URL: https://aka.ms/MDEAnalyzer
- The latest preview edition is available for download from following URL: https://aka.ms/MDEClientAnalyzerPreview
- The latest stable edition will be integrated into the MDE for Endpoint agent. Ensure that you are running the latest edition for either macOS or Linux.
- The latest preview edition is available for direct download from following URL: https://aka.ms/XMDEClientAnalyzer
MDE VDI Deployments
Onboard non-persistent virtual desktop infrastructure (VDI) devices in Microsoft Defender XDR
- Open the VDI configuration package file (
WindowsDefenderATPOnboardingPackage.zip) that you downloaded from the service onboarding wizard. You can also get the package from the Microsoft Defender portal.- In the navigation pane, select Settings > Endpoints > Device management > Onboarding.
- Select the operating system.
- In the Deployment method field, select VDI onboarding scripts for non-persistent endpoints.
- Select Download package and save the file.
- Copy the files from the
WindowsDefenderATPOnboardingPackagefolder extracted from the zipped folder into the golden/primary image under the pathC:\WINDOWS\System32\GroupPolicy\Machine\Scripts\Startup. (The folder will be generated by local group policy from next step, if the folder is not presented in the system)- If you’re implementing multiple entries for each device – one for each session, copy
WindowsDefenderATPOnboardingScript.cmd. - If you’re implementing a single entry for each device, copy both
Onboard-NonPersistentMachine.ps1andWindowsDefenderATPOnboardingScript.cmd.
- If you’re implementing multiple entries for each device – one for each session, copy
- Open a Local Group Policy Editor window and navigate to Computer Configuration > Windows Settings > Scripts > Startup. NoteDomain Group Policy may also be used for onboarding non-persistent VDI devices.
- Depending on the method you’d like to implement, follow the appropriate steps:Expand tableMethodStepsSingle entry for each device1. Select the PowerShell Scripts tab, then select Add (Windows Explorer opens directly in the path where you copied the onboarding script earlier).
2. Navigate to onboarding PowerShell scriptOnboard-NonPersistentMachine.ps1. There’s no need to specify the other file, as it’s triggered automatically.Multiple entries for each device1. Select the Scripts tab, then select Add (Windows Explorer opens directly in the path where you copied the onboarding script earlier).
2. Navigate to the onboarding bash scriptWindowsDefenderATPOnboardingScript.cmd. - Test your solution
For VDI Master image, it will not be onboarded into MDE portal. To avoid it to be onboarded, following scrip will check the hostname of machines before run VDI start up script.
<span style="color: #2777ff;"><span style="font-size: 16px;"><b>Write-Host "INFO: Checking hostname against a list of known master images... Please wait..."
# Get the current hostname
$CURRENT_HOSTNAME = (hostname)
# Define the target hostnames
$TARGET_HOSTNAMES = @("example1", "example2", "example3", "example4", "MDLT2")
Write-Host "INFO: Current hostname is $CURRENT_HOSTNAME"
Write-Host "INFO: Target hostnames are $($TARGET_HOSTNAMES -join ', ')"
# Initialize a flag to indicate if a match is found
$MATCH_FOUND = $false
# Check if the current hostname matches any of the target hostnames
foreach ($TARGET_HOSTNAME in $TARGET_HOSTNAMES) {
if ($CURRENT_HOSTNAME -eq $TARGET_HOSTNAME) {
$MATCH_FOUND = $true
Write-Host "INFO: Hostname matches one of the target hostnames"
Write-Host "WARNING: This machine is a master image... Exiting..."
exit
}
}
if (-not $MATCH_FOUND) {
Write-Host "INFO: Hostname does not match any of the target hostnames"
$script = $PSScriptRoot+"\Onboard-NonPersistentMachine.ps1"
& $script
}</b></span></span>
For Windows 2012 R2 and Windows 2016, the onboarding script for VDI master image will be modified with :
@echo off
echo INFO: Checking hostname against a list of known master images… Please wait…
for /f “tokens=*” %%i in (‘hostname’) do set CURRENT_HOSTNAME=%%i
set TARGET_HOSTNAMES=example1 exampl2 example3 exampel4
echo INFO: Current hostname is %CURRENT_HOSTNAME%
echo INFO: Target hostnames are %TARGET_HOSTNAMES%
set MATCH_FOUND=false
for %%h in (%TARGET_HOSTNAMES%) do (
if “%CURRENT_HOSTNAME%”==”%%h” (
set MATCH_FOUND=true
echo INFO: Hostname matches one of the target hostnames¨C158C echo WARNING: This machine is a master image… Exiting…¨C159C exit ¨C160C )¨C161C)
¨C162C
¨C357C¨C358C¨C359C¨C360C¨C361C¨C362C¨C363C¨C364C
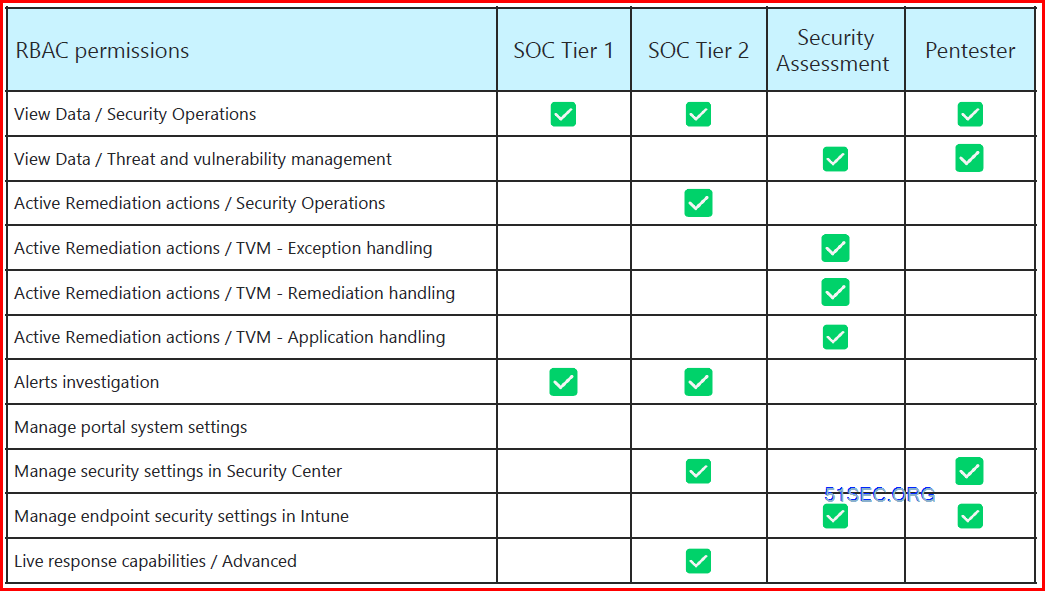
RBAC
4 Steps:
1. Create Azure AD User Groups
2. Configure MDE RBAC
3. Create Device Tags
4. Create Device Groups
Check List Sample:
Device Groups / User Groups
Many users ask when to use user groups and when to use device groups. The answer depends on your goal. Here’s some guidance to get you started.
Device groups
If you want to apply settings on a device, regardless of who’s signed in, then assign your policies to a devices group. Settings applied to device groups always go with the device, not the user.
For example:
- Device groups are useful for managing devices that don’t have a dedicated user. For example, you have devices that print tickets, scan inventory, are shared by shift workers, are assigned to a specific warehouse, and so on. Put these devices in a devices group, and assign your policies to this devices group.
- You create a Device Firmware Configuration Interface (DFCI) Intune profile that updates settings in the BIOS. For example, you configure this policy to disable the device camera, or lock down the boot options to prevent users from booting up another OS. This policy is a good scenario to assign to a devices group.
- On some specific Windows devices, you always want to control some Microsoft Edge settings, regardless of who’s using the device. For example, you want to block all downloads, limit all cookies to the current browsing session, and delete the browsing history. For this scenario, put these specific Windows devices in a devices group. Then, create an Administrative Template in Intune, add these device settings, and then assign this policy to the devices group.
To summarize, use device groups when you don’t care who’s signed in on the device, or if anyone signs in. You want your settings to always be on the device.
User groups
Policy settings applied to user groups always go with the user, and go with the user when signed in to their many devices. It’s normal for users to have many devices, such as a Surface Pro for work, and a personal iOS/iPadOS device. And, it’s normal for a person to access email and other organization resources from these devices.
If a user has multiple devices on the same platform, then you can use filters on the group assignment. For example, a user has a personal iOS/iPadOS device, and an organization-owned iOS/iPadOS. When you assign a policy for that user, you can use filters to target only the organization-owned device.
Follow this general rule: If a feature belongs to a user, such as email or user certificates, then assign to user groups.
For example:
- You want to put a Help Desk icon for all users on all their devices. In this scenario, put these users in a users group, and assign your Help Desk icon policy to this users group.
- A user receives a new organization-owned device. The user signs in to the device with their domain account. The device is automatically registered in Microsoft Entra ID, and automatically managed by Intune. This policy is a good scenario to assign to a users group.
- Whenever a user signs in to a device, you want to control features in apps, such as OneDrive or Office. In this scenario, assign your OneDrive or Office policy settings to a users group.For example, you want to block untrusted ActiveX controls in your Office apps. You can create an Administrative Template in Intune, configure this setting, and then assign this policy to a users group.
To summarize, use user groups when you want your settings and rules to always go with the user, whatever device they use.
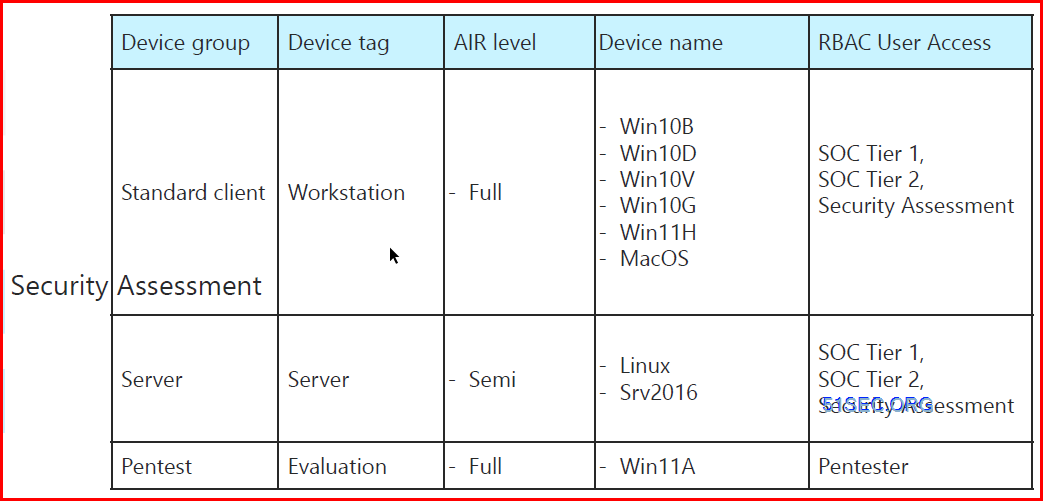
Sample Device Groups:

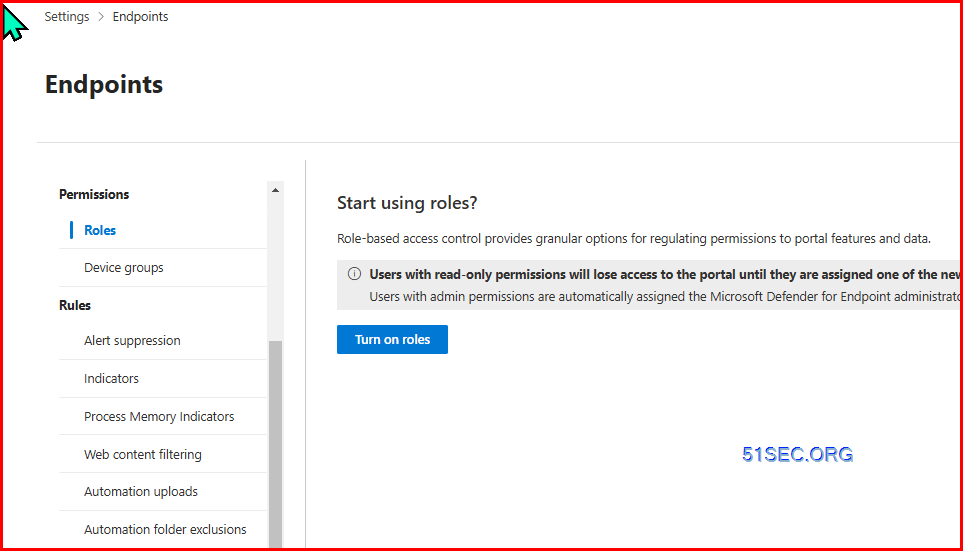
Create Custom Role:
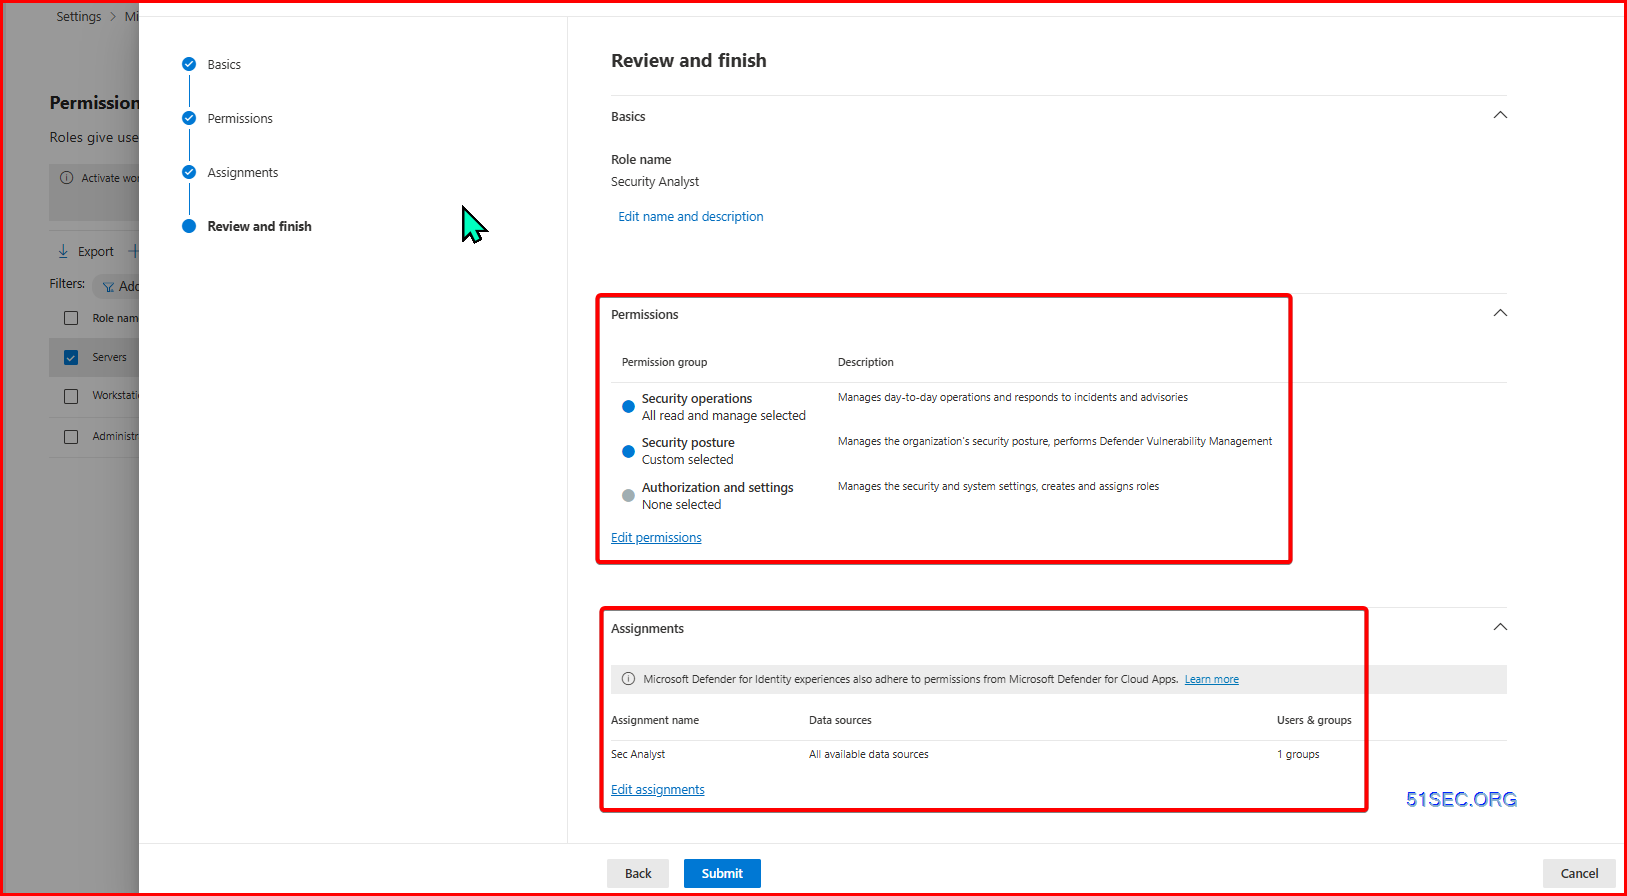
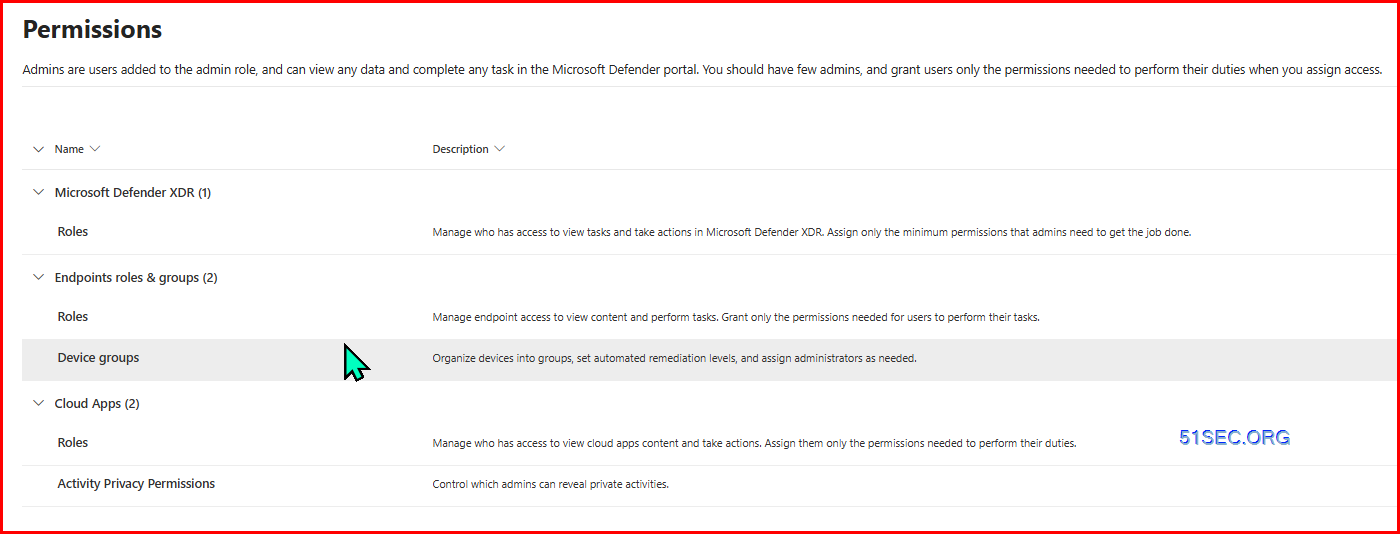
Permissions:
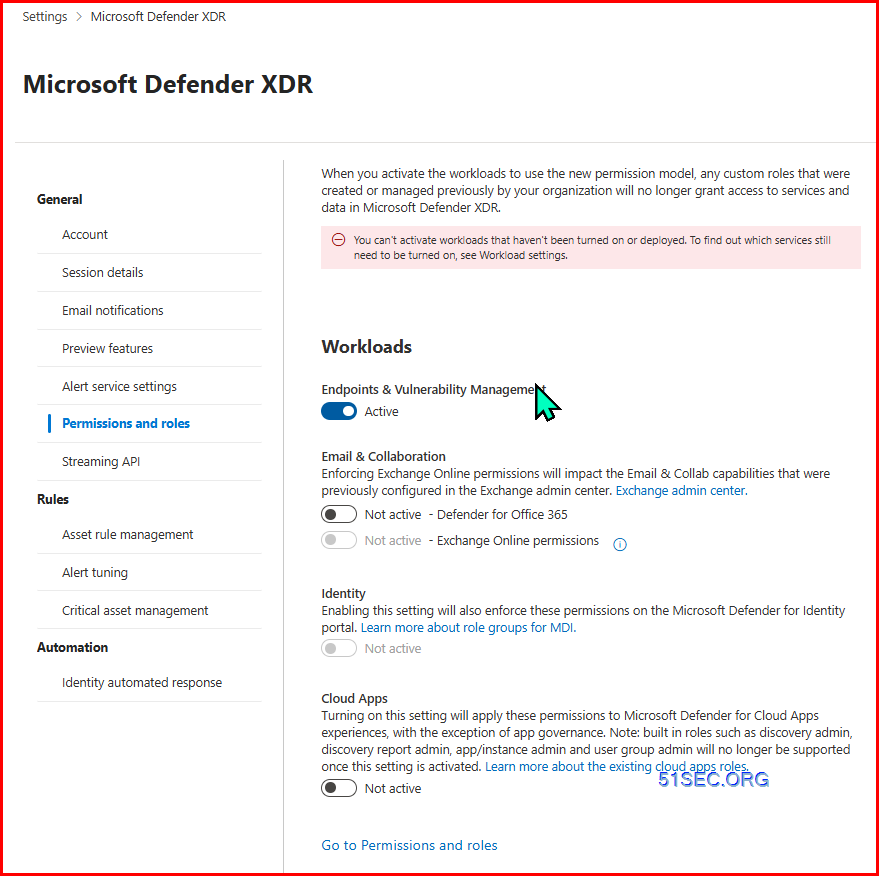
Roles for Endpoints, Defender XDR, and Cloud Apps
Tags
Here’s an example of how to add a TAG to devices using the onboarding script:
- Open the onboarding script file in a text editor
- Locate the :SCRIPT_START section
- Add a command to assign a TAG to the device. For instance, if we want to assign a TAG “Workgroup“, we can use the following command:
REG add "HKLM\SOFTWARE\Policies\Microsoft\Windows Advanced Threat Protection\DeviceTagging" /v Group /t REG_SZ /f /d "Workgroup" >NUL 2>&1By incorporating a command to assign TAGs within the onboarding script, we can streamline the process and automatically categorize the devices during onboarding.
Device Group and Device Tag Check List Sample:
Tagging through Group Policy
Tagging through Defender Portal – Settings – XDR – Rules – Asset Rule Mgmt
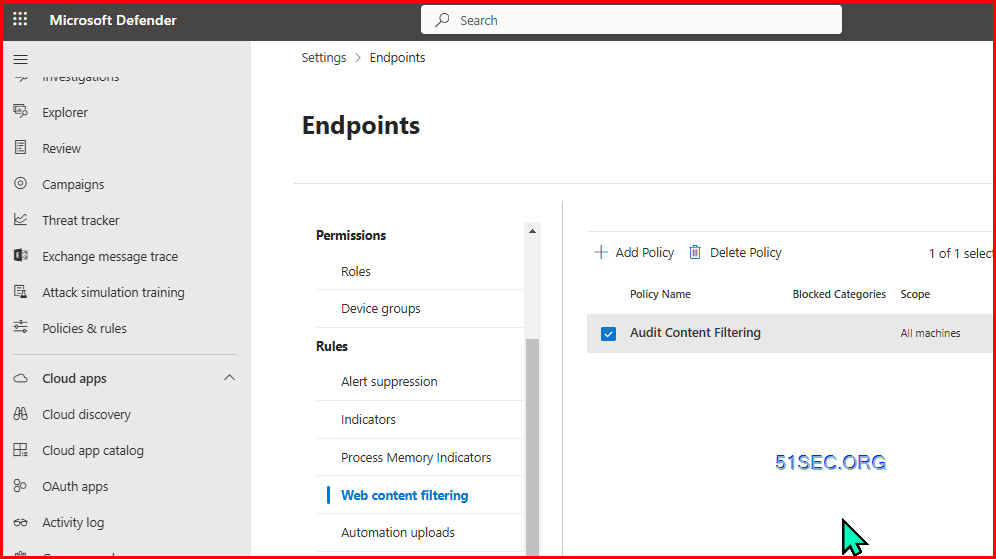
Web Content Filtering
References
- Firewall settings: https://aka.ms/MDE-streamlined-urls
- Enforcement Scope Documentation (This is what we will use to facilitate the configuration of MDE using Intune): Learn about using Intune to manage Microsoft Defender settings on devices that aren’t enrolled with Intune | Microsoft Learn
- Defender for Servers: Select a Defender for Servers plan in Microsoft Defender for Cloud – Microsoft Defender for Cloud | Microsoft Learn
- Generating an onboarding script: Onboard Windows devices using a local script – Microsoft Defender for Endpoint | Microsoft Learn
- Azure Arc: Quickstart – Connect hybrid machine with Azure Arc-enabled servers – Azure Arc | Microsoft Learn