One thing you can use your Cloud VPS to do is to set up downloading site for yourself. My previous posts have showed a way you can create your own downloading site to integrate with your cloud drivers using Aria2, AriaNG, Rclone, FileBrowser, etc.
- Build Cloud Download Site Using One Docker (FileBrowser+Aria2+AriaNg+Rclone+Caddy)
- Use Aria2 docker+ariang to download and Rclone to Mount Google Drive and Sync
There are lots of components to achieve that purpose in those posts, although it is already simplified by using one docker to host all application services. To make it simpler, I found another Github project to achieve this same purpose, but the process is much simpler. Please find out all related steps below and let me know if there is any question.
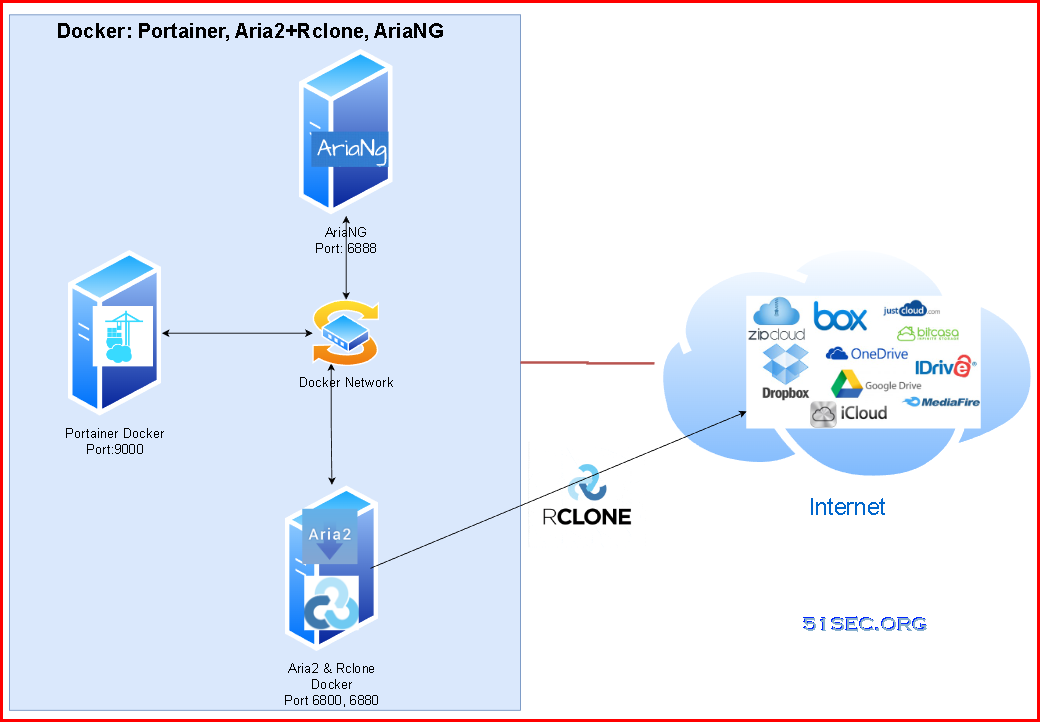
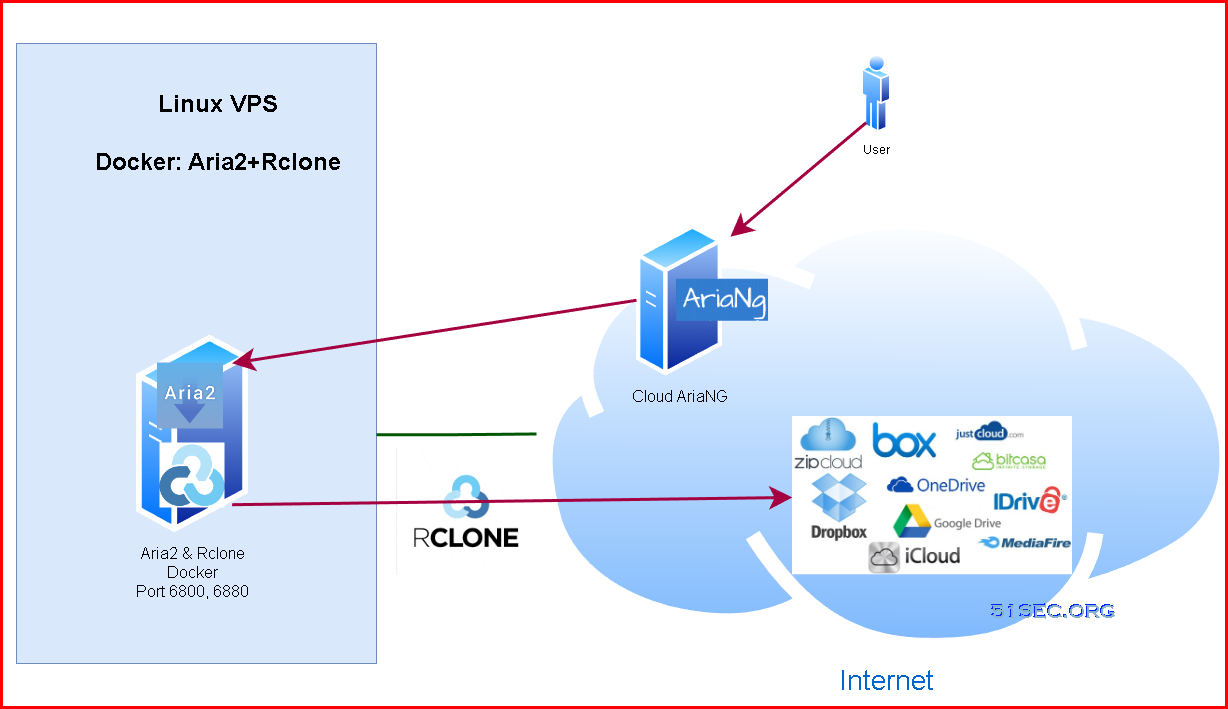
Diagram
Pre-requisites
In this lab, I am using Ubuntu 20.04 VM in Oracle Cloud Free tier as an example. All following commands are based on this Ubuntu 20.04 version Oracle Cloud platform. Please adjust it accordingly if you are using different system or platform.
apt update -y && apt upgrade -y
wget https://raw.githubusercontent.com/51sec/swap/main/swap.sh && bash swap.sh
apt install docker.io -y
apt install docker-compose -y
docker volume create portainer_data

docker run -d -p 9000:9000 --name portainer --restart always -v /var/run/docker.sock:/var/run/docker.sock -v portainer_data:/data portainer/portainer-ce:latest
docker run -d -p 80:80 -p 81:81 -p 443:443 --name npm --restart unless-stopped -v ./letsencrypt:/etc/letsencrypt -v ./data:/data jc21/nginx-proxy-manager:latest
Firewall Ports
It is important for the firewall to open follwoing ports:
- tcp 9000 – Portainer (Optional)
- tcp 80 – NPM (Optional)
- tcp 443 – NPM (Optional)
- tcp 81 – NPM (Optional)
- tcp 6800 – RPC port for AriaNG to connect
- tcp/udp 6888 – BT port
- tcp 6880 – AriaNG port
Create Folder Structure
Deploy Aria2-Pro Docker
Original Author’s Sites:
- GitHub: https://github.com/P3TERX/docker-aria2-pro
- Docker Hub: https://hub.docker.com/r/p3terx/aria2-pro
- Related Post: https://p3terx.com/archives/docker-aria2-pro.html
docker run -d \
    --name aria2-pro \
    --restart unless-stopped \
    --log-opt max-size=1m \
    -e PUID=$UID \
    -e PGID=$GID \
    -e UMASK_SET=022 \
    -e RPC_SECRET=<Token> \
    -e RPC_PORT=6800 \
    -p 6800:6800 \
    -e LISTEN_PORT=6888 \
    -p 6888:6888 \
    -p 6888:6888/udp \
    -v $PWD/aria2-config:/config \
    -v $PWD/aria2-downloads:/downloads \
    -e SPECIAL_MODE=rclone \
    p3terx/aria2-pro
Configure Rclone connecting to your Cloud Drives
docker exec -it aria2-pro rclone config
Croot@ubuntu-docker-1:~# docker exec -it aria2-pro rclone config
Current remotes:
Name Type
==== ====
gd drive
e) Edit existing remote
n) New remote
d) Delete remote
r) Rename remote
c) Copy remote
s) Set configuration password
q) Quit config
e/n/d/r/c/s/q> e
Select remote.
Choose a number from below, or type in an existing value.
1 > gd
remote>
This value is required and it has no default.
remote> 1
Editing existing “gd” remote with options:
– type: drive
– client_id: 84976948510-dd3808r8omub1bum92uan52hdhg6pjsu.apps.googleusercontent.com
– client_secret: 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
– scope: drive
Option client_id.
Google Application Client Id
Setting your own is recommended.
See https://rclone.org/drive/#making-your-own-client-id for how to create your own.
If you leave this blank, it will use an internal key which is low performance.
Enter a string value. Press Enter for the default (84976948510-dd3808r8omub1bum92uan52hdhg6pjsu.apps.googleusercontent.com).
client_id> 84976948510-dd3808r8omub1bum92uan52hdhg6pjsu.apps.googleusercontent.com
Option client_secret.
OAuth Client Secret.
Leave blank normally.
Enter a string value. Press Enter for the default (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).
client_secret> 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
Option scope.
Scope that rclone should use when requesting access from drive.
Choose a number from below, or type in your own string value.
Press Enter for the default (drive).
1 / Full access all files, excluding Application Data Folder.
\ (drive)
2 / Read-only access to file metadata and file contents.
\ (drive.readonly)
/ Access to files created by rclone only.
3 | These are visible in the drive website.
| File authorization is revoked when the user deauthorizes the app.
\ (drive.file)
/ Allows read and write access to the Application Data folder.
4 | This is not visible in the drive website.
\ (drive.appfolder)
/ Allows read-only access to file metadata but
5 | does not allow any access to read or download file content.
\ (drive.metadata.readonly)
scope> 1
Option service_account_file.
Service Account Credentials JSON file path.
Leave blank normally.
Needed only if you want use SA instead of interactive login.
Leading `~` will be expanded in the file name as will environment variables such as `${RCLONE_CONFIG_DIR}`.
Enter a value. Press Enter to leave empty.
service_account_file>
Edit advanced config?
y) Yes
n) No (default)
y/n>
Use auto config?
* Say Y if not sure
* Say N if you are working on a remote or headless machine
y) Yes (default)
n) No
y/n> n
Option config_token.
For this to work, you will need rclone available on a machine that has
a web browser available.
For more help and alternate methods see: https://rclone.org/remote_setup/
Execute the following on the machine with the web browser (same rclone
version recommended):
rclone authorize “drive” “eyJjbGllbnRfaWQiOiI4NDk3Njk0ODUxMC1kZDM4MDhyOG9tdWIxYnVtOTJ1YW41MmhkaGc2cGpz”
Then paste the result.
Enter a value.
config_token> eyJ0b2tlbiI6IntcImFjY2Vzc190b2tlblwiOlwieWEyOS5hMEFhNHhyWE9Jc2t2V0lSQkQ3NmFIMGpBNEdwN0REMlRBT1pEbVhsRXFINFV5YkRsS1dpeHI0LUhkN1d6WTg3YnVORHZaQ2I0OUo3bV9ibm1DT0JoeXRXSFZoMVBwdExNY1N6elZTVUZoWFNaczFucWNXYTVlSUlZbUF1SkZ5TDJBUkNWLXFCYlZKeTB0N3dEdlF6eG53TXZVYkxuSmFDZ1lLQVRBU0FSSVNGUUVqRHZMOVNodVg5ZFdtSFJ2NU5wYUZiTkxmZGcwMTYzXCIsXCJ0b2tlbl90eXBlXCI6XCJCZWFyZXJcIixcInJlZnJlc2hfdG9rZW5cIjpcIjEvLzA0TDB2V2VQU2xHVDBDZ1lJQVJBQUdBUVNOd0YtTDlJckMwNC1vSWRvZlVaODVwTVBnbnZQWjR3WVdFemZMLXFsamVDV2xmMG9rZnk2bk9aY3FnSUVKbUtUc0htRE4yVlgzejBcIixcImV4cGlyeVwiOlwiMjAyMi0xMC0wMVQxNjowMToxOC41NjI3NDQ1MjcrMDI6MDcIn0ifQ
Configure this as a Shared Drive (Team Drive)?
y) Yes
n) No (default)
y/n> y^H^H^[[D^[[D^[[D
This value must be a single character, one of the following: y, n.
y/n> y
Option config_team_drive.
Shared Drive
Choose a number from below, or type in your own string value.
Press Enter for the default (0AEZdJ516op5fUk9PVA).
1 / Private
\ (0AEZdJ516op5fUk9PVA)
config_team_drive>
Configuration complete.
Options:
– type: drive
– client_id: 84976948510-dd3808r8omub1bum92uan52hdhg6pjsu.apps.googleusercontent.com
– client_secret: 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
– scope: drive
– token: {“access_token”:”ya29.a0Aa4xrXOIskvWIRBD76aH0jA4Gp7DD2TAOZDmXlEqH4UybDlKWixr4-Hd7WzY87buNDvZCb49J7m_bnmCOBhytWHVh1PptLMcSzzVSUFhXSZs1nqcWa5eIIYmAuJFyL2ARCV-qBbVJy0t7wDvQzxnwMvUbLnJaCgYKATASARISFQEjDvL9ShuX9dWmHRv5NpaFbNLfdg0163″,”token_type”:”Bearer”,”refresh_token”:”1//04L0vWePSlGT0CgYIARAAGAQSNwF-L9IrC04-oIdofUZ85pMPgnvPZ4wYWEzfL-qljeCWlf0okfy6nOZcqgIEJmKTsHmDN2VX3z0″,”expiry”:”2022-10-01T16:01:18.562744527+02:00″}
– team_drive: 0AEZdJ516op5fUk9PVA
– root_folder_id:
Keep this “gd” remote?
y) Yes this is OK (default)
e) Edit this remote
d) Delete this remote
y/e/d> y
Current remotes:
Name Type
==== ====
gd drive
e) Edit existing remote
n) New remote
d) Delete remote
r) Rename remote
c) Copy remote
s) Set configuration password
q) Quit config
e/n/d/r/c/s/q>
rclone authorize "drive"
If your browser doesn't open automatically go to the following link: http://127.0.0.1:53682/auth
Log in and authorize rclone for access
Waiting for code...
Got code
Paste the following into your remote machine --->
SECRET_TOKEN
<---End paste
Then back to the aria2 box, paste in the code.
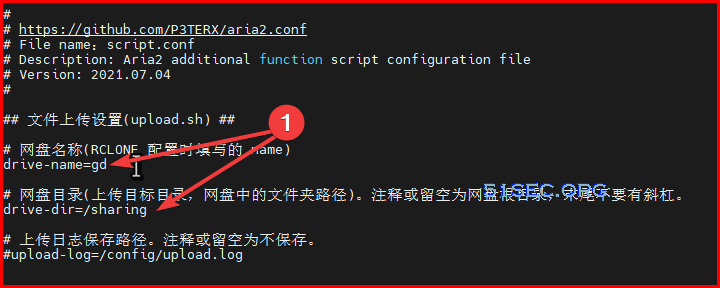
Last step is to change two settings in docker’s /config/script.conf:
- drive-name
- drive-dir
docker exec -it aria2-pro bash
vi /config/script.conf
Deploy AriaNG (Optional)
docker run -d \
    --name ariang \
    --log-opt max-size=1m \
    --restart unless-stopped \
    -p 6880:6880 \
    p3terx/ariang
Maintenance
Reboot:
- docker restart aria2-pro
- docker rm -f aria2-pro
- docker rmi p3terx/aria2-pro
- rm -rf ~/aria2-config
- docker pull p3terx/aria2-pro
- docker run <…>
- Realtime logs:
- docker logs -f –tail 30 aria2-pro
- Export logs
- docker logs aria2-pro > ~/aria2-pro.log
Video
References
- Aria2 Pro – 更好用的 Aria2 Docker 容器镜像
- https://hub.docker.com/r/p3terx/aria2-pro
- https://github.com/P3TERX/Aria2-Pro-Docker
- https://github.com/wahyd4/aria2-ariang-docker/


