Dec 12 2019, Microsoft announced that Azure AD (Azure active directory) authentication to Windows Virtual Machines (VMs) in Azure is now available in public preview—giving you the ability to manage and control who can access a VM.
Thanks to the Azure AD Authentication feature, we can now use Azure AD identities to sign in to Virtual Machine (Linux and Windows). For Windows OS, you can now use Azure AD as a core authentication platform to RDP into a Windows Server 2019 Datacenter edition and later or Windows 10 1809 and later. There are some prerequisites, but it works great and it is a nice feature for your Azure VM.
Using Azure AD to authenticate to VMs provides the ability to centrally control and enforce policies using tools like Azure Role-Based Access Control (RBAC) and Azure AD Conditional Access to allow you to control who can access a VM.
There are many benefits of using Azure AD authentication to login to Windows VMs in Azure, including:
- Utilizing the same federated or managed Azure AD credentials you normally use.
- No longer having to manage local administrator accounts.
- Using Azure RBAC to grant the appropriate access to VMs based on need and remove it when it is no longer needed.
- Requiring AD Conditional Access to enforce additional requirements such as:
- Multi-factor authentication (MFA)
- Sign-in risk
- Automating and scaling Azure AD join for Azure based Windows VMs.
AAD
Using Azure Portal To Enable Azure AD Login When Creating VM
- Sign in to the Azure portal, with an account that has access to create VMs, and select + Create a resource.
- In Search the Marketplace search bar, type Windows Server.
- Click Windows Server and from Select a software plan drop-down, select Windows Server 2019 Datacenter.
- Click Create.
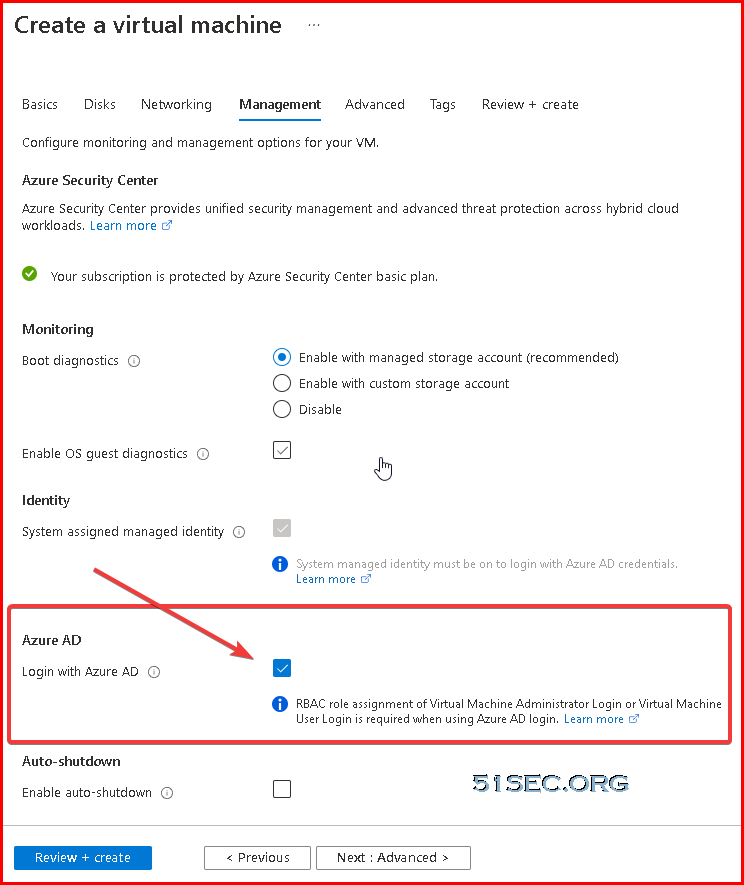
- On the Management tab, under the Azure Active Directory, toggle Login with AAD credentials (Preview) to On.
- Make sure System assigned managed identity under the Identity section is set to On. This action should happen automatically once you enable Login with Azure AD credentials.
Go through the rest of the experience of creating a VM. During this preview, you’ll have to create an administrator username and password for the VM.
Using Azure AD portal To Configure Role Assignment For VM
To configure role assignments for your Azure AD enabled Windows Server 2019 Datacenter or Windows 10 1809 and later VM images:
- Navigate to the specific Virtual Machine overview page.
- Select Access control (IAM) from the menu options
- Select Add, Add role assignment to open the Add role assignment pane.
- In the Role drop-down list, select a role such as Virtual Machine Administrator Login or Virtual Machine User Login.
- In the Select field, select a user, group, service principal, or managed identity. If you don’t see the security principal in the list, you can type in the Select box to search the directory for display names, email addresses, and object identifiers.
- To assign the role, select Save.
After a few moments, the security principal is assigned the role at the selected scope.
Configure Azure VM For AAD Login
Check this doc for more information: Login to Windows virtual machine in Azure using Azure Active Directory authentication
Using the Azure Cloud Shell experience to enable Azure AD login:
PS /home/johnyan_ca> az vm extension set --publisher Microsoft.Azure.ActiveDirectory --name AADLoginForWindows --resource-group test-storage --vm-name vm4adds
{
  "autoUpgradeMinorVersion": true,
  "enableAutomaticUpgrade": null,
  "forceUpdateTag": null,
  "id": "/subscriptions/bcf33549-1d47-45e1-9751-548e2fe15db3/resourceGroups/test-storage/providers/Microsoft.Compute/virtualMachines/vm4adds/extensions/AADLoginForWindows",
  "instanceView": null,
  "location": "eastus",
  "name": "AADLoginForWindows",
  "protectedSettings": null,
  "provisioningState": "Succeeded",
  "publisher": "Microsoft.Azure.ActiveDirectory",
  "resourceGroup": "test-storage",
  "settings": {
    "mdmId": ""
  },
  "suppressFailures": null,
  "tags": null,
  "type": "Microsoft.Compute/virtualMachines/extensions",
  "typeHandlerVersion": "1.0",
  "typePropertiesType": "AADLoginForWindows"
}
PS /home/johnyan_ca>
Now if we look at the output from Azure VM, we can see that the SSO State for AzureADPrt is NO, and the Device State for AzureAdJoined is set to YES.
C:\Users\netsec>dsregcmd /status

+----------------------------------------------------------------------+
| Device State                                                         |
+----------------------------------------------------------------------+

             AzureAdJoined : YES
          EnterpriseJoined : NO
              DomainJoined : NO

+----------------------------------------------------------------------+
| Device Details                                                       |
+----------------------------------------------------------------------+

                  DeviceId : 0fe1ce87-89e4-42ad-aabe-a0858d2e2421
                Thumbprint : 4FB026A152A2C3625DA981F17233703A77FE505D
 DeviceCertificateValidity : [ 2021-11-20 09:55:03.000 UTC -- 2031-11-20 10:25:03.000 UTC ]
            KeyContainerId : 7a61bedc-bb6f-4ed9-bd84-2381a5d7837f
               KeyProvider : Microsoft Software Key Storage Provider
              TpmProtected : NO

+----------------------------------------------------------------------+
| Tenant Details                                                       |
+----------------------------------------------------------------------+

                TenantName :
                  TenantId : 22dbd8e0-9e61-439a-8bd9-fdd502bff1dc
                       Idp : login.windows.net
               AuthCodeUrl : https://login.microsoftonline.com/22dbd8e0-9e61-439a-8bd9-fdd502bff1dc/oauth2/authorize
            AccessTokenUrl : https://login.microsoftonline.com/22dbd8e0-9e61-439a-8bd9-fdd502bff1dc/oauth2/token
                    MdmUrl :
                 MdmTouUrl :
          MdmComplianceUrl :
               SettingsUrl :
            JoinSrvVersion : 1.0
                JoinSrvUrl : https://enterpriseregistration.windows.net/EnrollmentServer/device/
                 JoinSrvId : urn:ms-drs:enterpriseregistration.windows.net
             KeySrvVersion : 1.0
                 KeySrvUrl : https://enterpriseregistration.windows.net/EnrollmentServer/key/
                  KeySrvId : urn:ms-drs:enterpriseregistration.windows.net
        WebAuthNSrvVersion : 1.0
            WebAuthNSrvUrl : https://enterpriseregistration.windows.net/webauthn/22dbd8e0-9e61-439a-8bd9-fdd502bff1dc/
             WebAuthNSrvId : urn:ms-drs:enterpriseregistration.windows.net
    DeviceManagementSrvVer : 1.0
    DeviceManagementSrvUrl : https://enterpriseregistration.windows.net/manage/22dbd8e0-9e61-439a-8bd9-fdd502bff1dc/
     DeviceManagementSrvId : urn:ms-drs:enterpriseregistration.windows.net

+----------------------------------------------------------------------+
| User State                                                           |
+----------------------------------------------------------------------+

                    NgcSet : NO
           WorkplaceJoined : NO
             WamDefaultSet : NO

+----------------------------------------------------------------------+
| SSO State                                                            |
+----------------------------------------------------------------------+

                AzureAdPrt : NO
       AzureAdPrtAuthority :
             EnterprisePrt : NO
    EnterprisePrtAuthority :

+----------------------------------------------------------------------+
| Diagnostic Data                                                      |
+----------------------------------------------------------------------+

         AadRecoveryNeeded : NO
               KeySignTest : PASSED

+----------------------------------------------------------------------+
| Ngc Prerequisite Check                                               |
+----------------------------------------------------------------------+

            IsDeviceJoined : YES
             IsUserAzureAD : NO
             PolicyEnabled : NO
          PostLogonEnabled : YES
            DeviceEligible : YES
        SessionIsNotRemote : NO
            CertEnrollment : none
              PreReqResult : WillNotProvision


C:\Users\netsec>
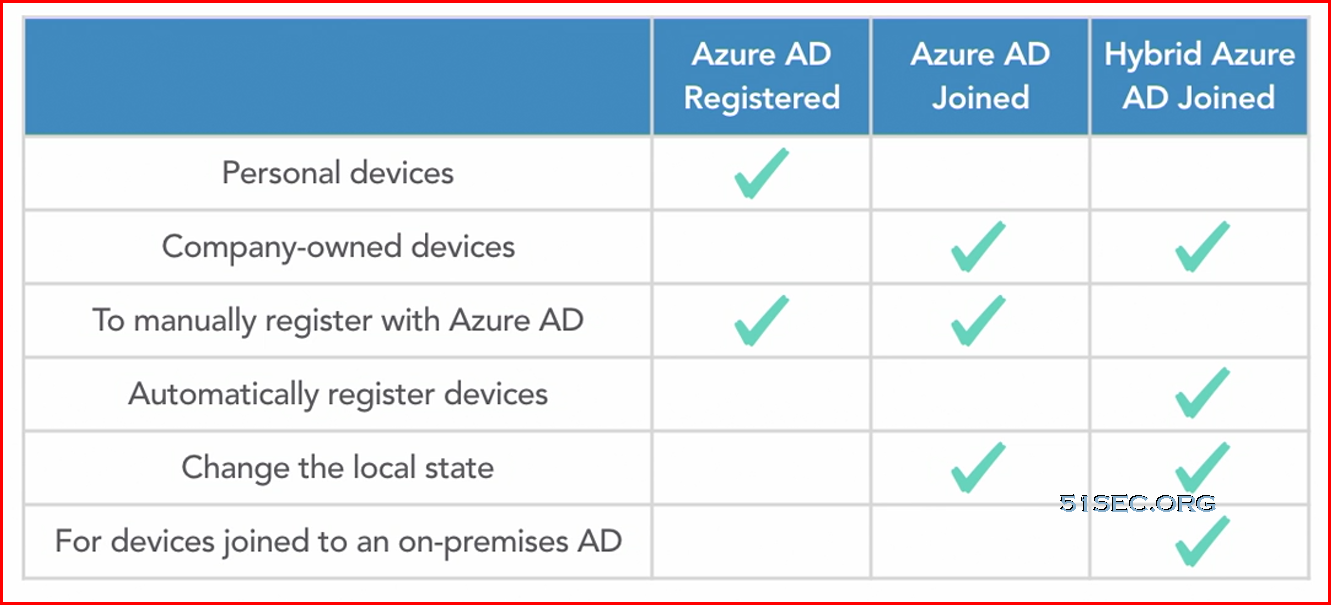
In this case, if you would need to remote log into this Azure VM using AAD login, you will need to verify that the Windows 10 PC you are using to initiate the remote desktop connection is one that is either Azure AD joined, or hybrid Azure AD joined to the same Azure AD directory where your VM is joined to.
Join Windows 10 Machine into AAD
Check this post for this step: Setup Hybrid Azure Active Directory Login For Your Client Machines
Here are some basic steps:
- Open Settings, go to Accounts and Access work or school and press Connect.
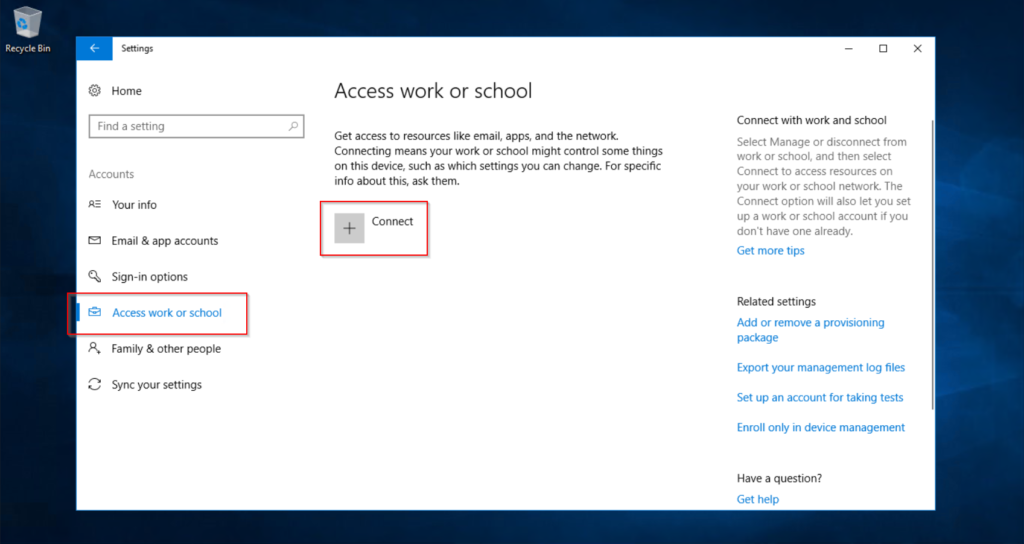
- Press Join this device to Azure Active Directory.
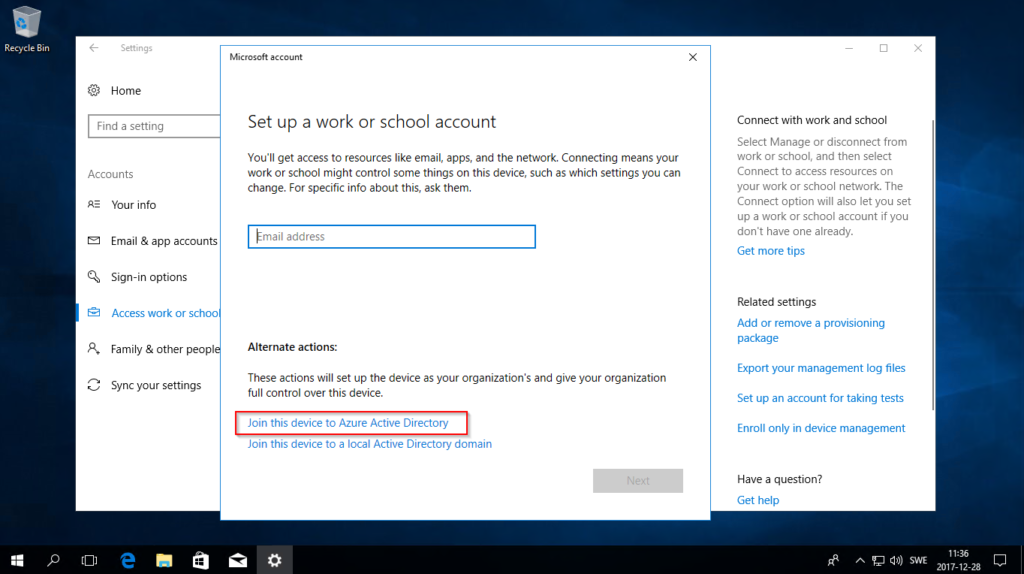
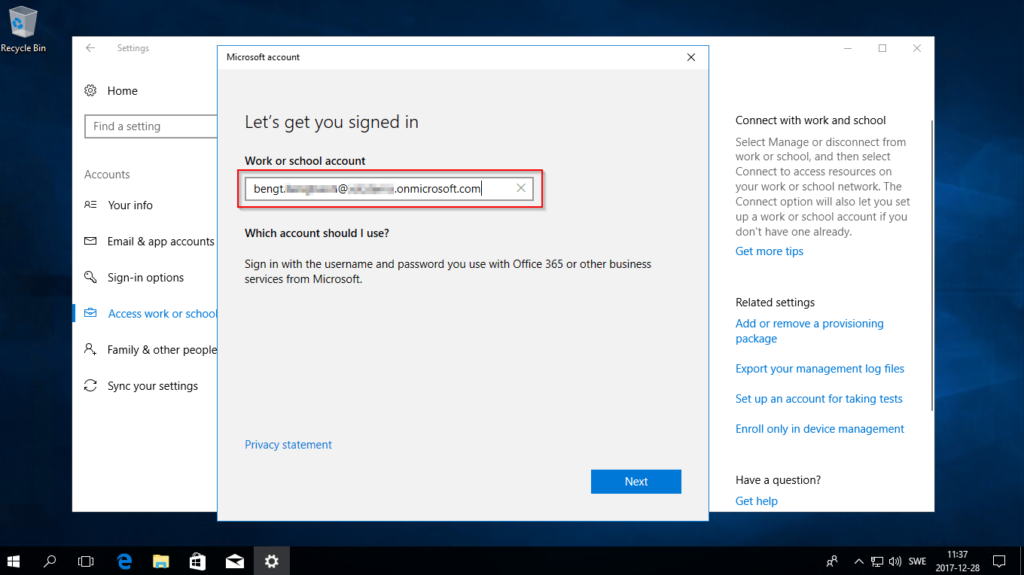
- Enter your mail address and press Next, on next screen you have to enter your password.
- Once you are done with the wizard you should restart your computer. It should now work to logon with your company credentials.
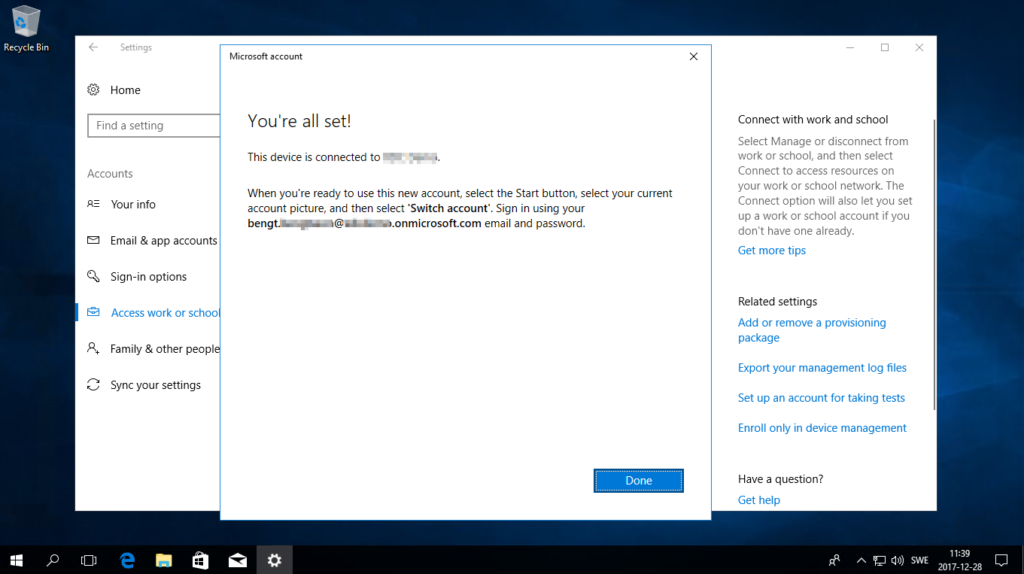
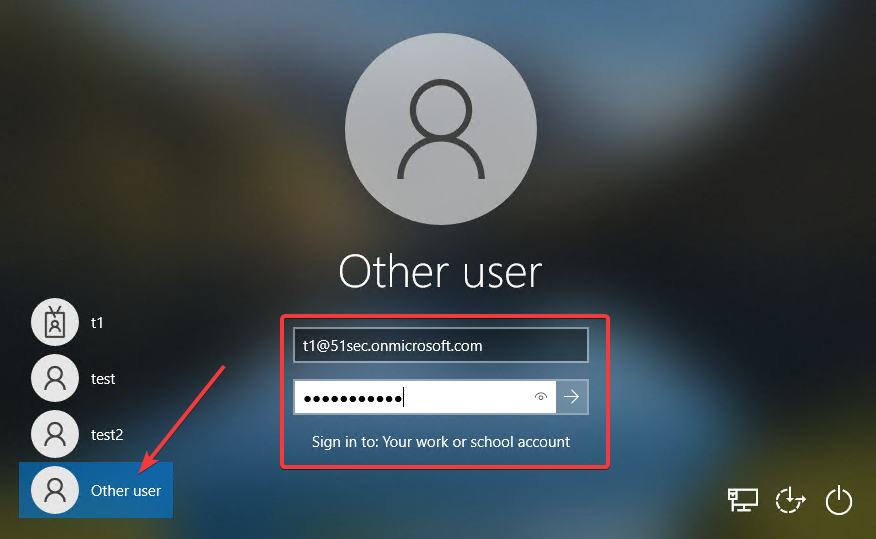
Switch User option will show up in the start – account menu:
After clicked Swtich user option, you will be able to enter your work or school account to log into your computer, which is AAD account login.
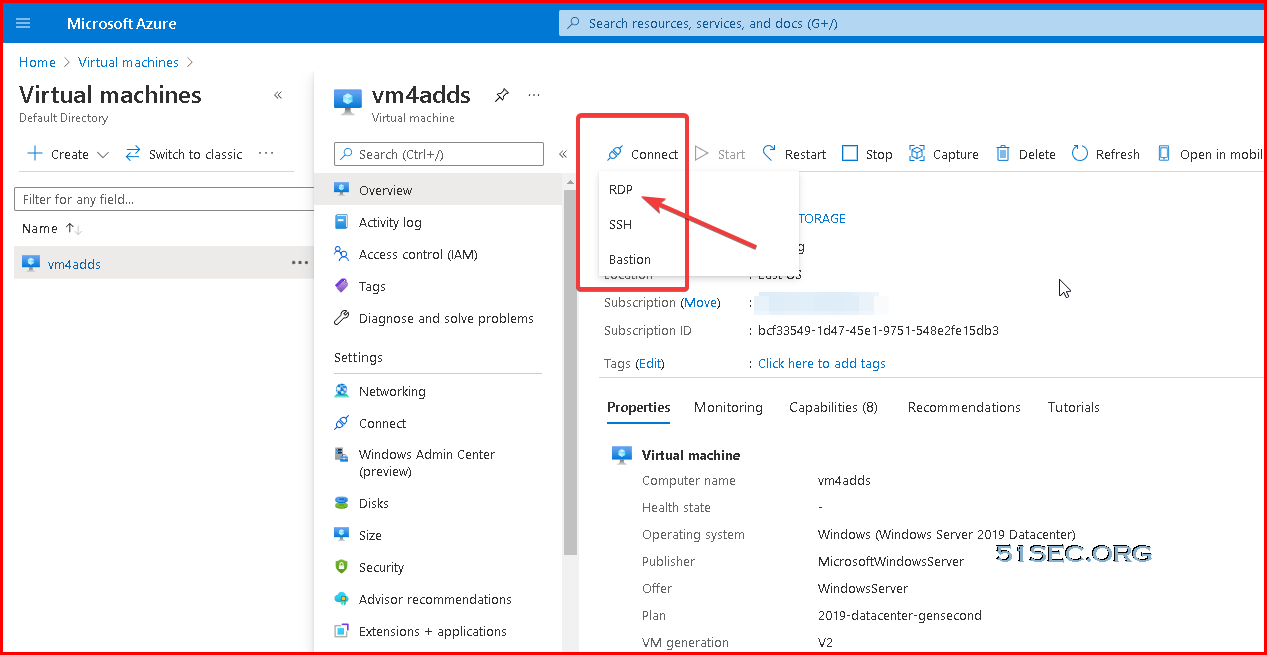
Download RDP file from Azure VM’s Connect button and RDP in
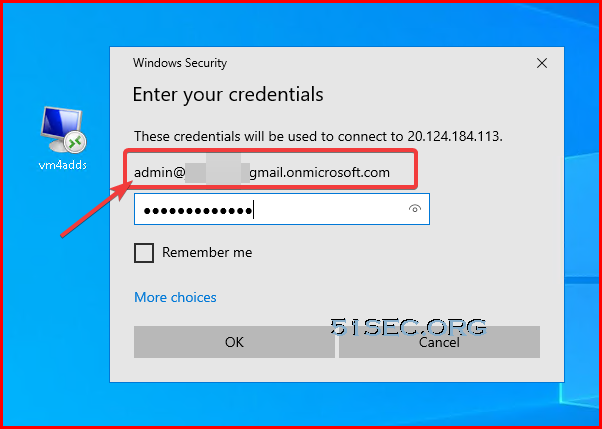
In following screenshot example, I am RDP from a on-prem Win10 (AAD joined) machine to an Azure VM (AAD joined)
Set Up Share Permission and NTFS on Azure VM’s Share Folder
Here are the key differences between NTFS and share permissions that you need to know:
- Share permissions are easy to apply and manage, but NTFS permissions enable more granular control of a shared folder and its contents.
- When share and NTFS permissions are used simultaneously, the most restrictive permission always wins. For example, when the shared folder permission is set to “Everyone Read Allow” and the NTFS permission is set to “Everyone Modify Allow”, the share permission applies because it is most restrictive; the user is not allowed to change the files on the shared drive.
- Share permissions can be used when sharing folders in FAT and FAT32 file systems; NTFS permissions can’t.
- NTFS permissions apply to users who are logged on to the server locally; share permissions don’t.
- Unlike NTFS permissions, share permissions allow you to restrict the number of concurrent connections to a shared folder.
- Share permissions are configured in the “Advanced Sharing” properties in the “Permissions” settings. NTFS permissions are configured on the Security tab in the file or folder properties.
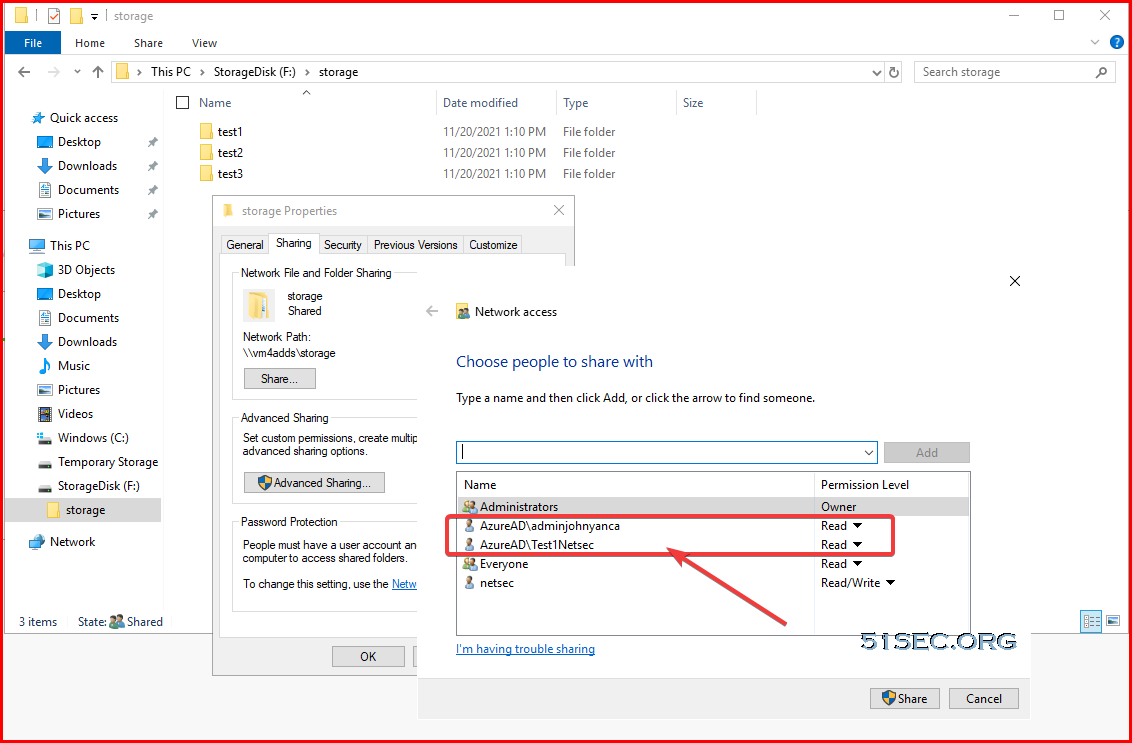
Some Key Points to assign AAD user(s) to Azure VM’s share folder(s):
1. AAD’s group will not be able to added in, only user(s)
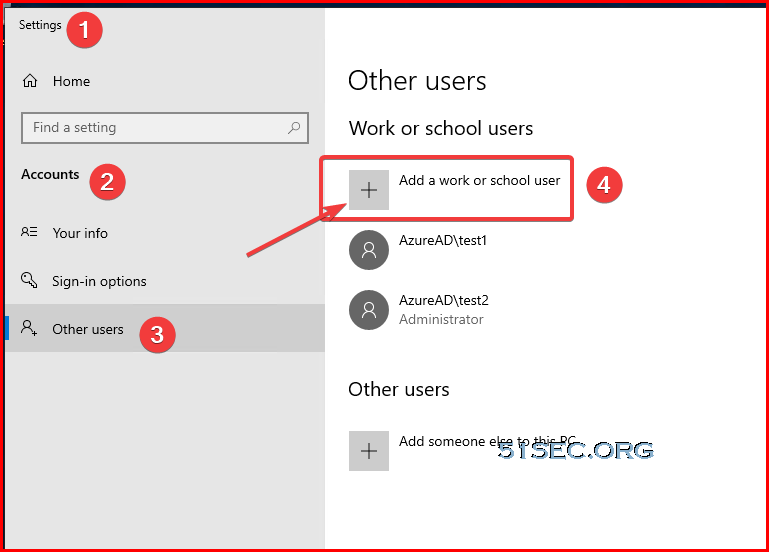
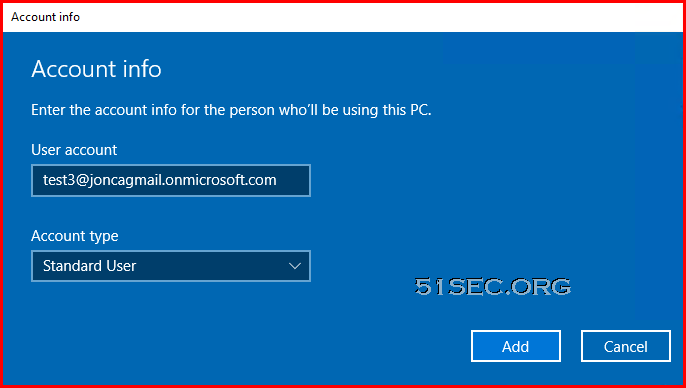
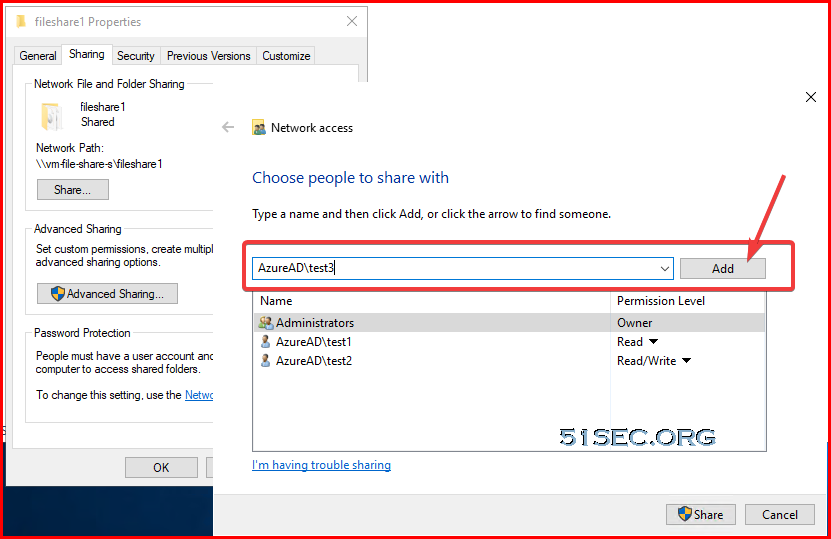
You can add multiple AzureAD users here. You will have to enter their email addresses to add them in.
2. To add AAD user into share folder’s permission, the user has to be added into either “Virtual Machine Administrator Login” or “Virtual Machine User Login”
After above steps done, once you create a new share, you should be able to see them. If not, just add it in using this format “AzureAD\test3”
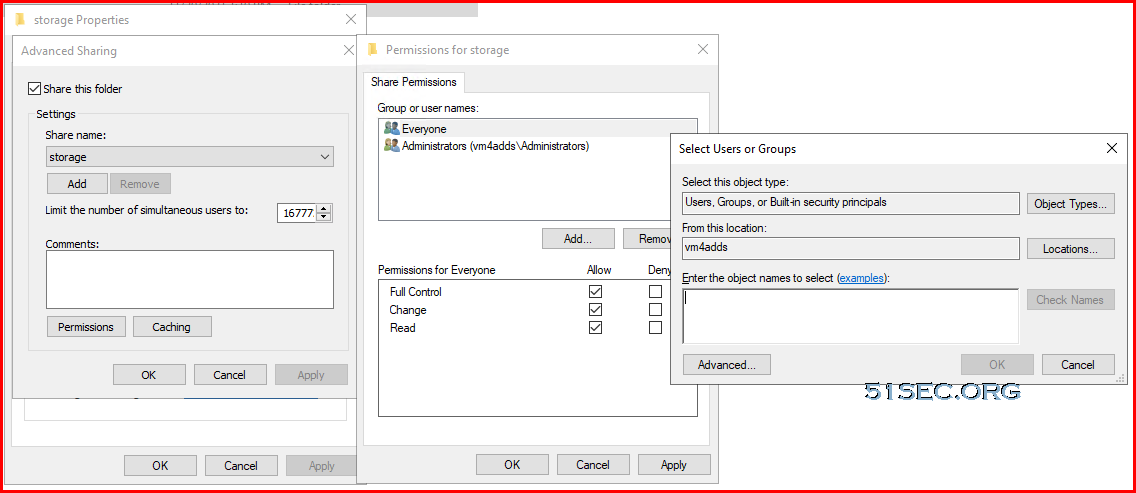
3. Advanced Sharing is not able to add ADD users or groups. Only local VM’s users and groups can be added
Configure Windows ACLs
Once your file share has been mounted with the storage account key, you must configure the Windows ACLs (also known as NTFS permissions). You can configure the Windows ACLs using either Windows File Explorer or icacls.
If you have directories or files in on-premises file servers with Windows DACLs configured against the AD DS identities, you can copy it over to Azure Files persisting the ACLs with traditional file copy tools like Robocopy or Azure AzCopy v 10.4+. If your directories and files are tiered to Azure Files through Azure File Sync, your ACLs are carried over and persisted in their native format.
Troubleshooting
Unauthorized client
If you see the following error message when you initiate a remote desktop connection to your VM:
- Your credentials did not work.
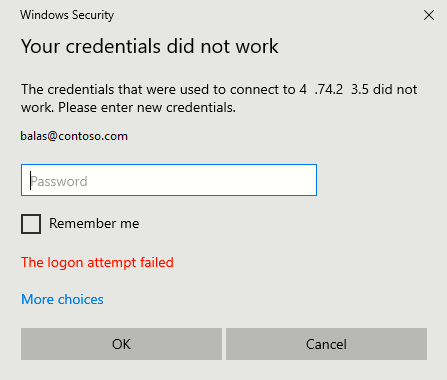
Verify that the Windows 10 PC you are using to initiate the remote desktop connection is one that is either Azure AD joined, or hybrid Azure AD joined to the same Azure AD directory where your VM is joined to.
Verify that the AADLoginForWindows extension was not uninstalled after the Azure AD join finished.
Also, make sure that the security policy “Network security: Allow PKU2U authentication requests to this computer to use online identities” is enabled on both the server and the client.
Password change required
If you see the following error message when you initiate a remote desktop connection to your VM:
- Your credentials did not work.

Verify that the user doesn’t have a temporary password. If the user has just been created, or if the user password has just been reset, the user’s password is temporary and must be changed on the next sign-in. Temporary passwords cannot be used to log in to a remote desktop connection.
To resolve the issue, log in to the user account in a web browser, for instance by opening the Azure portal in a private browsing window. If you are prompted to change the password, set a new password and connect to the remote desktop connection with that new password.
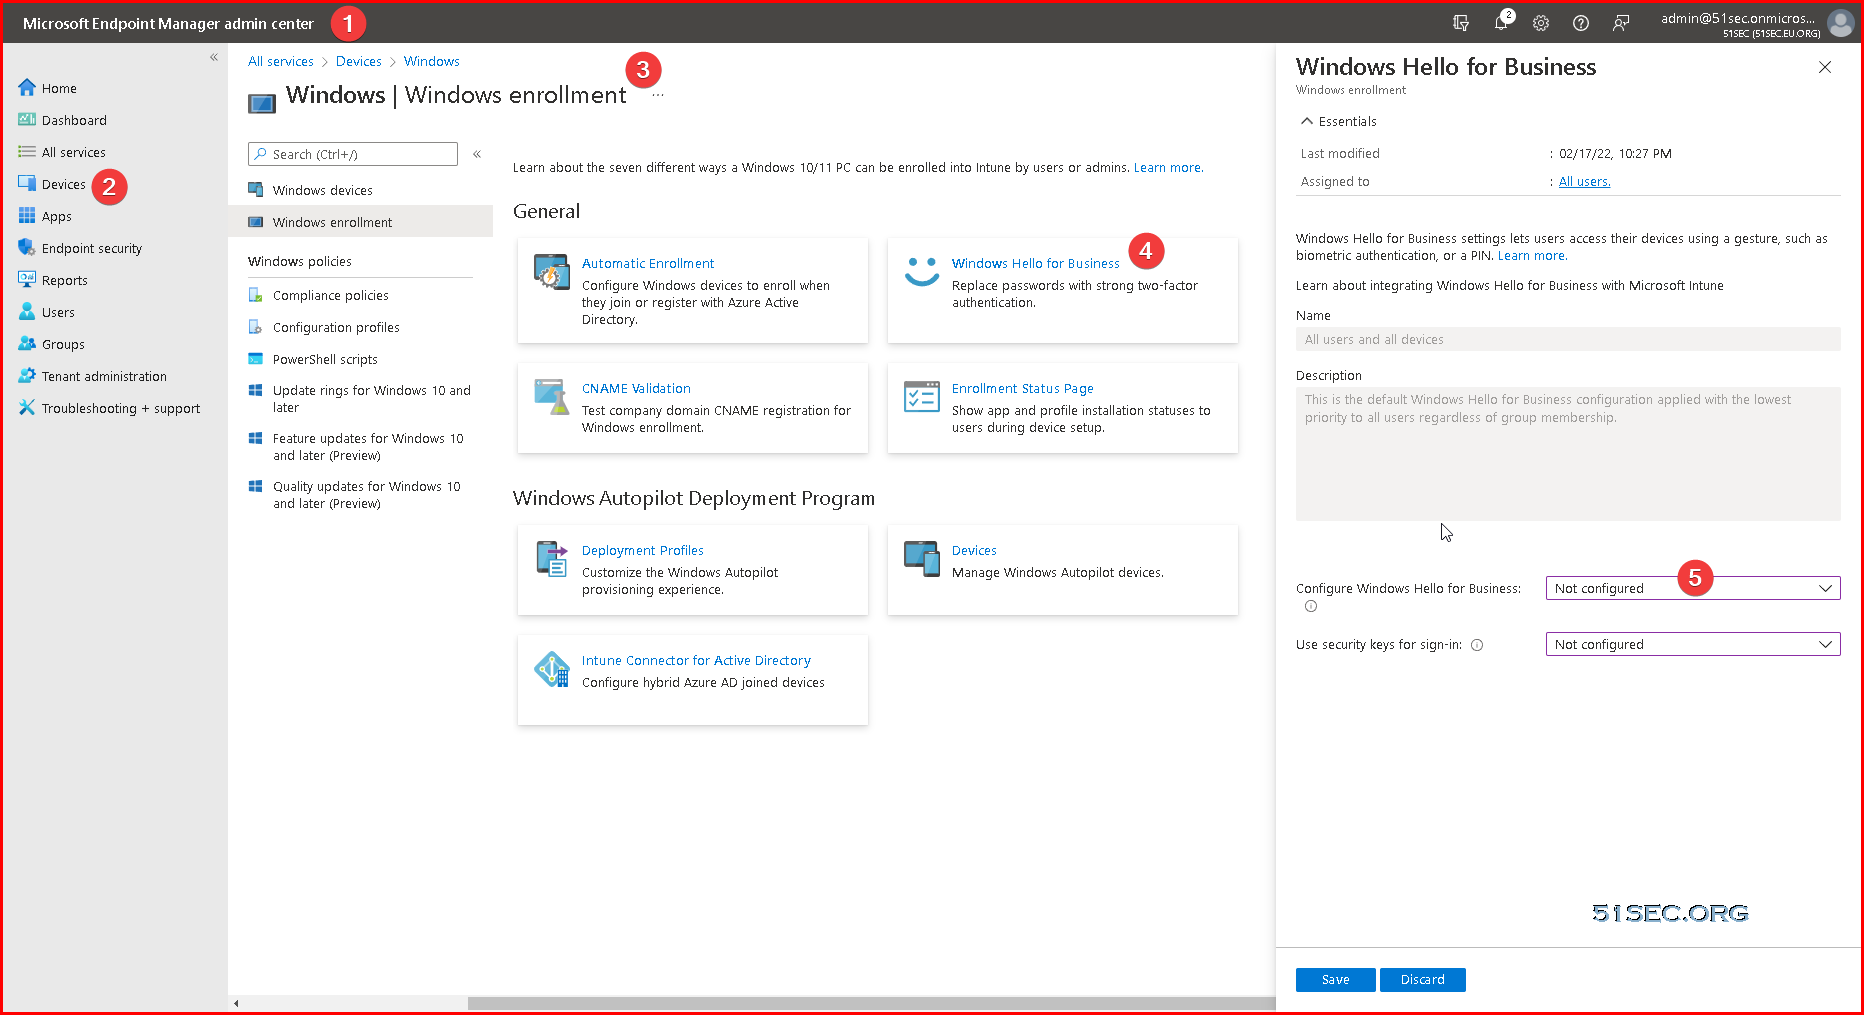
Disable PIN Requirement When Join Devices into AAD
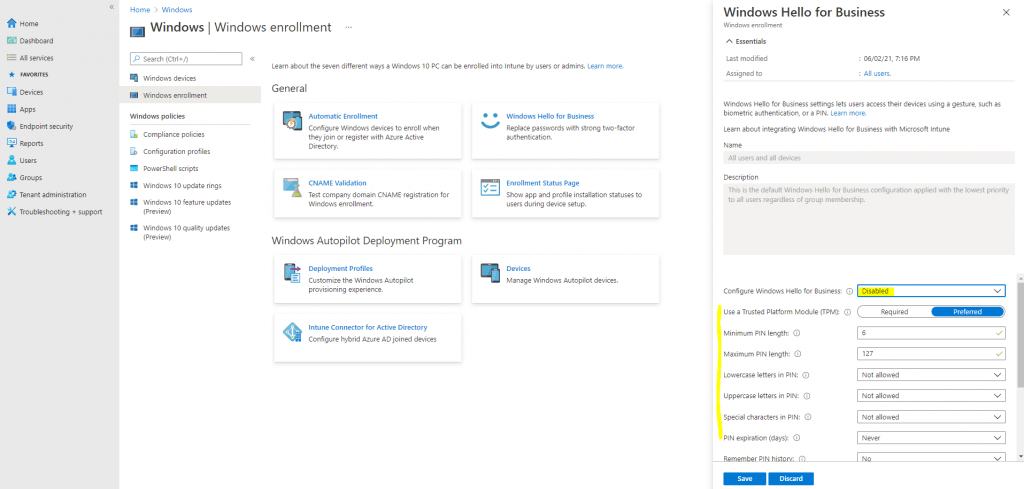
You can also configure here to use security keys for sign-in.
