With McAfee ePO software, IT administrators can unify security management across endpoints, networks, data, and compliance solutions from McAfee and third-party solutions. McAfee ePO software provides flexible, automated management capabilities so you identify, manage, and respond to security issues and threats. You define how McAfee ePO software should direct alerts and security responses based on the type and criticality of security events in your environment, as well as create automated workflows between your security and IT operations systems to quickly remediate outstanding issues.
Features
Please refer to ePO documentation : https://ift.tt/3hpVTLl
The ePO Software Repository
The McAfee ePO server is the central software repository for all McAfee product installations, updates, and other content. The modular design of ePolicy Orchestrator allows new products to be added as extensions. This includes new or updated versions of McAfee and McAfee-compatible solutions from the Security Innovation Alliance. Packages are components that are checked in to the master repository, and then deployed to client systems. ePolicy Orchestrator also allows for replication to distributed repositories at remote locations for bandwidth optimization.
For McAfee ePO to keep your client systems up-to-date, a repository task that retrieves updates from a McAfee site (HTTP or FTP) was created to run daily at 1:00 am. The steps below show you how to modify the task so that it checks the McAfee update site every 12 hours instead.
Systems and the System Tree
The ePolicy Orchestrator System Tree organizes managed systems in units for monitoring, assigning policies, scheduling tasks, and taking actions. These units are called groups, which are created and administered by Global Administrators or users with the appropriate permissions. Groups may contain both systems and other groups. As shown in the graphic below, the installer created a sample system tree during setup.
Three groups were created under the default My Organization group; Laptops, Servers, and Workstations. The Servers group also has several subgroups for different server types based on function or role. These sample groups were created for your convenience. You are not required to use them, but they are referenced in the instructional exercises that follow. If you wish to test system & group creation through Active Directory, detailed steps are provided in the McAfee Quick Tips video Active Directory Synchronization in ePO.
- adding system with automatic discovery
- adding system manually
Compatibility Matrix
| Microsoft operating system | Minimum Supported Versions | ||
| ePO 5.10.0 Update 7 |
ePO 5.10.0 |
ePO 5.9.0 5.9.1 |
|
| Windows Server 2019 Version 2004 | Yes | No | No |
| Windows Server 2019 Version 1909 Windows Server 2019 Version 1903 Windows Server 2019 Version 1809 |
Yes | Yes | No |
| Microsoft Windows Server 2016 | Yes 3 | Yes 3 | Yes 3 |
| Microsoft Windows Server 2012 R2 (Standard and |
Yes | Yes | Yes |
| Microsoft Windows Server 2012 (Standard and |
Yes | Yes | Yes |
| Microsoft Windows Server 2008 Release 2 (64-bit) (Standard, Enterprise, and |
Yes 2 | Yes 2 | Yes 2 |
| Microsoft Windows Server 2008 (64-bit)1 (Standard, Enterprise, and |
No | No | No |
| Microsoft Windows Server 2008 (32-bit) (Standard, Enterprise, and |
No | No | No |
| Microsoft Windows 2003 Storage Server | No | No | No |
| Microsoft Windows Server 2003 Release 2 (32-bit) | No | No | No |
| Microsoft Windows Server 2003 Release 2 (64-bit) | No | No | No |
| Microsoft Windows Server 2003 (32-bit) | No | No | No |
| Microsoft Windows Server 2003 (64-bit) | No | No | No |
| Microsoft Windows 2003 Web | No | No | No |
| Microsoft SQL versions | Minimum Supported Versions | ||
| ePO 5.10 |
ePO 5.9.1 |
ePO 5.9.0 |
|
| SQL Server 2019 Express SQL Server 2019 |
Yes | No | No |
| SQL Server 2017 Express | Yes | Yes | No |
| SQL Server 2017 | Yes | Yes | No |
| SQL Server 2016 Express | Yes | Yes | Yes |
| SQL Server 2016 | Yes | Yes | Yes |
| SQL Server 2014 Express | Yes | Yes | Yes |
| SQL Server 2014 | Yes | Yes | Yes |
| SQL Server 2012 Express | Yes | Yes | Yes |
| SQL Server 2012 | Yes | Yes | Yes |
| SQL Server 2008 R2 Express | No | Yes | Yes |
| SQL Server 2008 R2 | No | Yes | Yes |
| SQL Server 2008 Express | No | Yes 1 | Yes 1 |
| SQL Server 2008 | No | Yes 1 | Yes 1 |
| SQL Server 2005 Express | No | No | No |
| SQL Server 2005 | No | No | No |
Upgrade path
Supported Upgrade Paths:
| Upgrade From Version |
Upgrade To ePO Version | |||||||||
| 5.10 | 5.9.1 | 5.9.0 | 5.3.3 | 5.3.2 | 5.3.1 | 5.3.0 | 5.1.3 | 5.1.2 | 5.1.1 | |
| 5.9.1 | Supported | n/a | n/a | n/a | n/a | n/a | n/a | n/a | n/a | n/a |
| 5.9.0 | Supported | Supported | n/a | n/a | n/a | n/a | n/a | n/a | n/a | n/a |
| 5.3.3 | Supported | Supported | Blocked | n/a | n/a | n/a | n/a | n/a | n/a | n/a |
| 5.3.2 | Supported | Supported | Supported | Supported | n/a | n/a | n/a | n/a | n/a | n/a |
| 5.3.1 | Supported | Supported | Supported | Supported | Supported | n/a | n/a | n/a | n/a | n/a |
| 5.3.0 | Blocked | Blocked | Blocked | Blocked | Supported | Supported | n/a | n/a | n/a | n/a |
| 5.1.3 (EOL) | Supported | Supported | Supported | Supported | Supported | Supported | n/a | n/a | n/a | n/a |
| 5.1.2 (EOL) | Blocked | Blocked | Blocked | Supported | Supported | Supported | n/a | Supported | n/a | n/a |
| 5.1.1 (EOL) | Blocked | Blocked | Blocked | Supported | Supported | Supported | Supported | Supported | Supported | n/a |
| 5.1.0 (EOL) | Blocked | Blocked | Blocked | Supported | Supported | Supported | Supported | Supported | Blocked | Supported |
SQL Server 2016 with SP1 Express Edition
Below links are for SQL Server 2016 with SP1 Express Edition (English):
- Express Core (411 MB): https://download.microsoft.com/download/9/0/7/907AD35F-9F9C-43A5-9789-52470555DB90/ENU/SQLEXPR_x64_E…
- Express Advanced (1255 MB): https://download.microsoft.com/download/9/0/7/907AD35F-9F9C-43A5-9789-52470555DB90/ENU/SQLEXPRADV_x6…
Installation Steps
Database Server IP Change
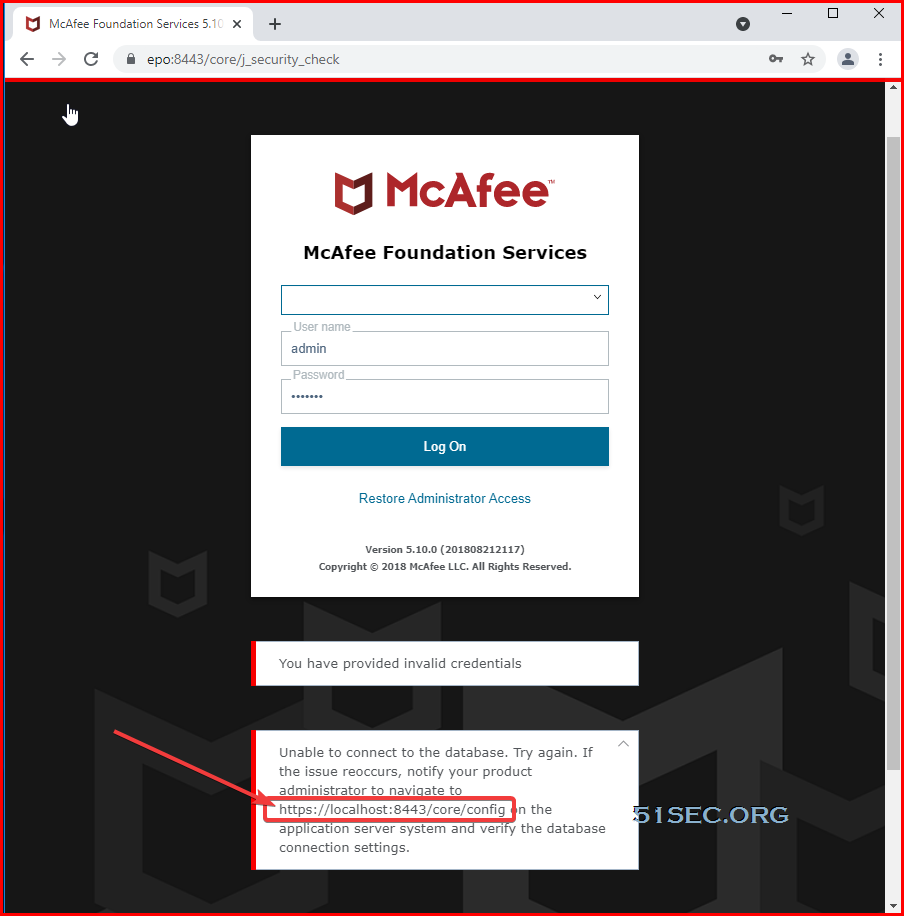
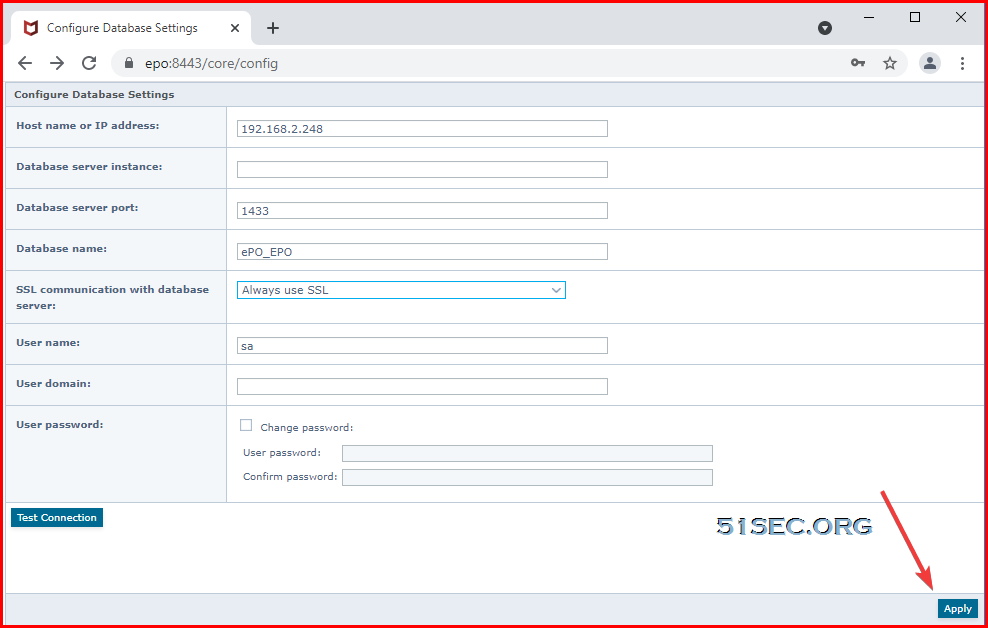
If DB server ip changed or moved, follow this kb to re-config ePO server connection:
https://ift.tt/3jwO6OD
https://localhost:8443/core/config
After tested Connection, do not forget to apply it. Apply button is at the bottom right corner.
References
- Install McAfee ePO on a single server
- YouTube Video:
from Blogger http://blog.51sec.org/2021/07/mcafee-epo-510-installation-on-single.html


