For how to Install JUNOS Space Virtual Appliance at ESXi 5.5, please check my previous posts:.
- Install JUNOS Space Virtual Appliance at ESXi 5.5
- Installation of Junos Space Security Director and Managing Juniper Firewall
- Juniper vSRX Firewall (Firefly Perimeter) installation in ESXi and Managed by JunOS Space
- Import Existing Juniper SRX Cluster into JunOS Space Security Director
Juniper Firefly Perimeter, also called vSRX is a virtual firewall from Juniper’s SRX product line. Firefly Perimeter provides security and networking services at the perimeter in a virtualized private or public cloud environments. It runs as a virtual machine on a standard x86 server and delivers similar security and networking features available on branch SRX Series appliance. The vSRX virtual firewall is with a complete and integrated virtual security solution, including core firewall, robust networking, advanced security services at Layers 4–7, and automated lifecycle management capabilities for enterprises and service providers alike. It is also able to managed by JunOS Space Network Management Platform with Security Director Application.
This following instructions are how it is being installed into ESXi 5.5 virtual lab environment and also how it integrated with JunOS Space Network Management Platform.
1. Topology
PC with ip address 192.168.2.20 is using browser to access JunOS Space (192.168.2.72 – Web GUI Interface eth0.0 IP address).
JunOS Space is using Device Management Interface eth3 (172.17.3.70) to manage vSRX through vSRX’s ge-0/0/1.
2. Download Firefly Perimeter (vSRX)
If you have license, you could download Firefly Perimeter from Juniper Supprt Site. For 60 days evaluation version, please download from here.
You can use an evaluation license to explore the Firefly Host product. The evaluation product is fully functional, and it has an embedded thirty-day license. This license will be removed after you save your first purchased license information in the wizard.
If no purchases license information is saved, after 30 days, the status turns Red for Firefly Host VM, IDS and AV and says License Expired. Also, every twenty four hours, a high security alert is displayed saying The 30 Day trial period has expired. A purchased license is required to be input in Settings->Status & License. However, no functionality is blocked and the system continues to work as before.
3. Deploy OVF Template in ESXi 5.5
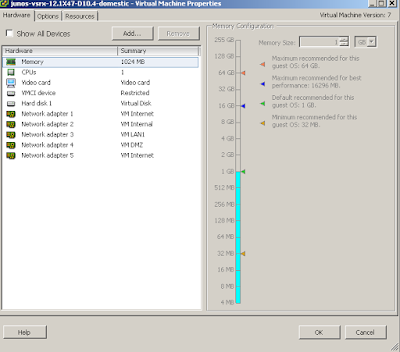
Select junos-vsrx-12.1X47-D20.7-domestic.ova. After deployment, you could check settings and add more interface as you needed.
4. Start vSRX virtual machine.
Log in by user account root without password.
5. Basic Configuration on vSRX
There are some basic configuration such as root password, interface ip addresses, zone interface and services.
root> show configuration
## Last commit: 2015-05-10 20:02:32 UTC by root
version 12.1X47-D20.7;
system {
root-authentication {
encrypted-password “$1$x20k81NM$wphXL5F5Y10fRwNZp44nf.”; ## SECRET-DATA
}
services {
ssh {
max-sessions-per-connection 32;
}
netconf {
ssh;
}
web-management {
http {
interface ge-0/0/0.0;
}
}
}
syslog {
user * {
any emergency;
}
file messages {
any any;
authorization info;
}
file interactive-commands {
interactive-commands any;
}
file default-log-messages {
any info;
match “(requested ‘commit’ operation)|(copying configuration to juniper.save)|(commit complete)|ifAdminStatus|(FRU power)|(FRU removal)|(FRU insertion)|(link UP)|transitioned|Transferred|transfer-file|(license add)|(license delete)|(package -X update)|(package -X delete)|(FRU Online)|(FRU Offline)|(plugged in)|(unplugged)|GRES”;
structured-data;
}
}
license {
autoupdate {
url https://ae1.juniper.net/junos/key_retrieval;
}
}
}
interfaces {
ge-0/0/0 {
unit 0 {
family inet {
address 192.168.2.80/24;
}
}
}
ge-0/0/1 {
unit 0 {
family inet {
address 172.17.3.80/24;
}
}
}
}
snmp {
trap-group space {
targets {
172.17.3.70;
}
}
}
routing-options {
static {
route 0.0.0.0/0 next-hop 192.168.2.1;
}
}
security {
screen {
ids-option untrust-screen {
icmp {
ping-death;
}
ip {
source-route-option;
tear-drop;
}
tcp {
syn-flood {
alarm-threshold 1024;
attack-threshold 200;
source-threshold 1024;
destination-threshold 2048;
queue-size 2000; ## Warning: ‘queue-size’ is deprecated
timeout 20;
}
land;
}
}
}
policies {
from-zone trust to-zone trust {
policy default-permit {
match {
source-address any;
destination-address any;
application any;
}
then {
permit;
}
}
}
from-zone trust to-zone untrust {
policy default-permit {
match {
source-address any;
destination-address any;
application any;
}
then {
permit;
}
}
}
from-zone untrust to-zone trust {
policy default-deny {
match {
source-address any;
destination-address any;
application any;
}
then {
deny;
}
}
}
}
zones {
security-zone trust {
tcp-rst;
host-inbound-traffic {
system-services {
all;
}
}
interfaces {
ge-0/0/1.0;
}
}
security-zone untrust {
screen untrust-screen;
interfaces {
ge-0/0/0.0 {
host-inbound-traffic {
system-services {
http;
https;
ssh;
telnet;
dhcp;
}
}
}
}
}
}
}
6. JunOS Space Configuration
6.1 Add 172.17.3.80 into Discover Target
6.2 Discovered Device
6.3 Confirm vSRX managed by JunOS Space
Reference:
1. Junos®Space Network Management Platform User Guide


